Howdy, Stranger!
It looks like you're new here. If you want to get involved, click one of these buttons!
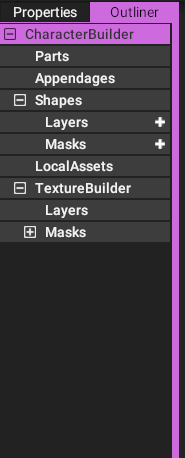
Categories
YL2 Update April
 odes
Administrator
odes
Administrator

Hello all!
We hope you're doing well.
Let me start off by apologizing for the lack of updates as of late. I understand it's frustrating not knowing what's going on. Likewise, it has been frustrating and stressful for us not being able to put out updates at the pace we were intending. The reason for the lack of updates is simple - we haven't been able to reach the goals we wanted within the time frame we set. I was absolutely convinced we'd reach a certain level of completion several weeks ago, and now - when we still haven't - it's becoming clear I severely misjudged just how much time is required to get there.
Writing in this fashion almost makes it sound like everything has gone to hell or something, but that's not what I mean at all. I want to stress that this is not about us hitting a wall or being stuck. We're making good progress, it's just that I underestimated how much time it takes to iterate on the content and getting it into the app. It's frustrating, because the coding parts of the things we wanted to show off (regarding the shape layering system) were finished weeks ago, but preparing the content turned out to require far more iterations than I expected. I think I grew overconfident in our ability to put things out, having focused solely on my own work and the coding, forgetting just how much it takes to synchronize with another person and making sure everything works the way you intended. In retrospect, I don't know what I was thinking, believing all of this could be completed in the time I predicted. It goes without saying that our original plan of releasing a build in the spring has been pushed back to summer.
In any case, even though my predictions were wrong, it's not like we've lost time or anything. While Dogson has been iterating on the content, I've been implementing several features that were going to be implemented sooner or later anyway, as well as new features I hadn't even thought of implementing at first, in addition to going over the code, greatly enhancing and optimizing it. I've never felt as satisfied with the quality of my work as I am in this project!
And it is given these circumstances that I find myself in somewhat of a predicament. On the one hand, I want to lay down all cards on the table and show off everything that we've been working on... But on the other hand, so much content is still missing or not yet ready for public display. Most of these features would look sooo much more impressive if we actually had the intended content to go with it, so showing them off now would sort of ruin it. Some features are so dependent on content, that without it they become meaningless. For example, we've been investing a tremendous amount time and effort into creating a system for making models and maps seamless [where the different body parts connect], but in order for that to work, the content has to be prepared in a very specific way, in addition to the maps that actually have to exist [for the effect to be complete]. We haven't gotten that far yet, so showing off the seamless tech on something that is only half done sort of defeats its purpose.
It is for reasons like this that I've chosen to push showing off some of these features (like the shape layering system) to a later date, when we feel more ready and have more content to go on. I know some of you will disagree with this decision, and if that's the case we are ready to face the consequences. We are simply trying to do what we believe is best long term.
I can however offer you something else instead - a more in depth text about our vision with the character creator in YL2 - how it will work from a technical standpoint. You can see it as a form of promise we're making to you of what it is we're trying to achieve. It also acts as a summary of the work we've done so far. Most of these things have already been implemented. All we need is the content and final gluing, which we are working on as we speak. Hopefully our enthusiasm will brush off on you!
YL2 Character Editor - Feature dive
The character editor in YL2 is not one that you can really compare to that of other games. Not in the sense that it is necessarily better (because that comes down to a matter of perspective) but rather in the sense of how it works, and what it's trying to achieve. I like to think of it as more closely resembling a 3D authoring application than a traditional game-esque character editor. You'll have great freedom in creating very custom effects for your character, so if you're an artist, this will be a huge advantage for you!
Main character options
Starting with the basic stuff.
(Properties are distributed among different objects in a hierarchy. The interface is not yet ready.)
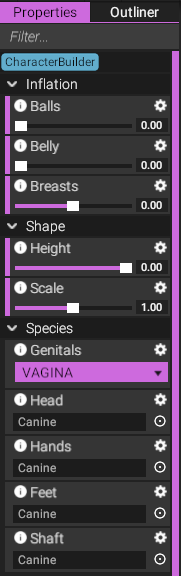
Inflation category
This one you'll probably recognize from Yiffalicious (1). Here you can inflate (or deflate) parts of the body to your liking.
Unlike other settings in the character builder, inflation options will be present during interaction authoring, meaning you can change inflation of a character during the course of an interaction (but not change the head model, for example).
Shape category
Height
Set the height of the model, i.e. make the model tall or short. Not the same as scale, as scale doesn't take body proportions into account.
Scale
Set the scale of the model (make it bigger or smaller).
Species category
Genitals
You will be able to select from three different genitals - dick, dick + vagina, or vagina. Any body type that you have selected in the shape layering system will automatically adapt to fit your genital selection, meaning that body type and gender are separate. (More on shape layers below.)
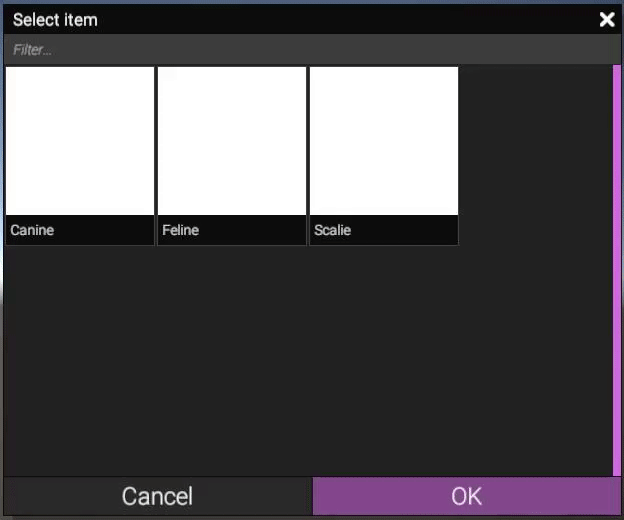
Head
When clicking the head property, a new window appears displaying all the heads that are available in the app. Currently, we don't have any images for any of the heads, but closer to release each item will have a picture associated with it.
You can also filter this window.
The window is endless scrolling through pooling (efficient use of resources).
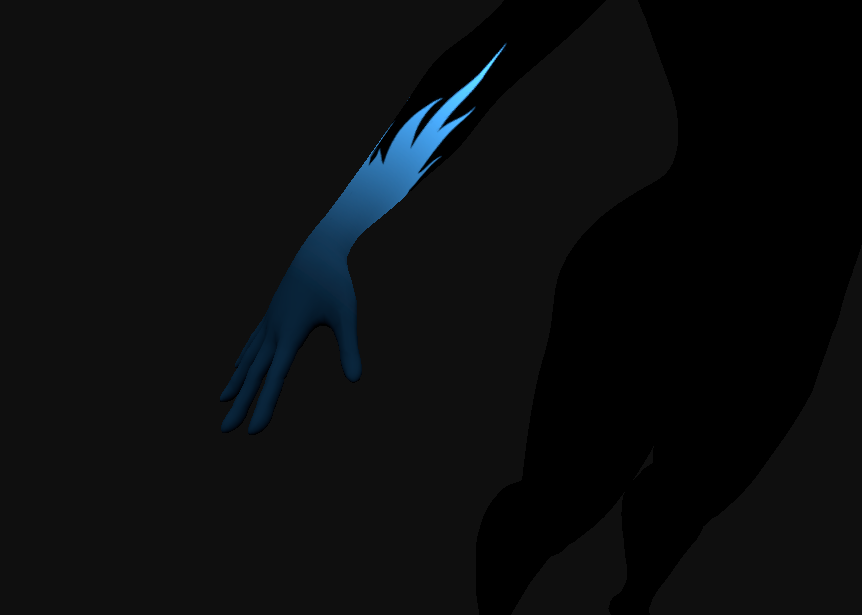
Hands
Same behaviour as the head, but for hands instead.
Hands can differ greatly from eachother. They can have different number of fingers, be from different species and even have webbing for example.
Feet
Same behavior as hands, but for feet.
Items can be either digitigrade or plantigrade. If a digitigrade type foot is chosen, the body mesh will adapt to fit the digitigrade feet.
Shaft
Select a shaft to use for the character from an ever increasing selection of different shafts.
This one will probably get its own category in the future, where size is also possible to tweak.
This option will only be available if you've chosen dick or dick + vagina in the genital selection.
Color category
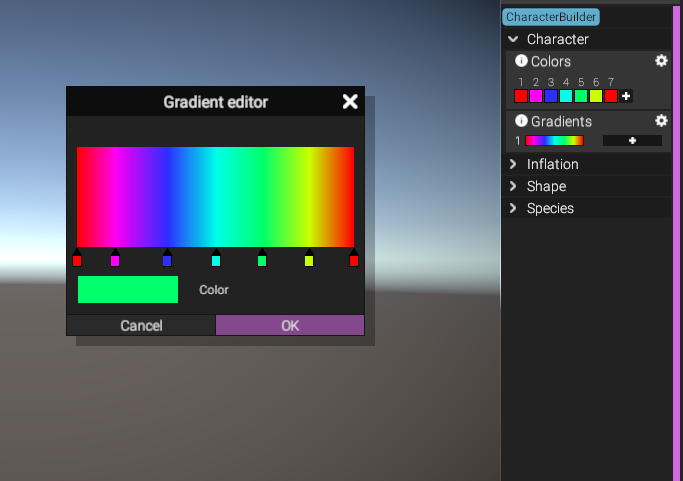
Instead of defining a color inside each and every layer (more about layers below in the texture builder section), colors in YL2 are defined in a single place. Layers reference an index from the color array property in the character object. This means if you change a color, all layers that are using that color index will be changed automatically. It also means you don't have to go inside each one of those layers and change their colors manually (for example if many of them use the same color).
Gradients are another type of color item in YL2 that can be used by gradient layers (more about them further down). They interpolate between colors, and they also use color indexes from the color array, meaning you get a single place to control all colors in the character file.
To add a color, click the plus sign:

To remove a color, right click it:
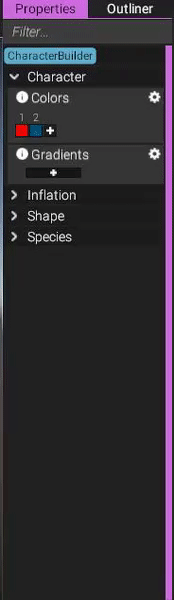
To add a gradient, click the plus sign:

Gradients reference color indexes, meaning if you change a color, the gradient will change too:
Use many (up to 20) colors in a gradient to achieve the effect you want:
Masking system
YL2 makes prevalent use of "masks". A mask is a single channel texture that acts as a selection upon a mesh. In YL2, they're utilized to apply colors and shapes to specific parts of a model, but also for special effects. You can combine them to create any type of mask you like, using the same blend modes that you find in Photoshop.
The problem with textures
Textures are huge resources. They take up perhaps 95% of all content in Yiffalicious (1). In YL2, we want to enable you to create very custom color schemes for your characters, while keeping the character files small so they're compatible with the cloud and fast to download. For this reason, we have implemented a procedural masking system that greatly reduces the amount of data required to create a certain mask. As an example, a radial selection theoretically only requires 2 pieces of data - a source point and a radius. In data terms, that would mean a Vector3 and a float, resulting in 16 bytes of data. Compare that to a 2048x2048 RGB texture that requires 12,582,912 bytes! (Uncompressed.)
You're free to use them as you want, or not at all if you so choose. Procedural masks exist solely to offer you more options while keeping the character files small.
Procedural masks
Radial gradient
This mask takes a point, radius and blend parameter as inputs. The mask is filled from the point source towards its radius, according to the blend parameter. It's a spherical type of selection.

Mask capsule gradient
The capsule gradient is similar to a radial gradient, but instead of originating from a single point, it originates from a line (defined by two points).

Mask linear gradient
The linear gradient is defined by two points. The first point means black, and the second one means white. Texture surface area in between the points will be blended from black to white, depending on where it is on the virtual line defined by the two points. Surface area beyond the points will be either completely white or black, depending on which end it is.

Mask operation
The mask operation mask is probably one of the most interesting ones. Instead of defining a mask itself, it takes two existing masks as input and performs a blend operation on them. It offers the same 18 blend modes supported by layers. Furthermore, because a Mask operation inherits from "Mask", it can be used as input to another Mask operation! This allows for some really interesting opportunities.
(MaskTexture and LinearGradient combined (multiplied) in a MaskOperation to create a gradually increasing emission (FillMask layer).)
Mask decal
Mask decal is similar to the Mask texture in the sense that it takes a texture as input. This texture is not a predefined selection, but rather an image that can be projected onto the mesh. You can of course tweak where this decal is projected, its size and rotation.
As other masks, this operation is performed on the GPU and thus is very fast. What you see below is texture generation performed in real time.

Mask select side
Selects left or right side of the model.
Mask texture
A pre-authored selection on a model, for example a teeth selection, nose or inside of ears. We intend to create such pre-authored selections to ease coloration of your characters.
Custom masks
We realize it's not enough to rely solely on these masks for many patterns and effects. For this reason, we will allow custom import of masks (textures). Since textures take such huge amounts of space, there will be a size restriction on the final character file, meaning you need to use custom textures with care to not exceed this limit. (We are still discussing what the limit will be.)
To reduce the size of imported textures, we have implemented a multi threaded wrapper class from the official 7-zip library, meaning you get top-notch lossless compression. Due to the way the 7-zip algorithm works, simple masks (for example, masks that are for the most part either just black or white in simple patterns) will take very little space, while more granular masks will take more space (like large gradients). For this reason, it will be good to use procedural masks for gradient effects, if possible.
You can import a custom texture by simply dragging and dropping it inside YL2. An import window will appear, allowing you to select which channels you want to import. If you have a single mask in the texture you're importing, you only need to import 1 channel.
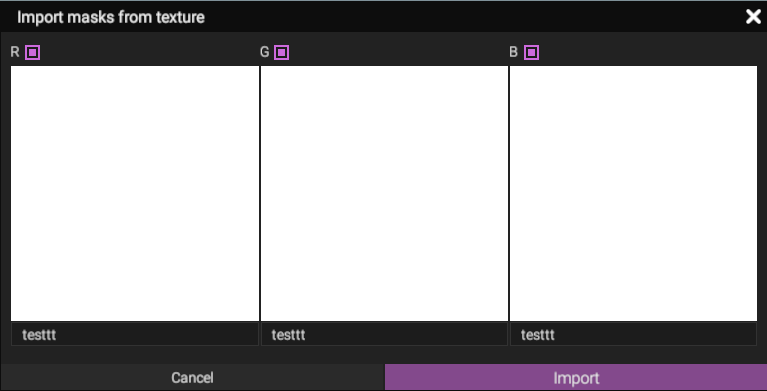
(A WIP for the import window. Each square will show each channel respectively. In the input fields at the bottom, you can specify custom names for the masks, or leave them alone to get auto-generated names.)
A cool thing about the import system in YL2 is that it will remember where the files came from, so if you change them in an outside application, YL2 will detect the changes and reimport the new files' data and apply the changes automatically. This makes it very convenient to jump between different applications (for example if you're painting in Substance Painter or Photoshop).
Mask filters
In addition to mask themselves, we have also implemented filters that can be added to masks. So far we have implemented these filters.
Invert
Invert the mask (turn black areas white, and white areas black).
Flip
Flip the resulting mask, so right side becomes left, and left side becomes right.
Mirror
Mirror the mask. You have three different options for the mirror operation - add both sides together, mirror left to right, or mirror right to left.
Levels
Perform a photoshop-eque levels operation on the mask.
Edge blur
Blur the edge of the mask.
Texture builder
The texture builder is a system we have created to fill a character with color. It is made up by different types of layers that you can choose from when creating your stack of layers, that write into 4 different textures - albedo (color), emission, smoothness and metalness.
If you're used to Substance Painter, you'll recognize yourself.
Each model use its own texture builder. For example, the body, head, hands and feet use the same texture builder, the dick (if you model has one) has its own texture builder, and if you add ears or tails to your model, those will also use their own texture builders.
LayerFill
This is the most basic type of layer. It simply just takes a color input (index from color array) and influences (sliders) for how much it affects the different channels.
LayerFillMask
This layer takes a mask as input (in addition to color), meaning you only fill the masked part of the model.
LayerFillGradientMask
This mask takes a color gradient and two masks as inputs - one to decide where to fill the gradient, and the other mask to decide what color to use when filling the masked area (from the gradient). References a gradient index.
Part system
Parts are additional models that are not part of the main body, but that can be added to it. Examples of such parts are tails and ears. They can be placed where-ever and however you like. Options for mirroring exist too, so you only need to place a ear on one side, and it will be automatically mirrored to the other side.
Parts have their own texture builders.
Appendage system
Appendages work similarly to parts, in the sense that they are their own models that can be added to a model. However, they don't have their own texture builders.
Appendage group
To reduce draw calls, appendages are organized into groups. Each group references a model, while each appendage instance within the group contains data for location, rotation and scaling. If the model is changed in the appendage group, all instances will be affected.
Appendage group fluff
The fluff appendage group is special in the sense that it doesn't reference a pre-authored model. Instead you define a spline, along which a model will be extruded. Each spline point also references a color index, meaning colors are interpolated along the spline according to this selection. You can also sample colors from each instance's own attachment point, so it blends into the body's textures. Each instance can also blend into the attachment point's normals, making it seamlessly blend into the body.
(Turning blending on and off on a fluff instance.)
Fluff groups can also have a mask attached, to achieve a certain cut along the spline.
Shape layers
Shape layers is the way you define shape for your model in YL2. In addition to affecting the actual shape of the mesh, they also affect the normal and AO maps of the character. Each shape layer can be masked, so if you only want to apply a shape on a certain part of the mesh, you can do that. So far we have implemented three different shape layers:
Blend shape
This is the most basic type of layer and also the foundation of the shape layering system. Each blend shape layer can reference a pre-authored body type, complete with normal and AO maps. Like heads and other body parts, body types are selected from a browser with images.
Unlike some other character creators, we are not limited to small adjustments in these body types. These shapes can be absolutely huge, or small, and everything in between. This tech also handles seams between parts, making them seamless regardless of what shape is thrown at them. This means we are not limited by having to interface each body part to a specific shape. Taking the neck as an example, where the body connects with the head (2 different parts) - this area could be altered (for example be made extremely muscular) and they would still connect seamlessly.
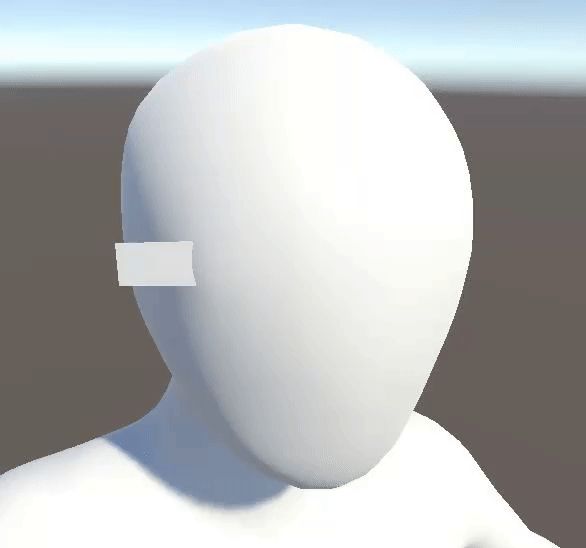
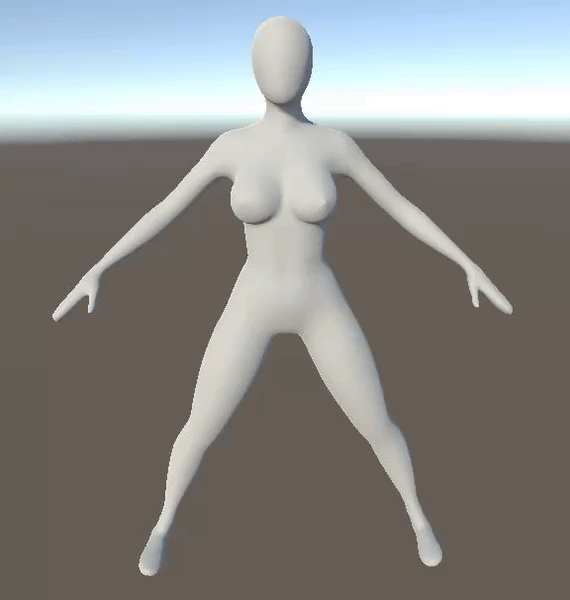
Blend shape layers, like all layers, support masking. But masking a blend shape can look pretty weird, and not end up the way you wanted at all. To give you an example, have a look at this image:

This is a somewhat muscular feminine shape. Now, imagine we wanted to apply this shape solely on the arms by masking them out. Then you'd get something like this:

That looks... pretty bad. The shoulders are offset and it generally doesn't look good at all.
To fix this problem, we have invented our own tech that we like to call "shape correction". This correction works by "re-imagining" what the shape would look like if applied as an offset to the current skeleton, rather than as something that offsets the skeleton. With shape correction applied, this is the result we get for the scenario above (animation):
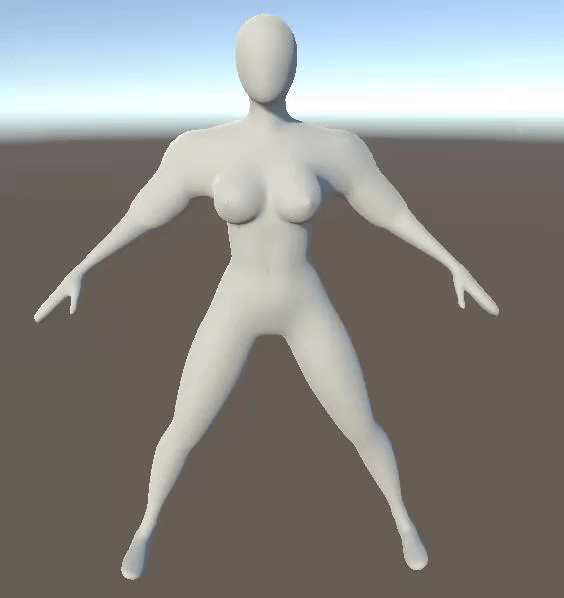
To give you a better idea of what it's actually doing, look at these two images.
Here's the default shape:
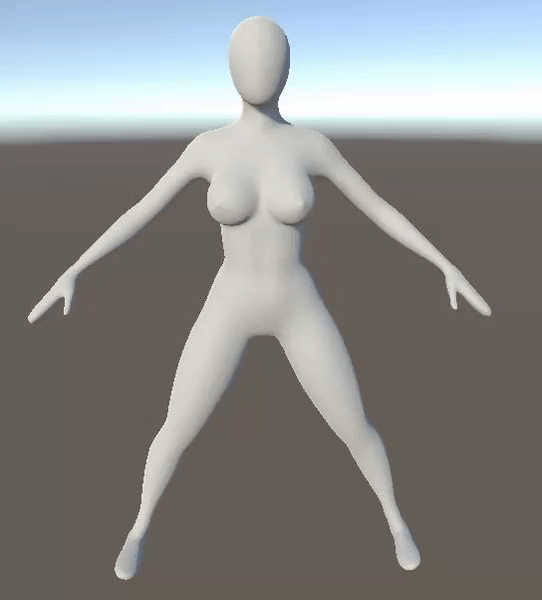
And here it is again, but with shape correction applied:
Notice how the skeleton is changed in the first picture, but remains in place in the second one.
Now, this system is mostly intended to work together with masks, so applying it on the whole model is a bit iffy. But just as a way to explain how the tech works...
We're really excited about this technology and hope it will help you create better models!
Inflate
This layer simply moves each vertex along its normal, either inward or outward. With masking, it can act as a way to make some parts bigger by default (for example muscles).
HeightToNormal
This layer is a bit special, and will probably be moved out of the shape layering system into its own system at some point. But regardless of where it will be located, we are super excited about this layer!
HeightToNormal doesn't affect the mesh, rather it only affects the normal and AO maps. It takes a mask as input (custom texture if you like) and converts it into a normal map that is combined with the normal maps in the shape stack. Since YL2 will offer native model export, this means you could export the model you're working on, sculpt custom details into it (for example dragon scales), bake them into a height map, and then import that texture into the app. Since it is a single channel texture (a mask), it doesn't take anywhere near as much space as a normal map, and you get custom normals, all compatible with the cloud! (Given reasonable texture size.) SUPER COOL!
It works exactly the same way and has the same properties as Substance's HeightToNormal node, so if you're familiar with that one, you'll know what to expect.
We can't wait to see what artists will create using this layer! We're super excited about it.
Things missing from this text
Face options
We don't know yet what the face options will be like. At least you'll be getting a feminine -> masculine slider, but other than that we haven't decided anything yet. We haven't implemented this slider yet, but doing so will be quick. It's mostly a content thing.
Genital options
We want to offer genital options. Dicks are easy, as it's mostly a size and length thing on a "contained" model, where as for feminine genitalia, they're placed directly on the body mesh, and shapes can be so different, so making all that work on all body types is a more complex problem.
Nipple & areola options
We have more tangible ideas regarding this topic, of how to create a large selection of different areolas and nipples to choose from, but nothing that we have started implementing yet. Only ideas.
Eye options
We will definitely have options for eyes, but we haven't gotten as far as to discussing what they will be just yet.
Detail textures
Detail textures are repeating patterns that you can use to create immense detail in models. We don't have a system implemented for this yet, but we have tangible ideas for how to make something like it accessible to users. This means you would, for example, get a way to fill your character with super high quality snake-like skin. Since custom textures will be a thing, you would be able to author your own detail textures to create the kind of effect you want.
We want to make it compatible with the masking system, so you get a way to only apply the detail texture where you want.
Summary
Game development (or rather app development in this case) can be a long and arduous process, and things don't always play out the way you thought they would. While we've made good progress, we haven't been able to reach the goals we intended to by this time. We haven't hit a wall or anything though, it's just that creating and integrating content has turned out to require more iterations than we anticipated.
While dogson has been iterating on the content, I've been improving old features and implementing new ones into the app. We are super excited about all different tools you will have when designing your characters, and hope they will help you express yourself in truly unique ways while retaining cloud compatibility and keeping relatively small file sizes.
We're super excited about the development and are working as hard as ever. We hope you still have faith in us!
- odes
P.S.
The submission picture at the top is of a feminine muscular body type that we've been working on. It accurately depicts what kind of detail you can come to expect in YL2 as far as shape, normal and AO maps go.
BIG SHOUTOUT TO @SpadeScout for restoring the wiki that went down and lost all its data in a catastrophic database crash. The data was unrecoverable, but SpadeScout offered to restore the wiki by hand. A big thanks to SpadeScout for this!
Comments
I know YL2 is less a game and more of an animation studio, but the above still applies! Very exciting stuff you guys, I'll have to start thinking of some character designs. Keep on trucking!
The idea was to have the character creator part of YL2 out sometime during the summer, but I can't say I feel certain about it anymore.
he character creator would be kinda like fursona maker but 3D. If it features enough variants or at least modding support for new parts and mask decals, it will become very popular pretty fast.
2018 is definitely the goal.
oh any my project is working in FILMORA