Howdy, Stranger!
It looks like you're new here. If you want to get involved, click one of these buttons!
Categories
YL2 Update Nov 2018 - Texture builder demonstration/tutorial
We hope you're doing great!
This month we've been integrating the texture building system into the editor. This system is our attempt to facilitate the creation of color schemes for your characters, all while having a small performance and bandwidth footprint. By utilizing the GPU for all texture operations, response is immediate and interactive. This system has been a long time in the making, so we are super excited about it finally being fully integrated!
Before we begin ...
In our last update, we showed a roadmap of what is left to be done before we feel ready to release a patron build. In it we mentioned the texture building system. However, I realize afterwards I wasn't properly expressing the amount of work still required to finish it. There's much more to it than just writing different states for different object selections. The states are a big part of it, but so is the whole event driven architecture that has to be meticulously setup in order to cause the right things to happen when you change objects connected to it, and also actually handling the input and output of the system. It was these parts that I forgot to properly communicate the depth of. But! It's all implemented now and works like magic, so let's just jump right into it!
Texture builder
What?
The texture builder is a system designed to generate textures used by characters in YL2.
Why?
Textures are huge resources, so in order to minimize the bandwidth usage and download times, we have opted for creating a system that procedurally generates textures. This also comes with other benefits, such as being able to change colors and have the whole stack of layers update dynamically.
How?
The texture builder makes use of "masks" and "layers" when filling in the textures used by a character. Each mask can also have many different kinds of filters added to them to achieve different kinds of effects. Furthermore, each layer can be blended according to many different blend modes. You can use both procedural masks (computer generated) as well as custom made ones (imported textures). While custom masks are much heavier than procedurally generated ones, they're still relatively small in comparison to full color textures. Combine these options to achieve the kind of look you want!
Demonstration / Tutorial
PLEASE NOTE!
The character is missing normal/AO maps, ears and hair, so it does not represent final quality. These are examples of the texture building system only - nothing more, nothing less.
Also, I recommend opening the gyazo links because the framerate in those is much better than in these gif files (unfortunately, Patreon doesn't allow video embed). Plus, they start from the beginning, making it easier to follow.
Let's go through the different type of masks and layers to see how they work and how they can be used together.
By default, a character spawns with the most simple type of layer - a "Fill" layer. All it does is simply fill each channel with a value. It works well as a starting point to give the character the general appearance you're going for. Let's go through some of this layer's settings:
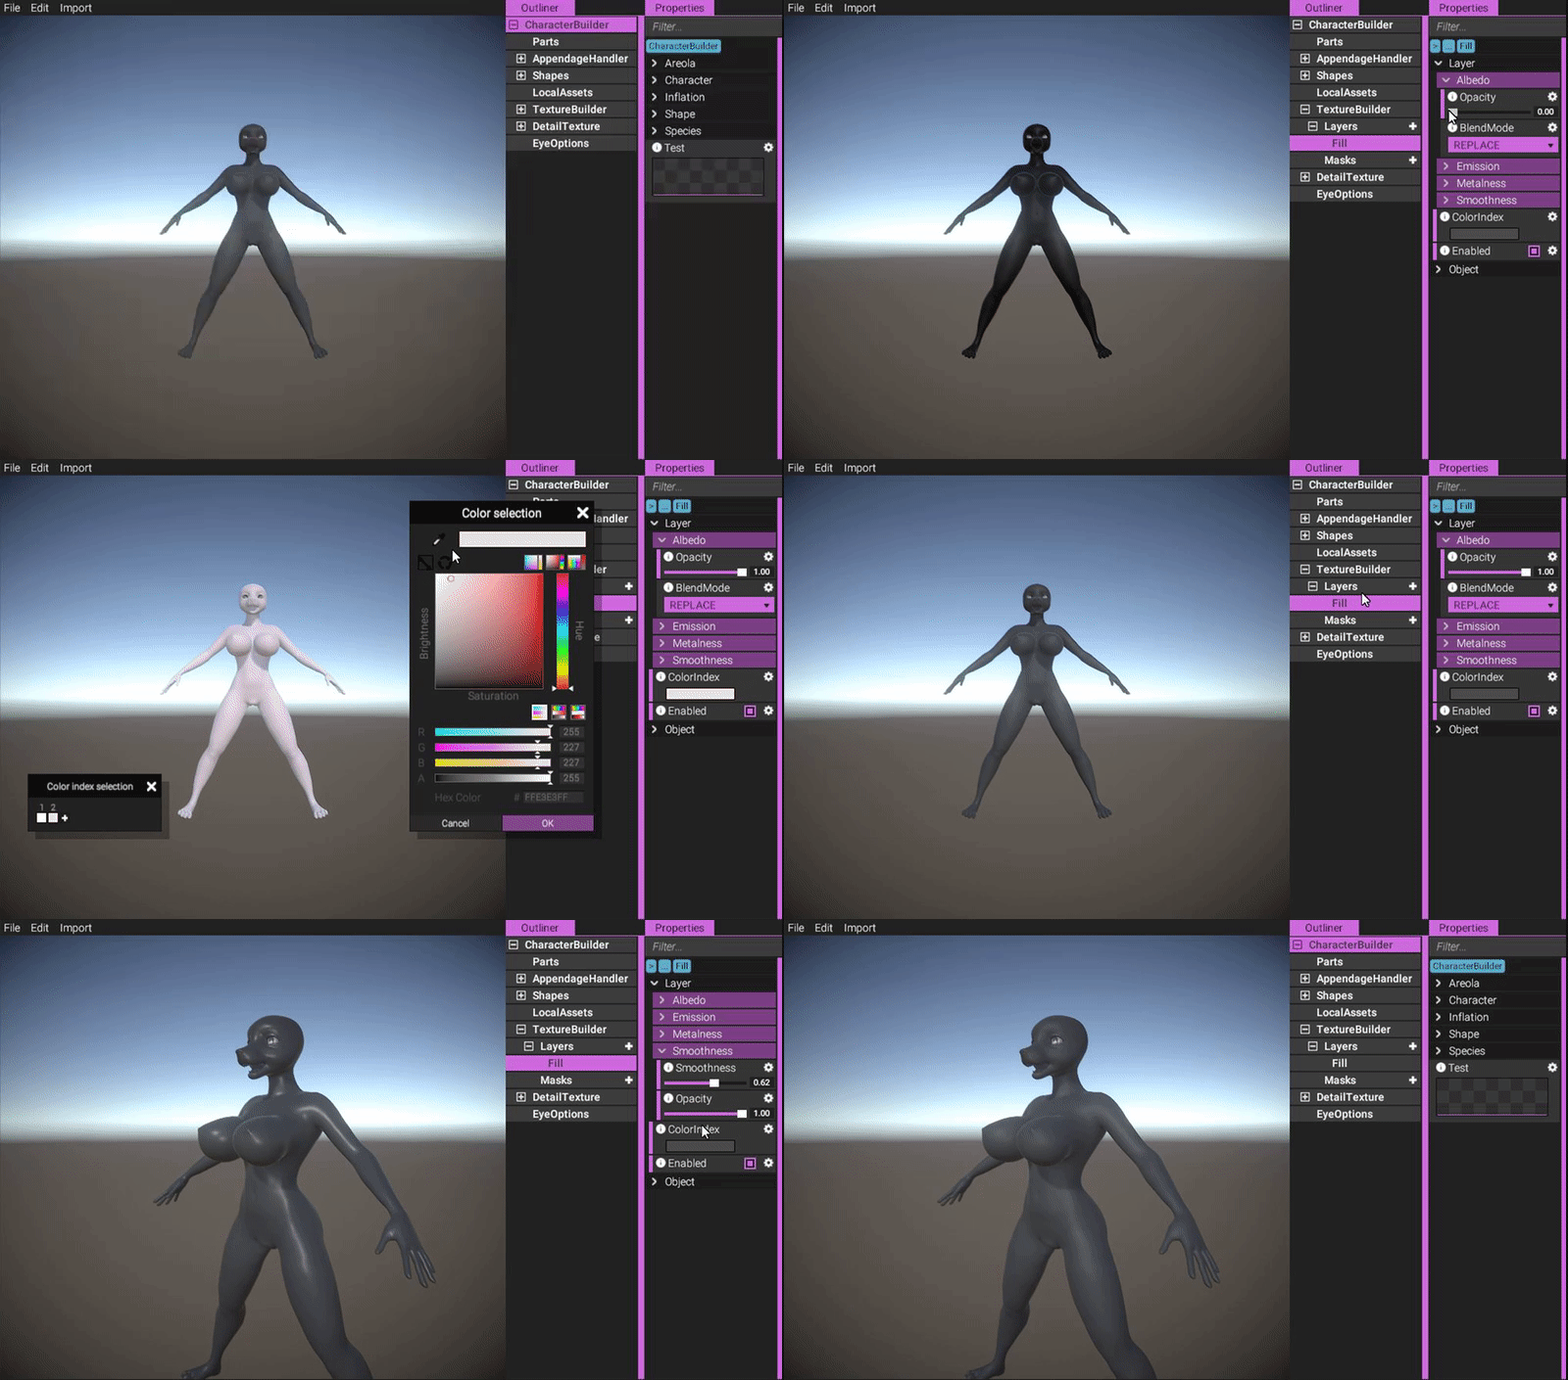
https://gyazo.com/6257daae0cc42a12dfae3d65accf11b9
Now, let's try to create something more interesting by using masks!
The linear gradient is one of the procedural masks. It simply smoothly blends from black to white according to two placed points in the scene. These points can be snapped to the character, either directly on the surface or to a bone. That way, if you were to alter the character (for example change body type, height or bone scale), the points would remain in their relative locations.
To add a linear gradient, simply browse to the plus symbol beneath "Masks" in "TextureBuilder":
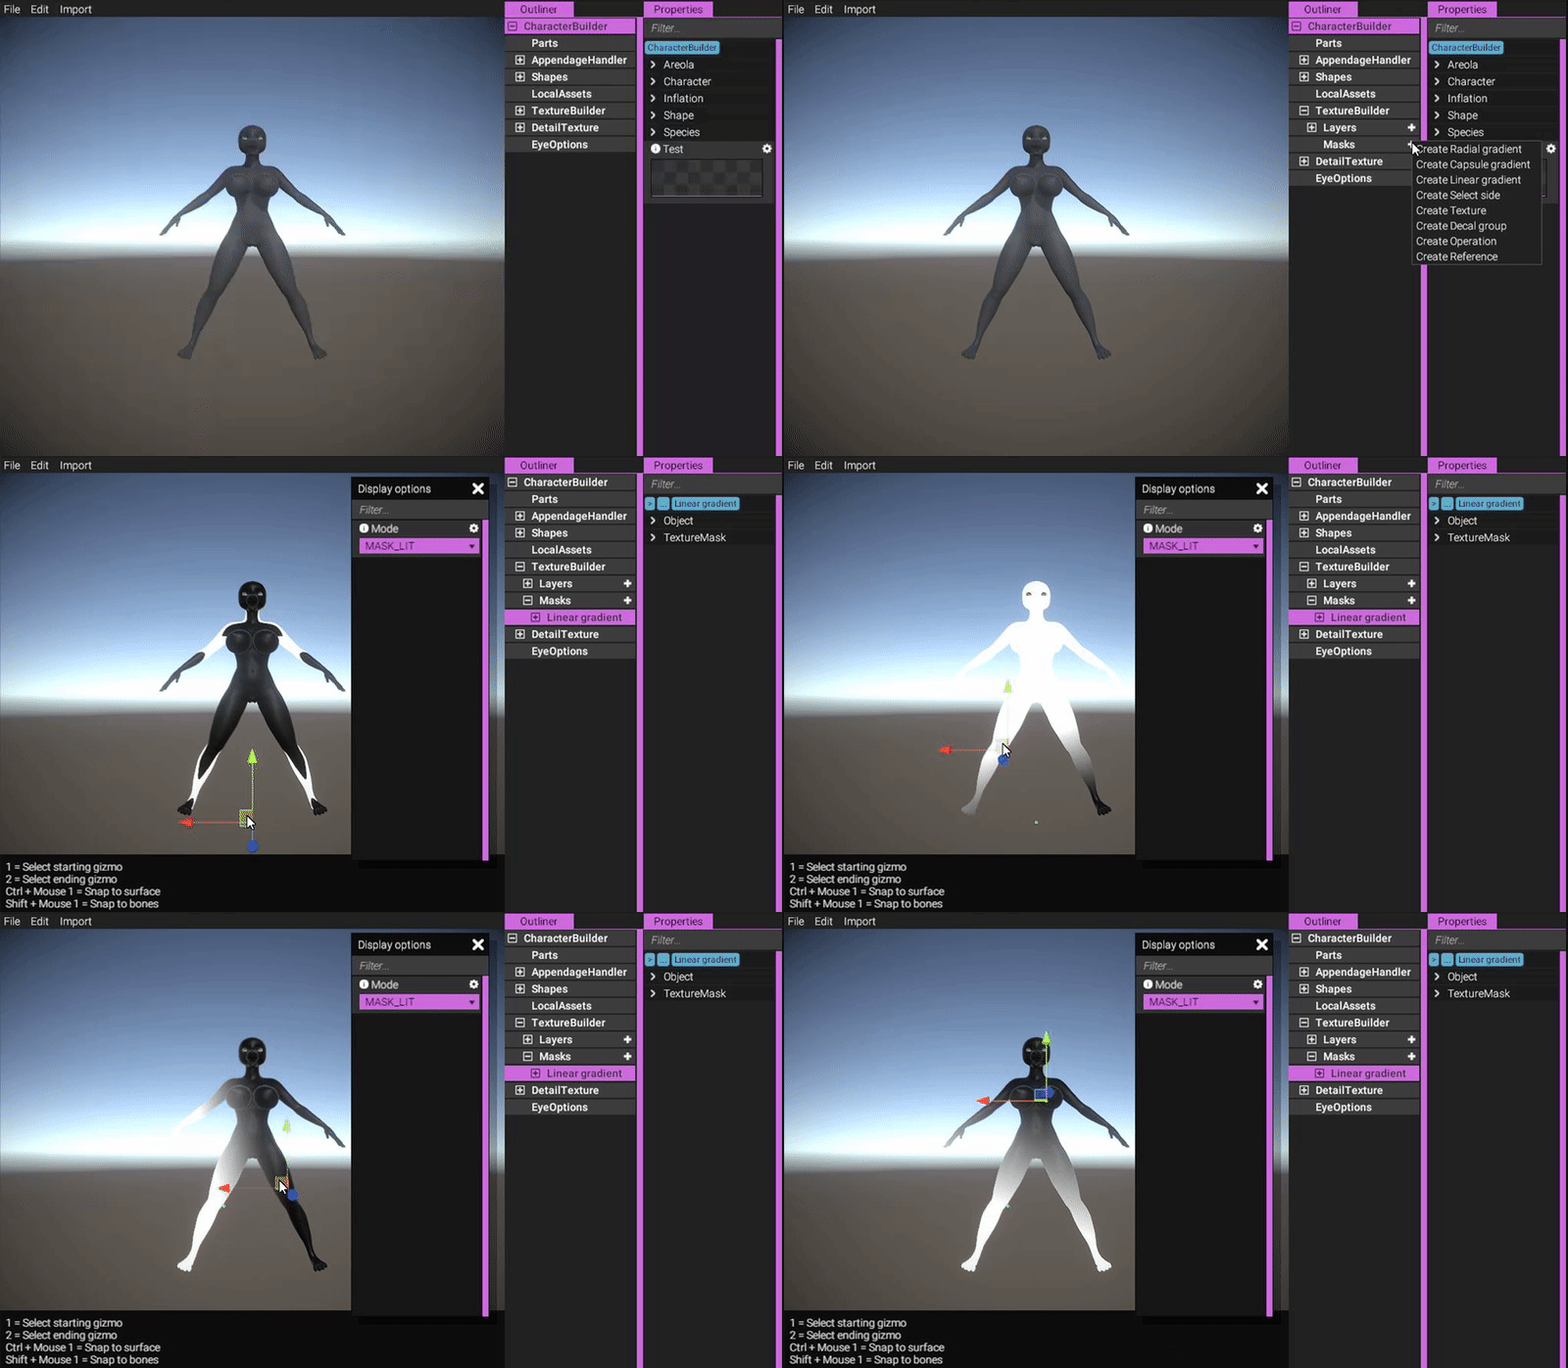
https://gyazo.com/cd46784ab9289ace0e624ba7286d0428
As you can see, when the gradient is added, it is automatically selected and the editor transitions into a special state tailored for this object.
The linear gradient has two main inputs - a point where it starts and a point where it ends. Simply click on a point to activate its 3D gizmo, and then drag it around. You can also quick-select a certain point using the number keys - "1" for the starting point and "2" for the end point.
Let's assume we want to create a gradient on the arm that goes from white to black (using number keys to select points):
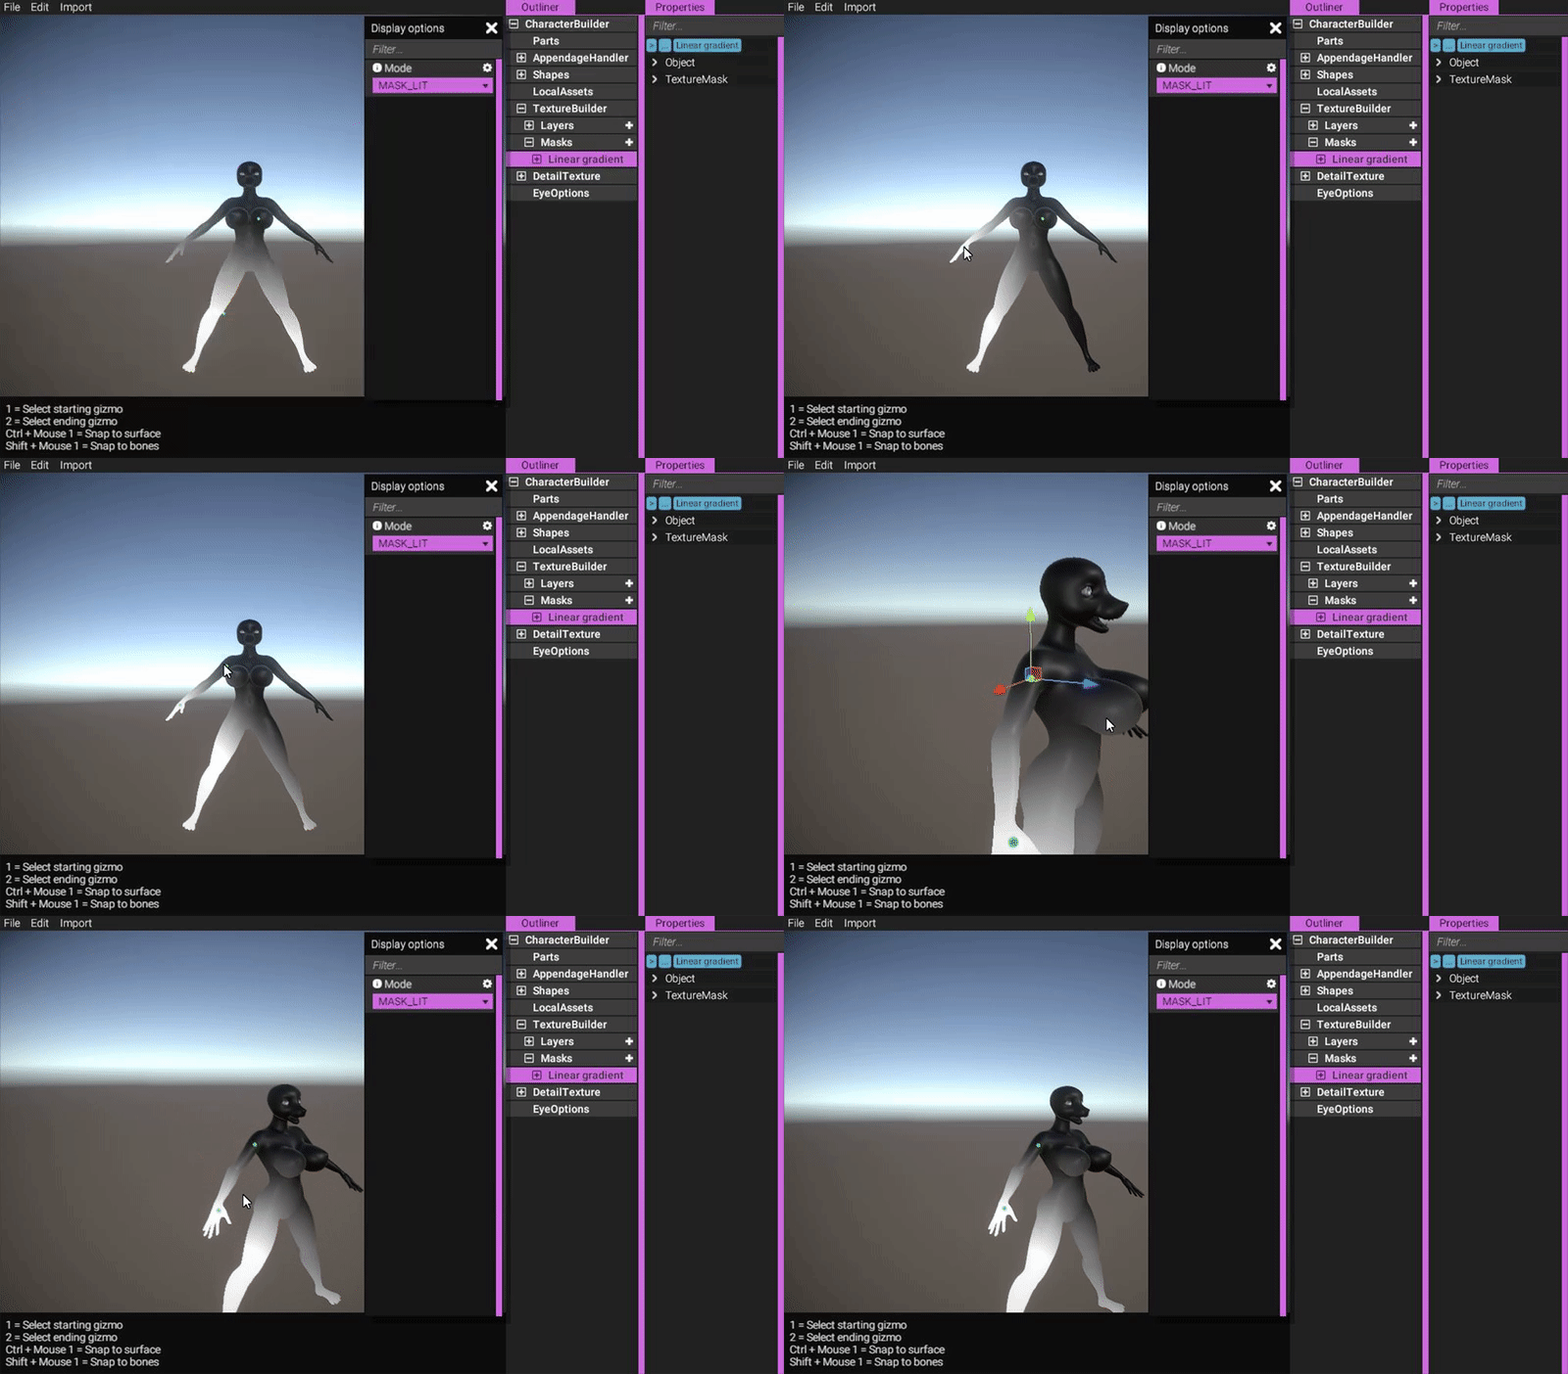
https://gyazo.com/bb581c0dc94cc57dd15343d9f66be29d
Here, we're also making use of another shortcut - Shift + Mouse 1 to snap the points to a bone. (These shortcuts are displayed at the bottom of the screen.)
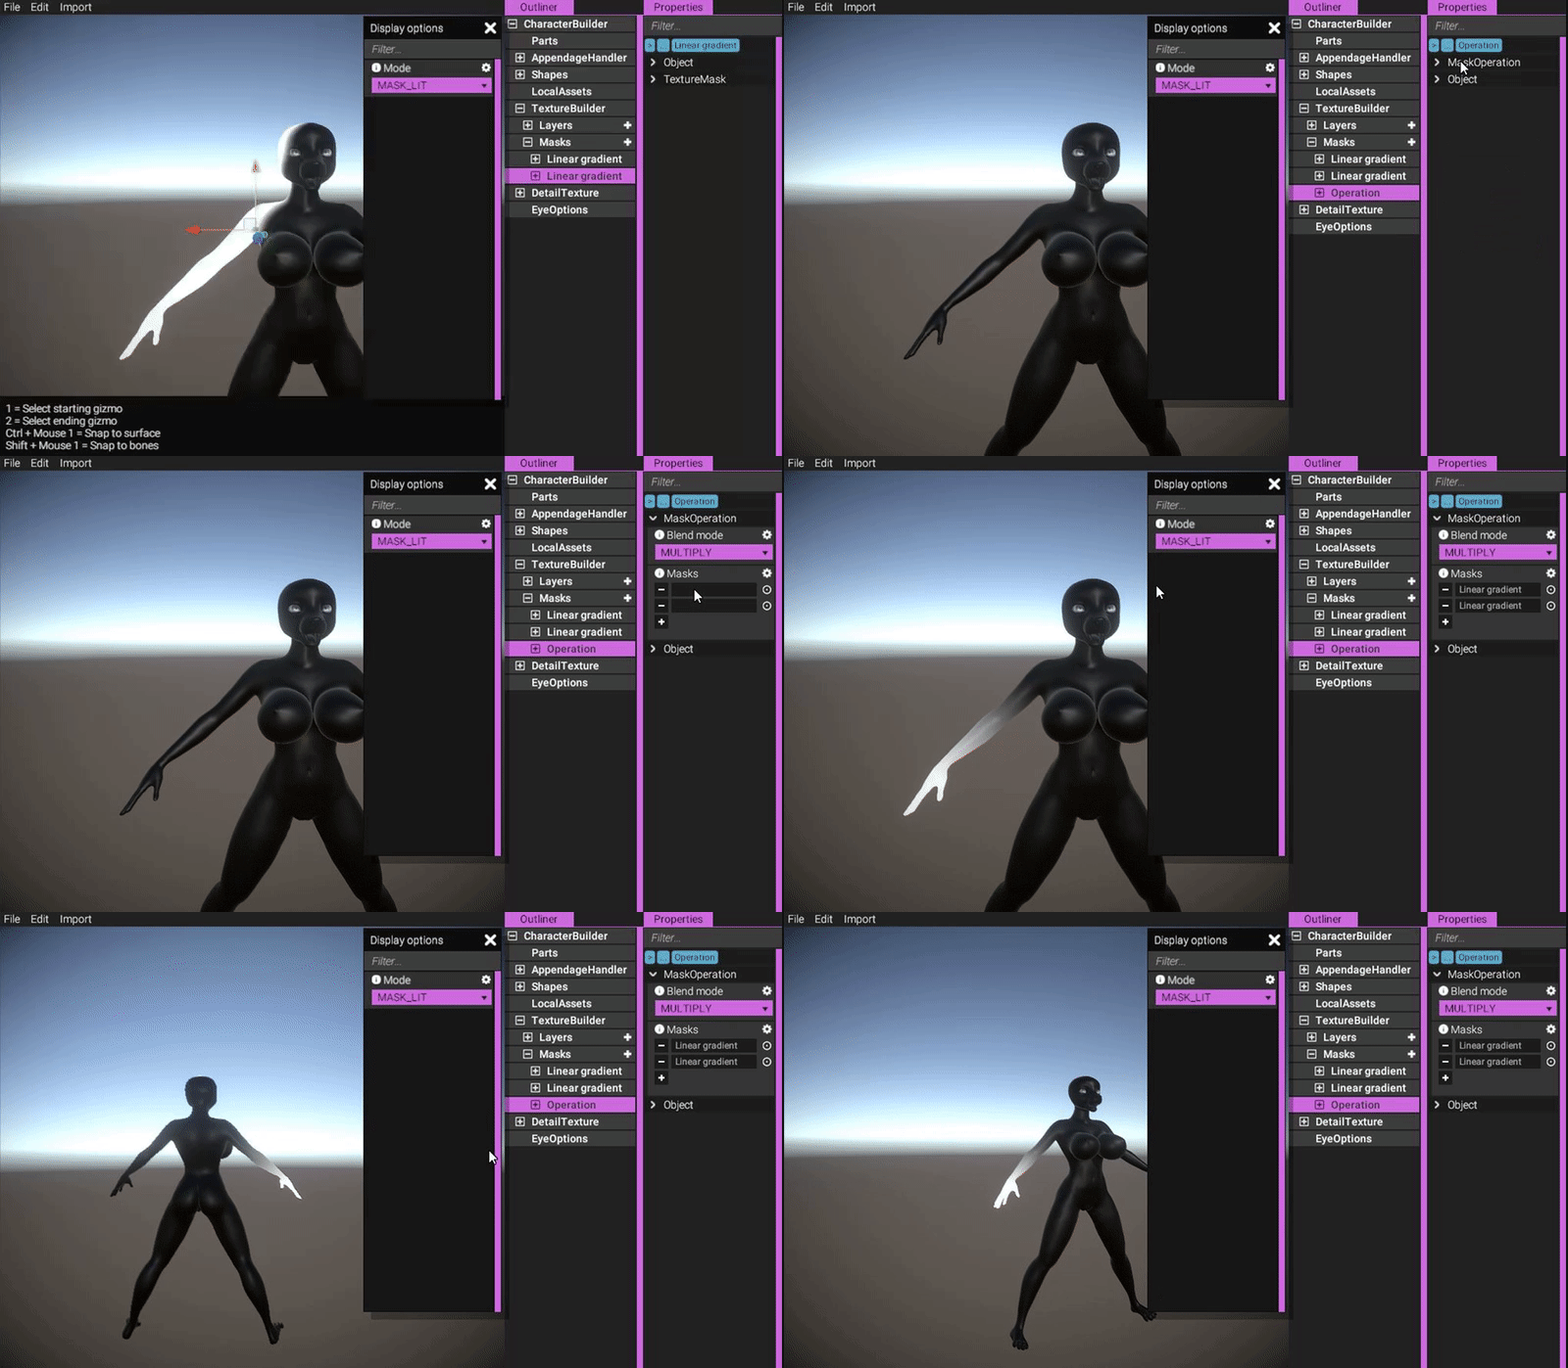
The arm looks fine now, but the problem is that the mask is also affecting the torso and legs. There are many ways one could fix this. Let's try to fix it by using another mask that only selects the arm, and then combine it with the one we just made:
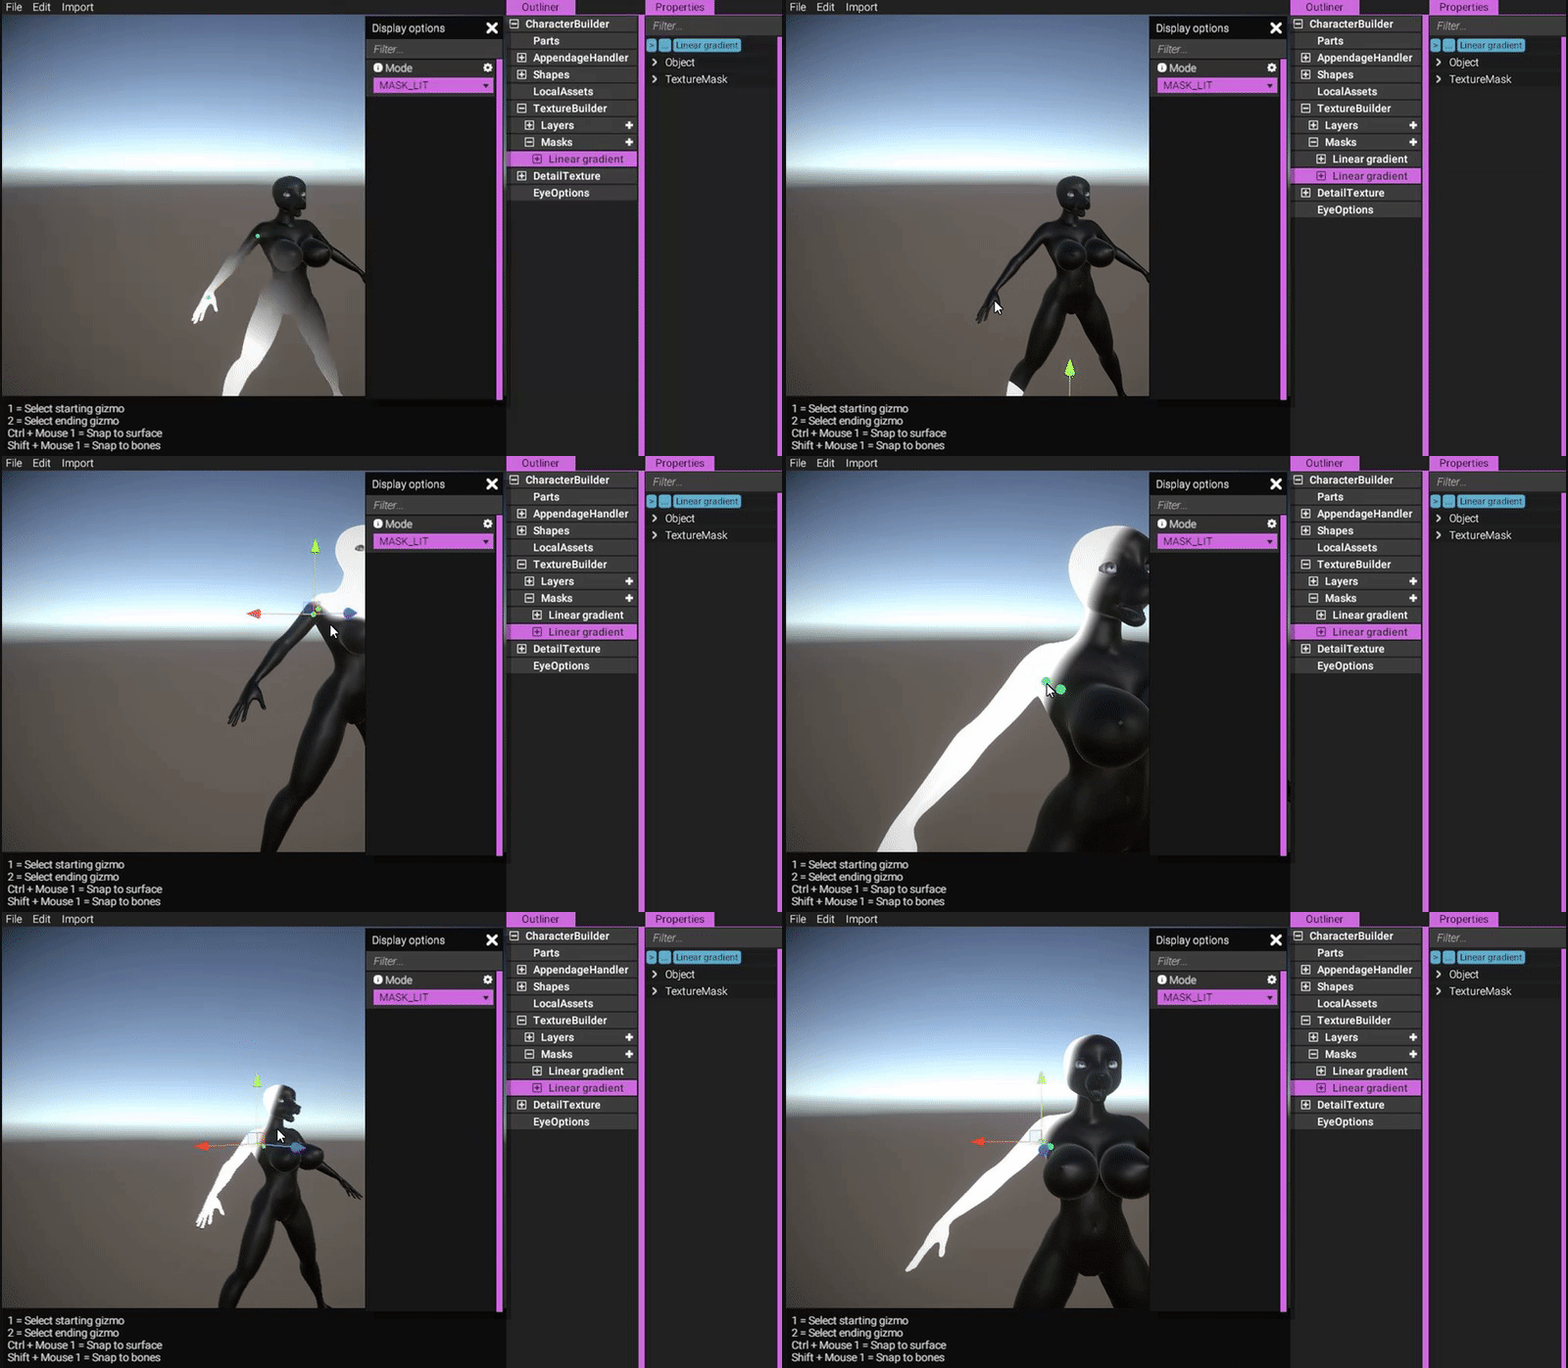
https://gyazo.com/99006e80a385a71b50cd20ae133c745b
https://gyazo.com/7be7bdf3876d2db0b757ee455a13ea88
When creating the linear gradient, we are snapping the points using the "snap to surface" shortcut, Ctrl + Mouse 1. Then we add another mask, "Mask operation". This mask can be used to combine masks together into a single mask. The default blend mode "multiply" will simply multiply any referenced masks, thus only filling the intersecting selections.
Now we have an arm filled in the manner we want. We want it on the other side too though. Does that mean we have to repeat this whole process for the other side as well? Luckily no, we can just use a "mirror" filter:
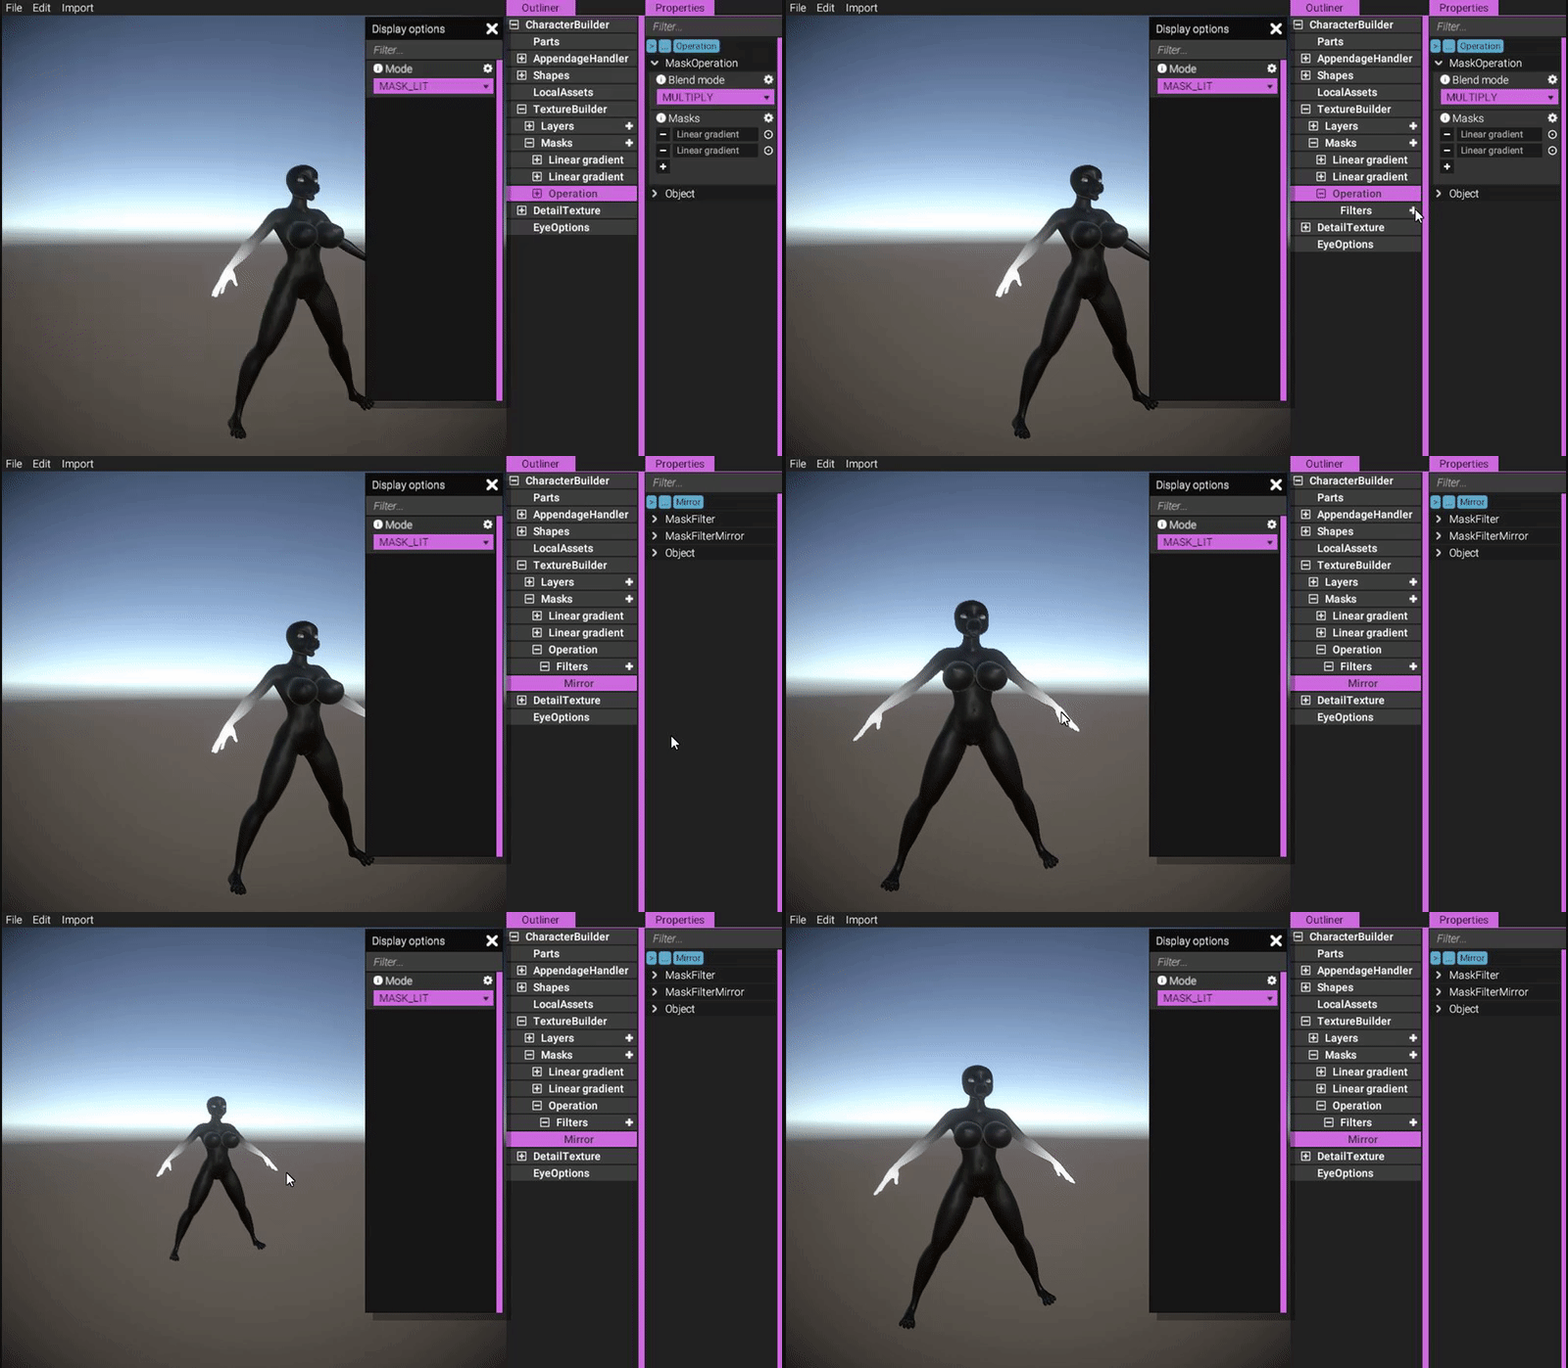
https://gyazo.com/982f0fe67b293c33fad938eb6aca3a28
Much better!
A mask by itself doesn't really do anything. It needs to be referenced somewhere. Let's add a mask layer to do just that:
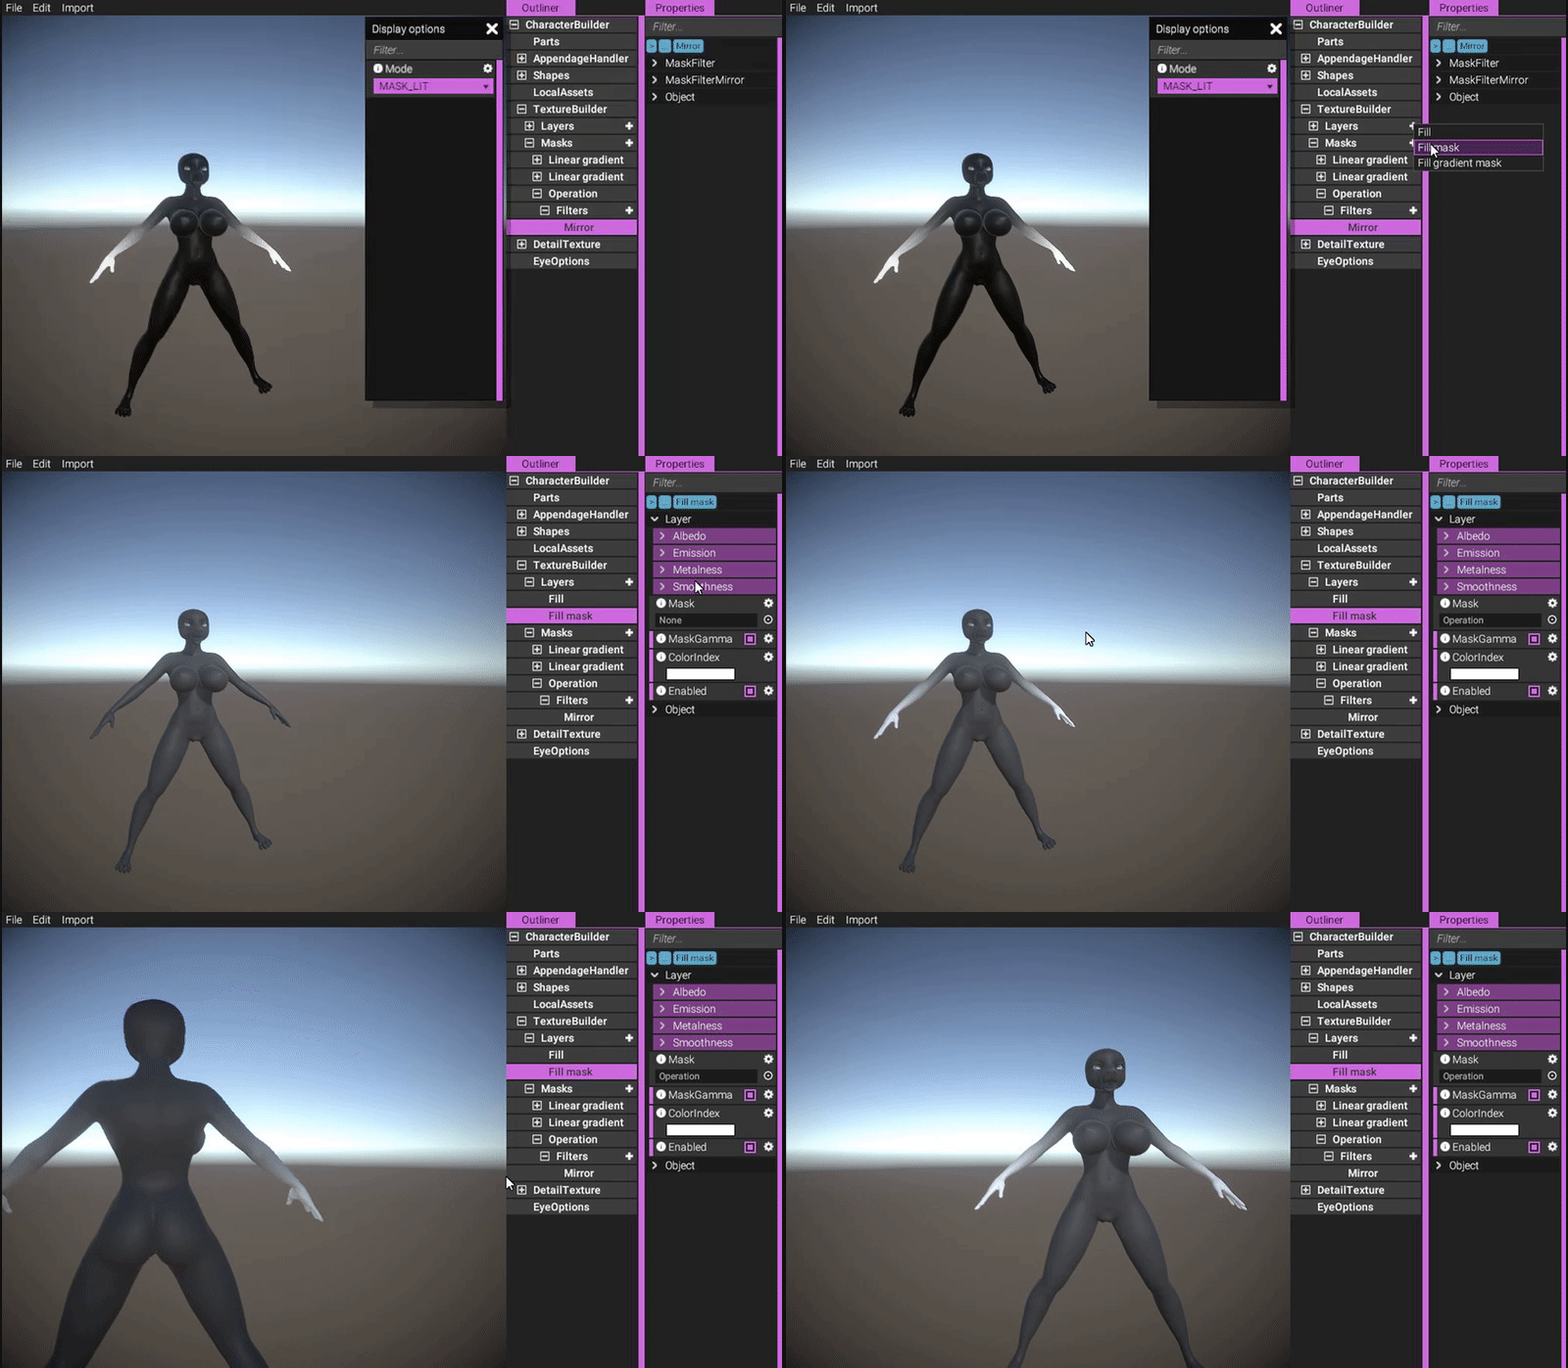
https://gyazo.com/42d4bc879669b4b5620306f830a02282
In YL2, all colors used by a character are defined in the main character object. These colors can then be referenced in other objects. This means you have a single location to control all colors.
By default, a new layer will always fill the albedo channel with the color at index 0. You can of course change what channels to fill and what colors to use:
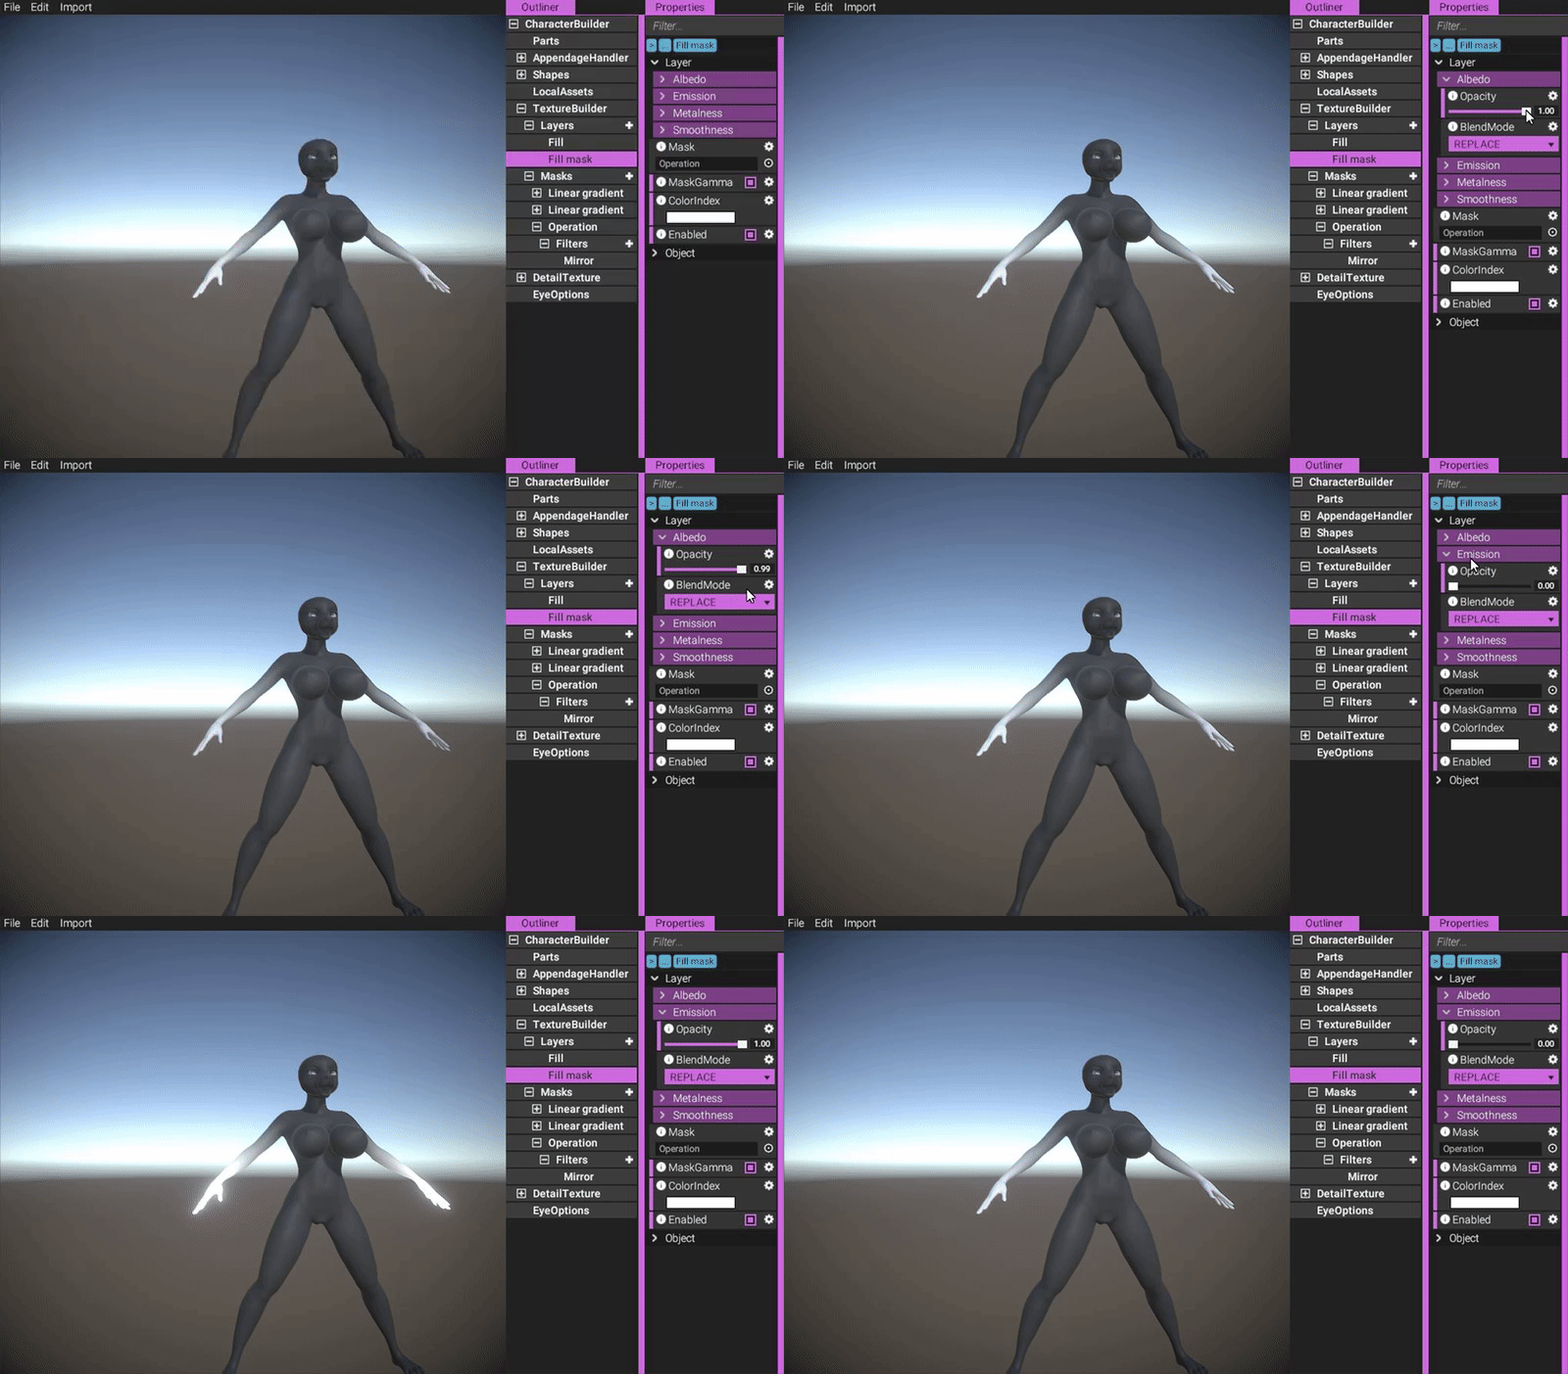
https://gyazo.com/0f42f9c6a07b50ce42e106aa4344b839
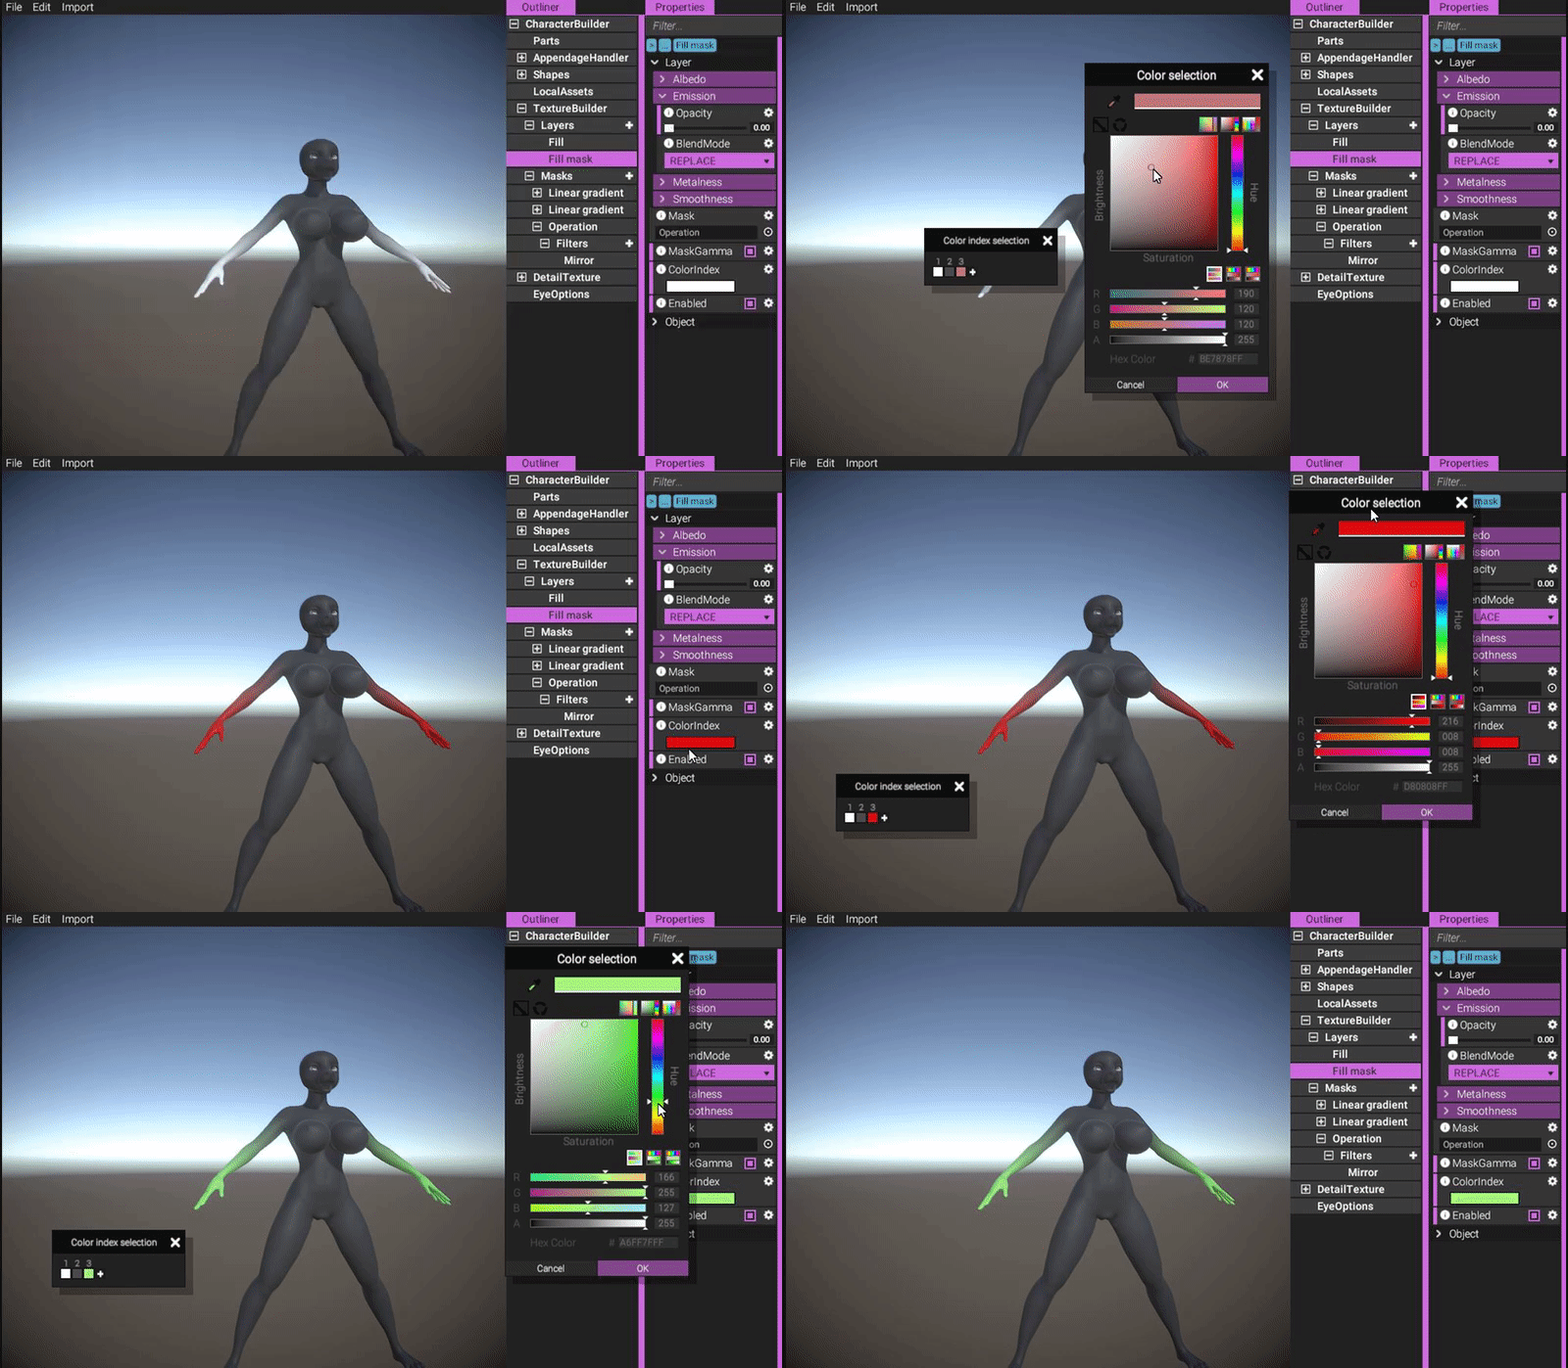
https://gyazo.com/4b4fd0bd3c1a47a9121358743a65e27c
Since we're using a PBR shader, you can also make the character metallic if you wish (for whatever reason). Let's try to make our mask look like gold:
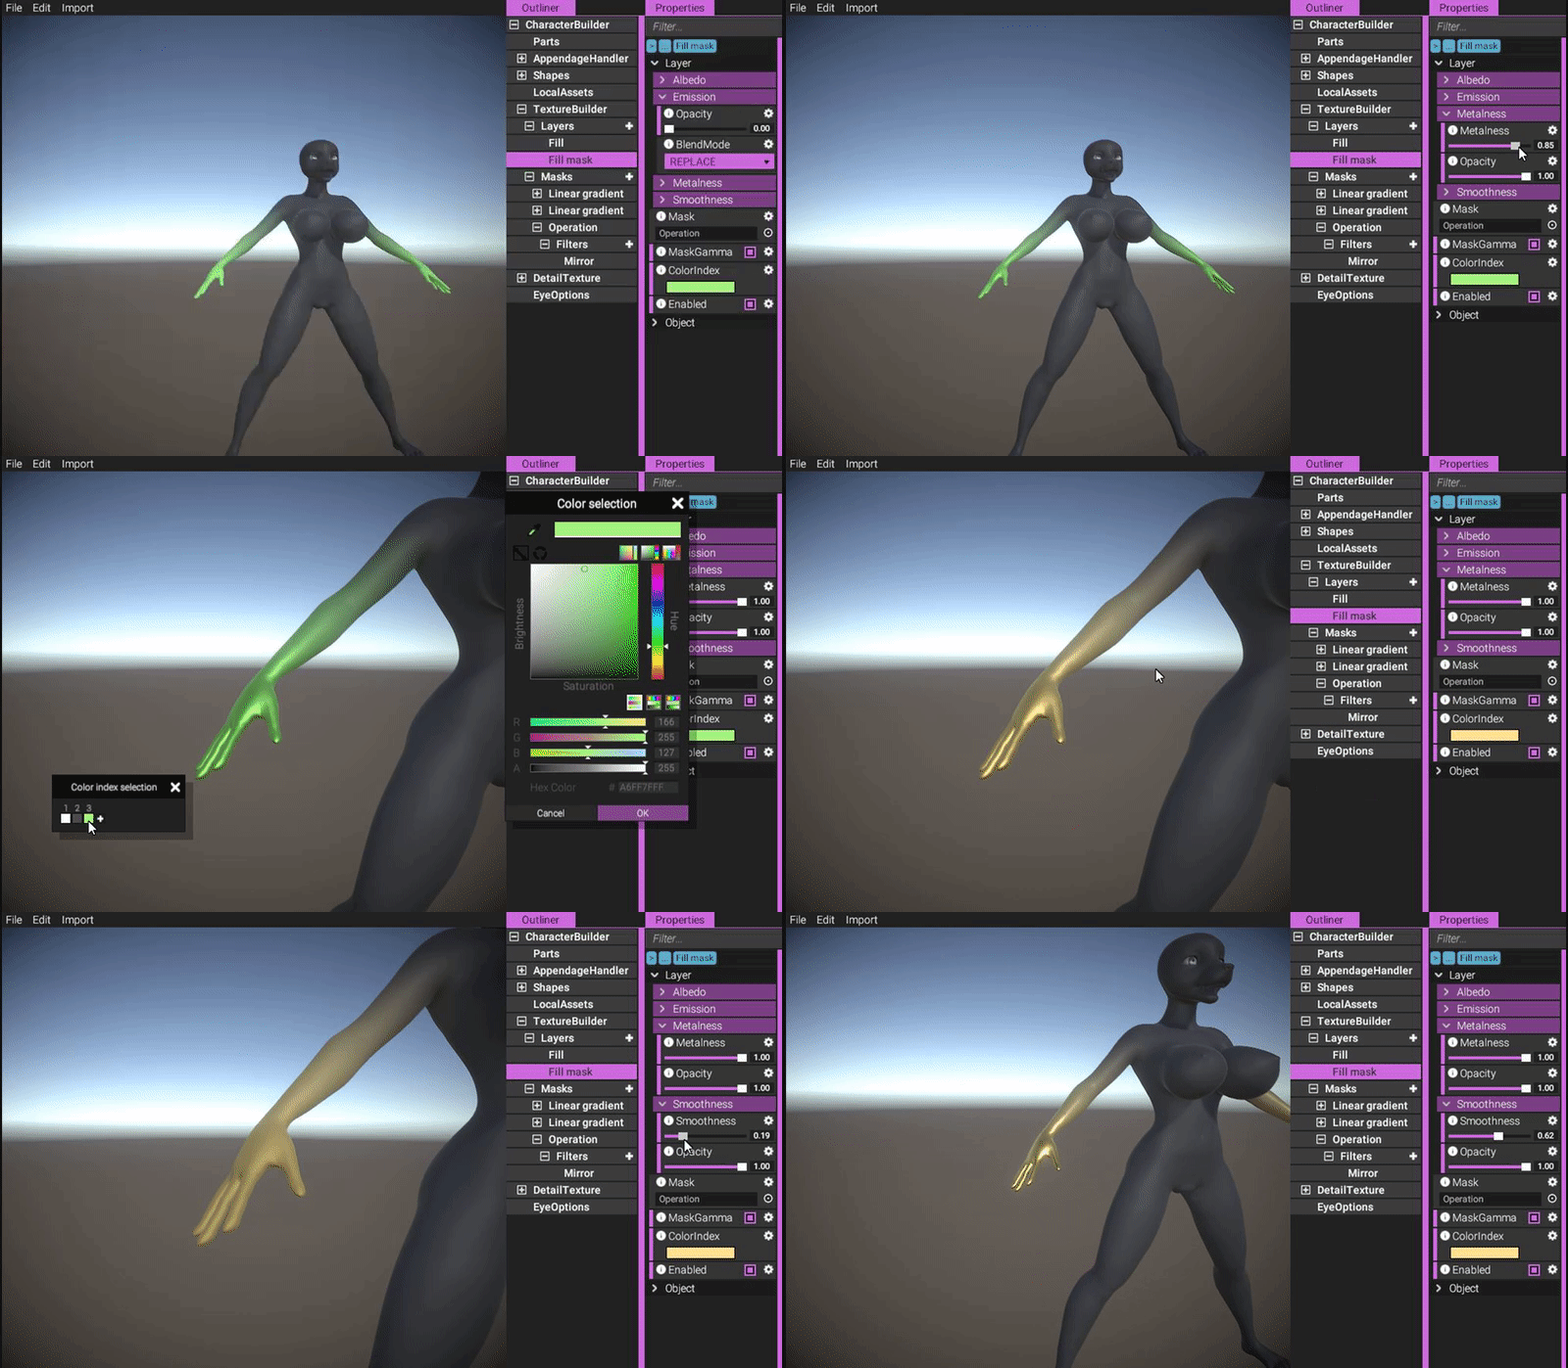
https://gyazo.com/573c8dfb2daa726b56c0198f9e2c4378
Granted, this example is a bit silly, but it proves what control you have over the channels.
Let's revert back to the old green color by undoing these steps:
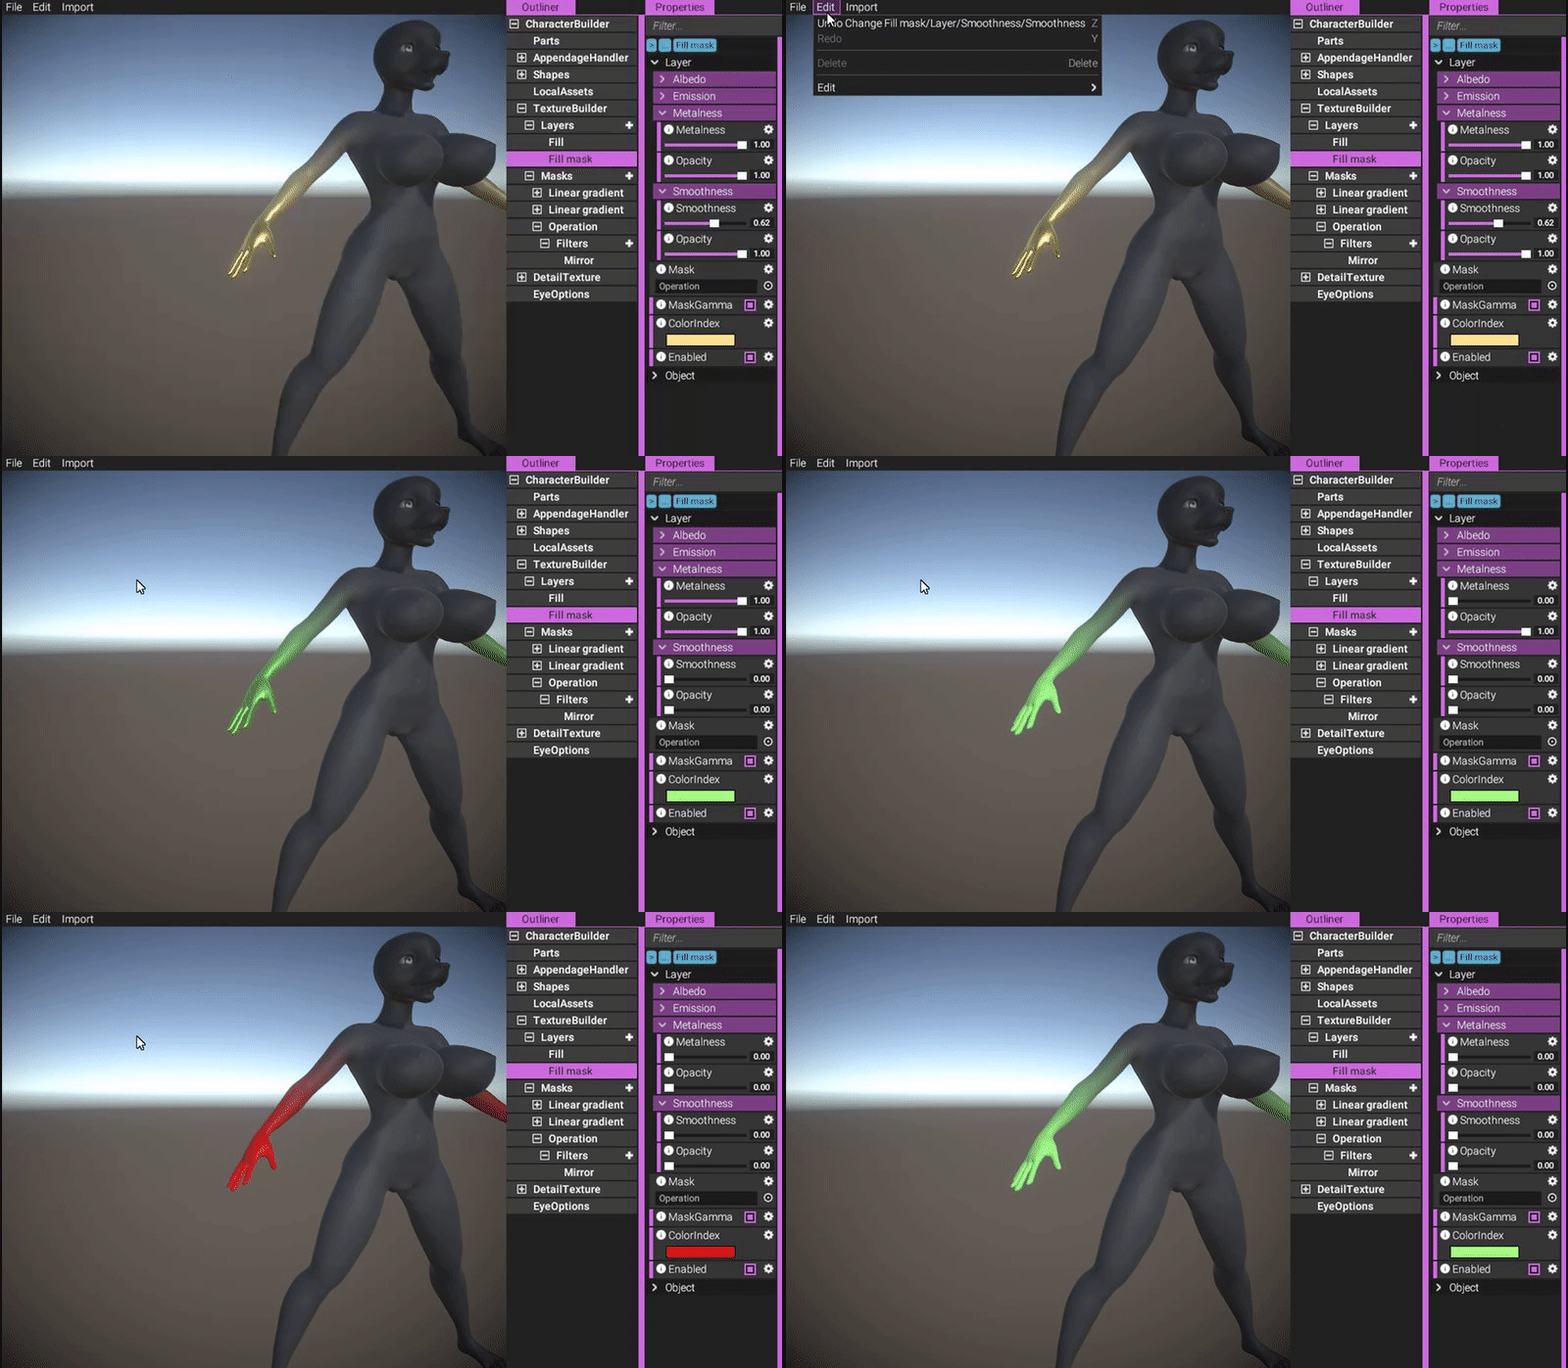
(Undoing steps, first by menu commend and all following times with keyboard-shortcut.)
https://gyazo.com/791f2b8989a8320e333b95113801a8a2
Almost all actions in the editor are possible to undo. The exception is deletion of local assets, which will be released from memory if deleted. Other actions, such as altering objects or even completely deleting them are possible to undo.
Now, let's assume we wanted this kind of effect on the legs too. Let's create a new linear gradient:
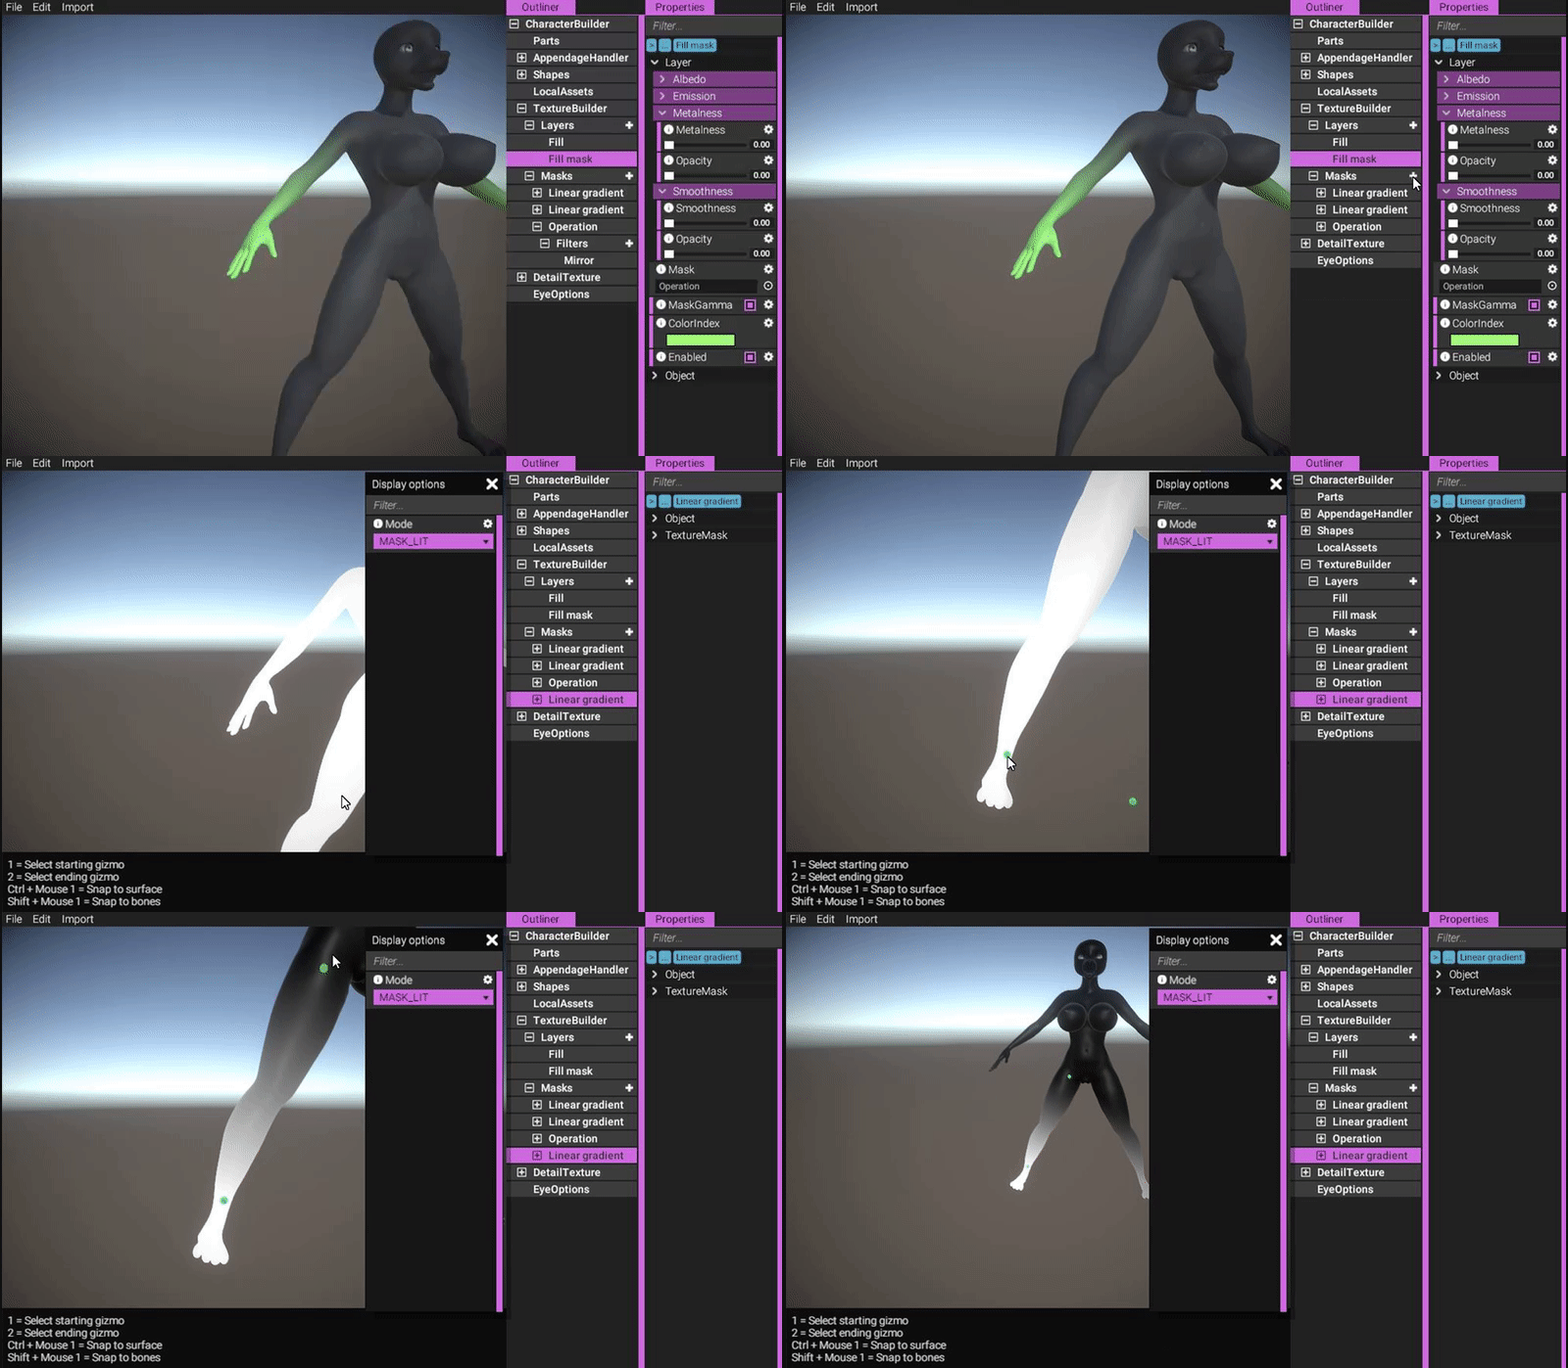
https://gyazo.com/04eb06ad3dbcec562f068b61bb86601b
Since this gradient doesn't affect any other body part than the legs, we only need one gradient. We still need to mirror it though:
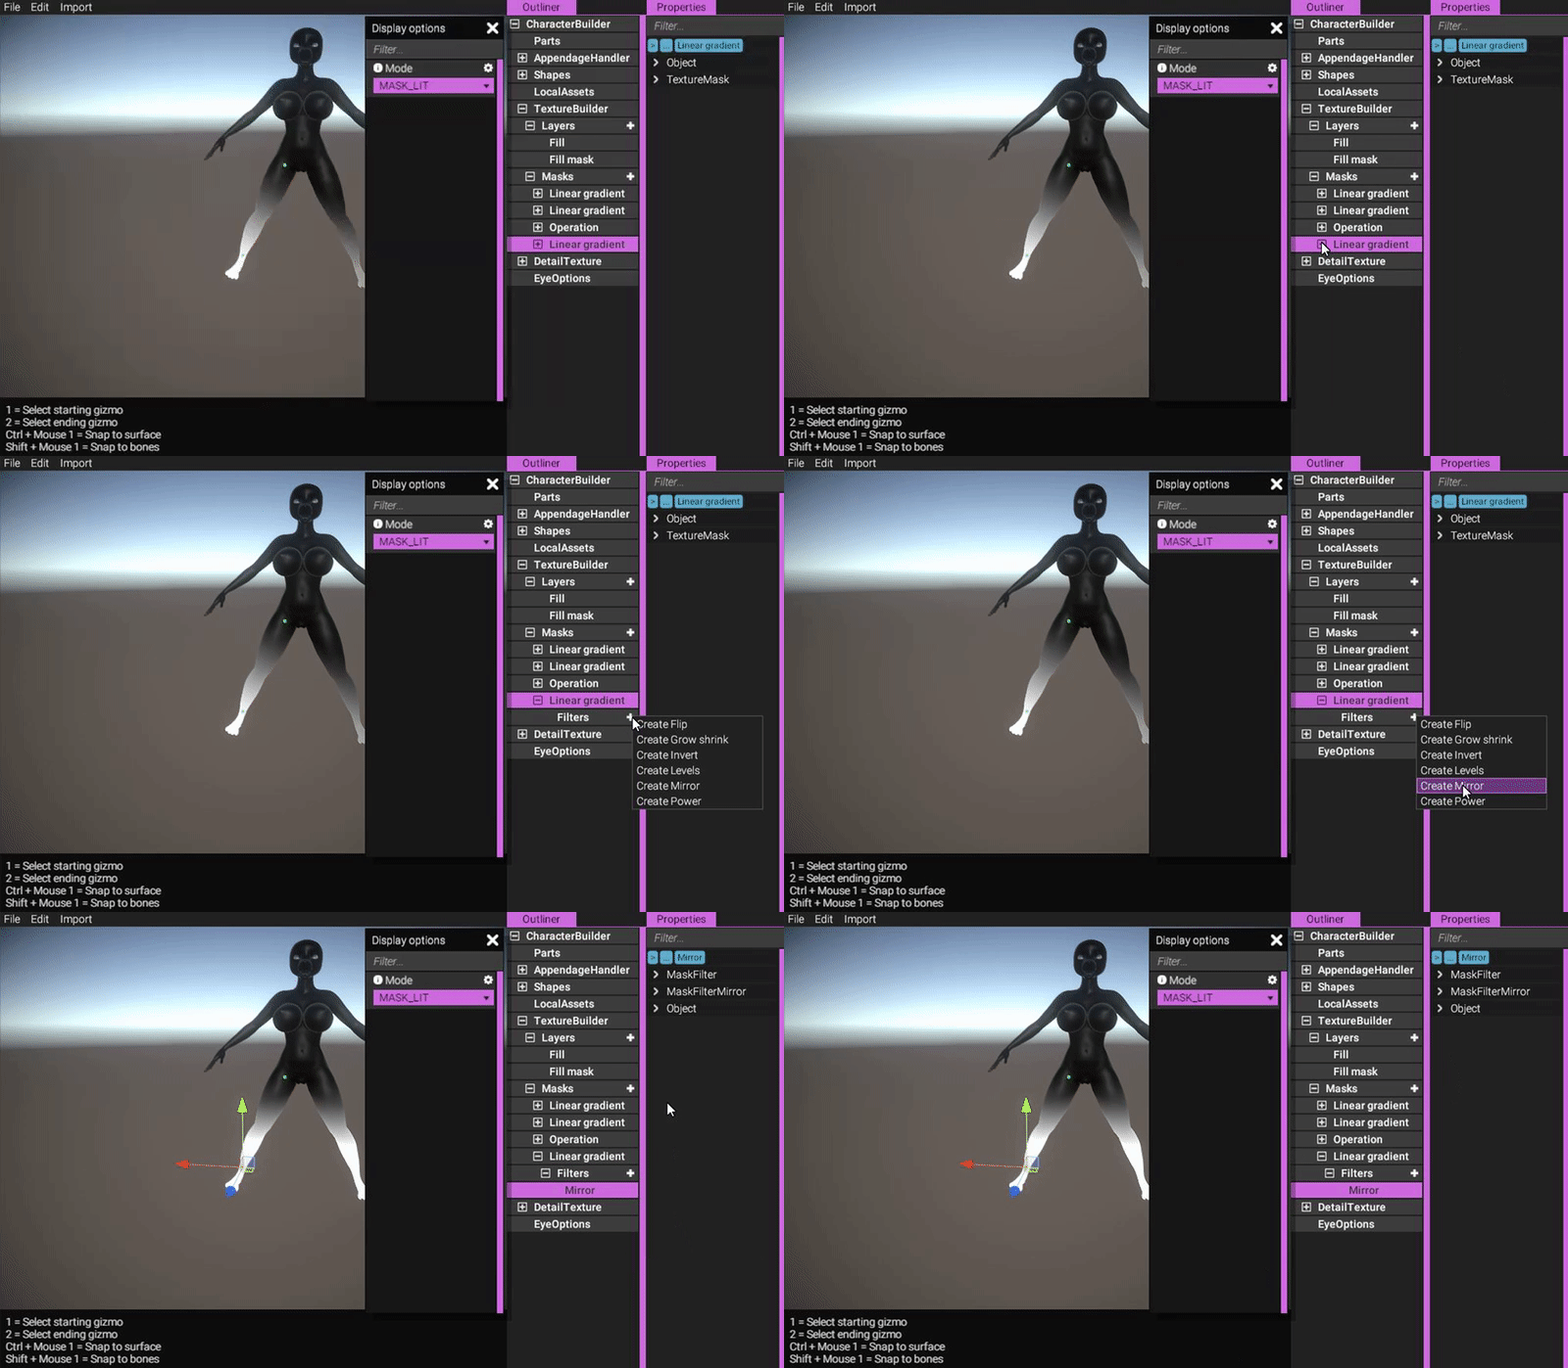
https://gyazo.com/7504703683742a66c0eb25f09b62cc6e
By default, a mirror filter simply mirrors the texture and then adds it together with the original one. In this case, this is not what we want. We want the character's right side to mirror to its left side. So lets go into the mirror filter's options and change it to do just that:
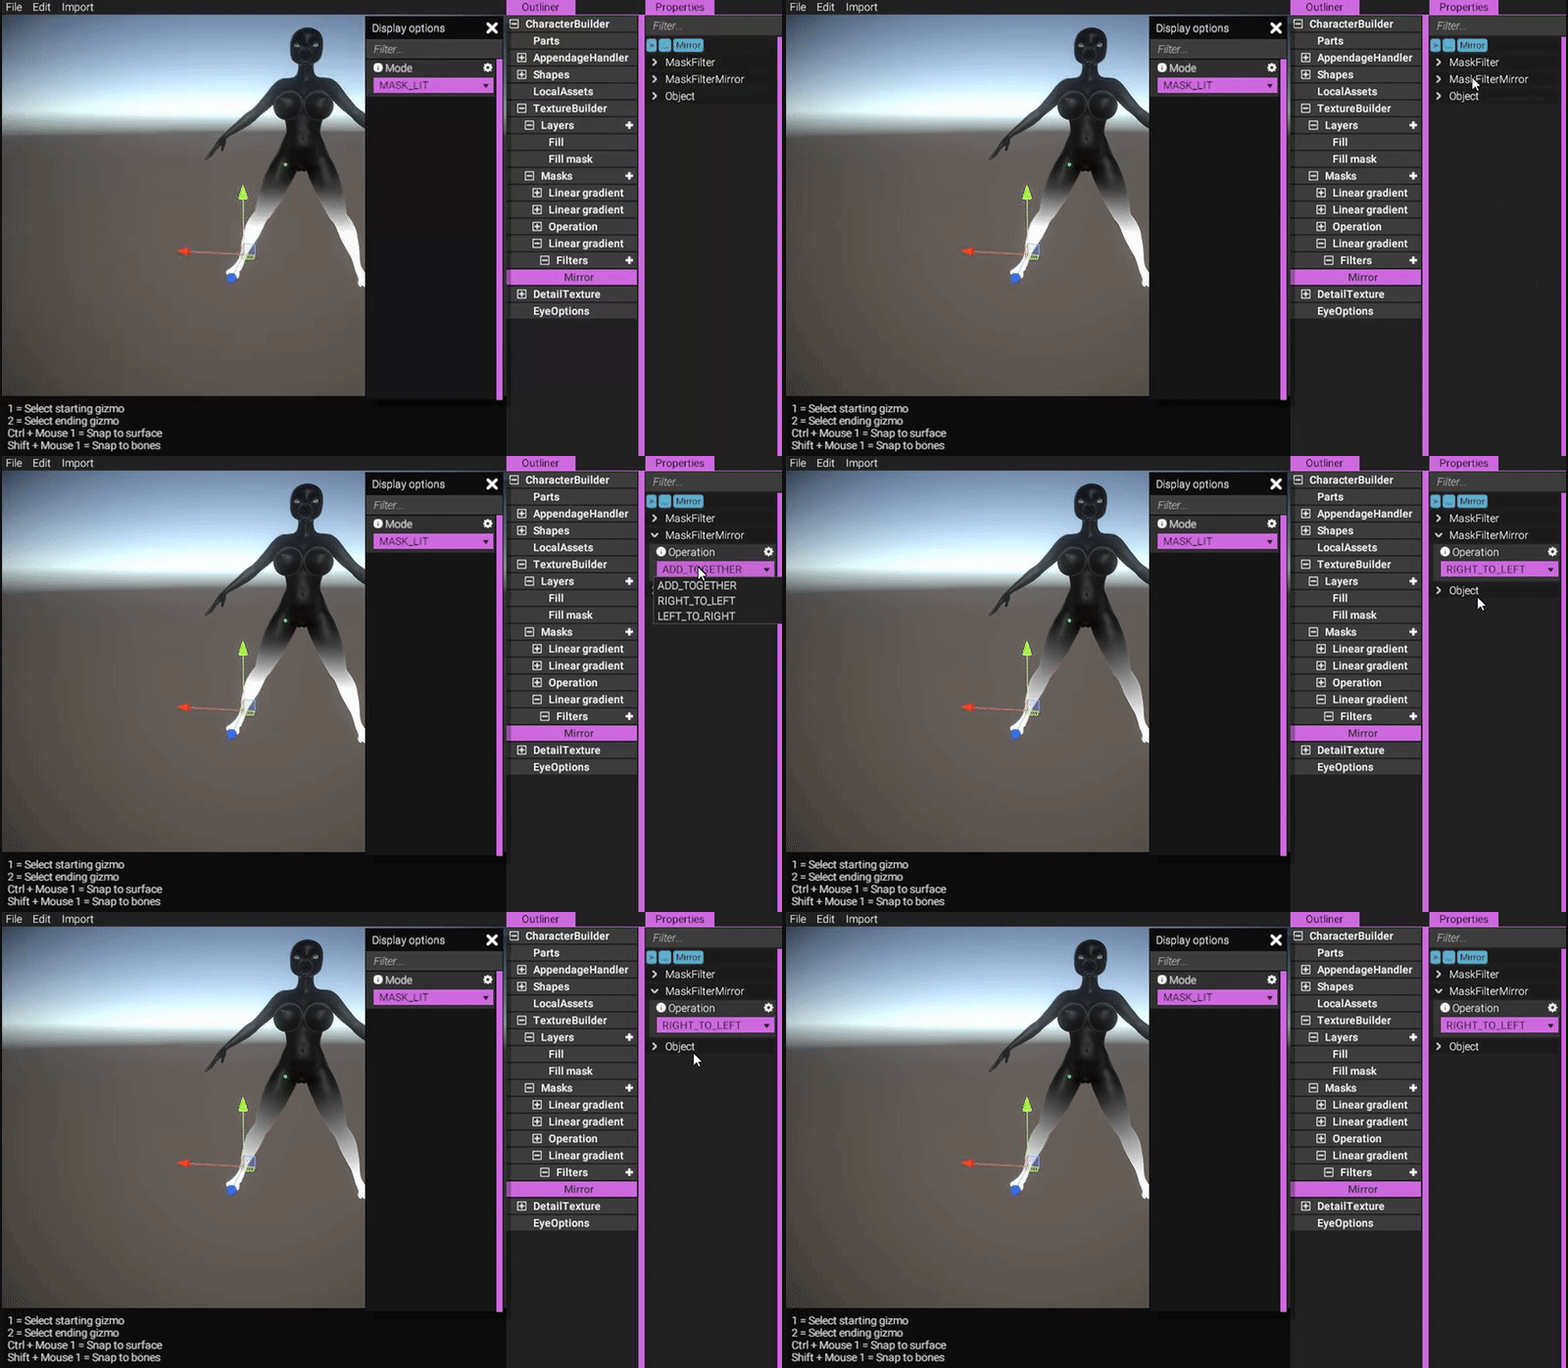
https://gyazo.com/7713fc0ddaf6781921614dee339e5488
Excellent! Now we have a satisfactory mask selection on the legs. Let's combine it with the arm selection by creating another mask operation, but this time, instead of intersecting the layers (multiply), let's just add them together (linear dodge):
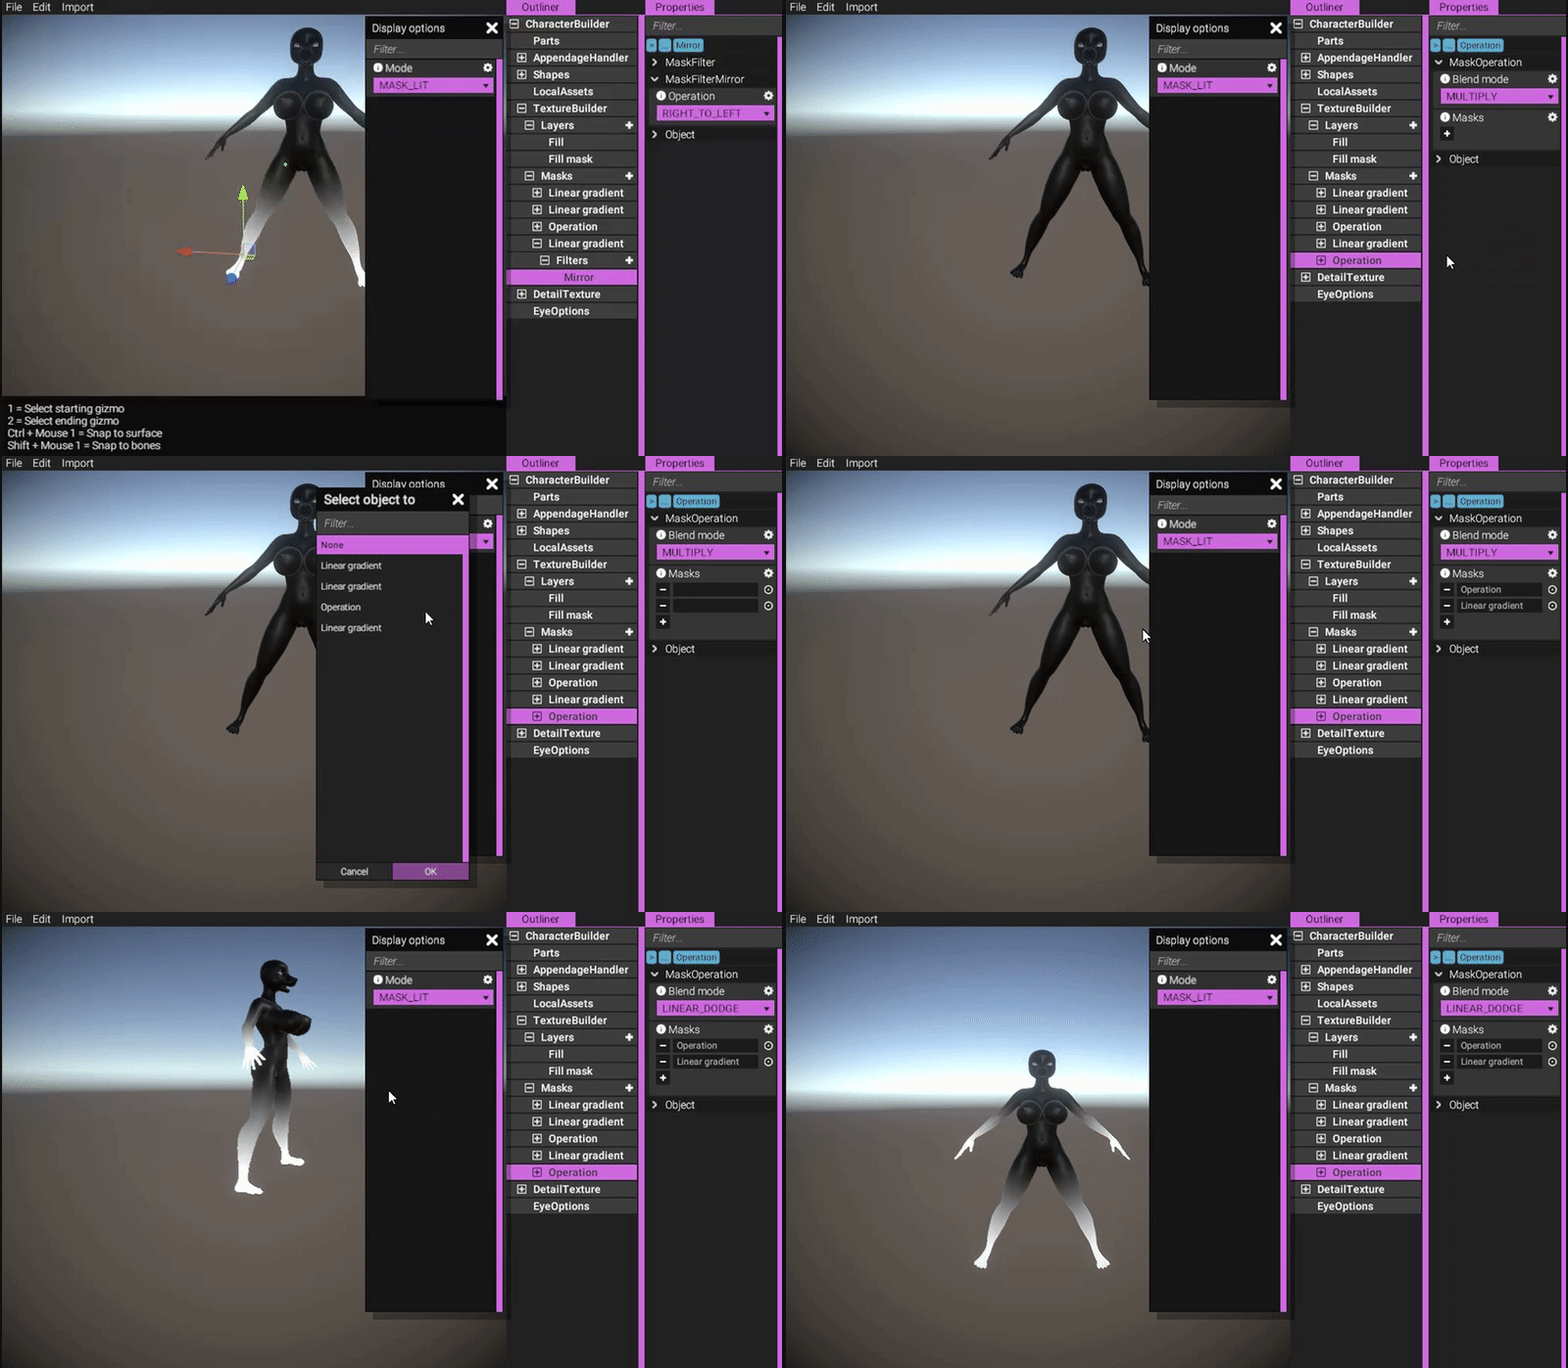
https://gyazo.com/e4b23960bfe5479ac24dad73e0f7cdc2
Then, reference this newly created mask in the mask layer:
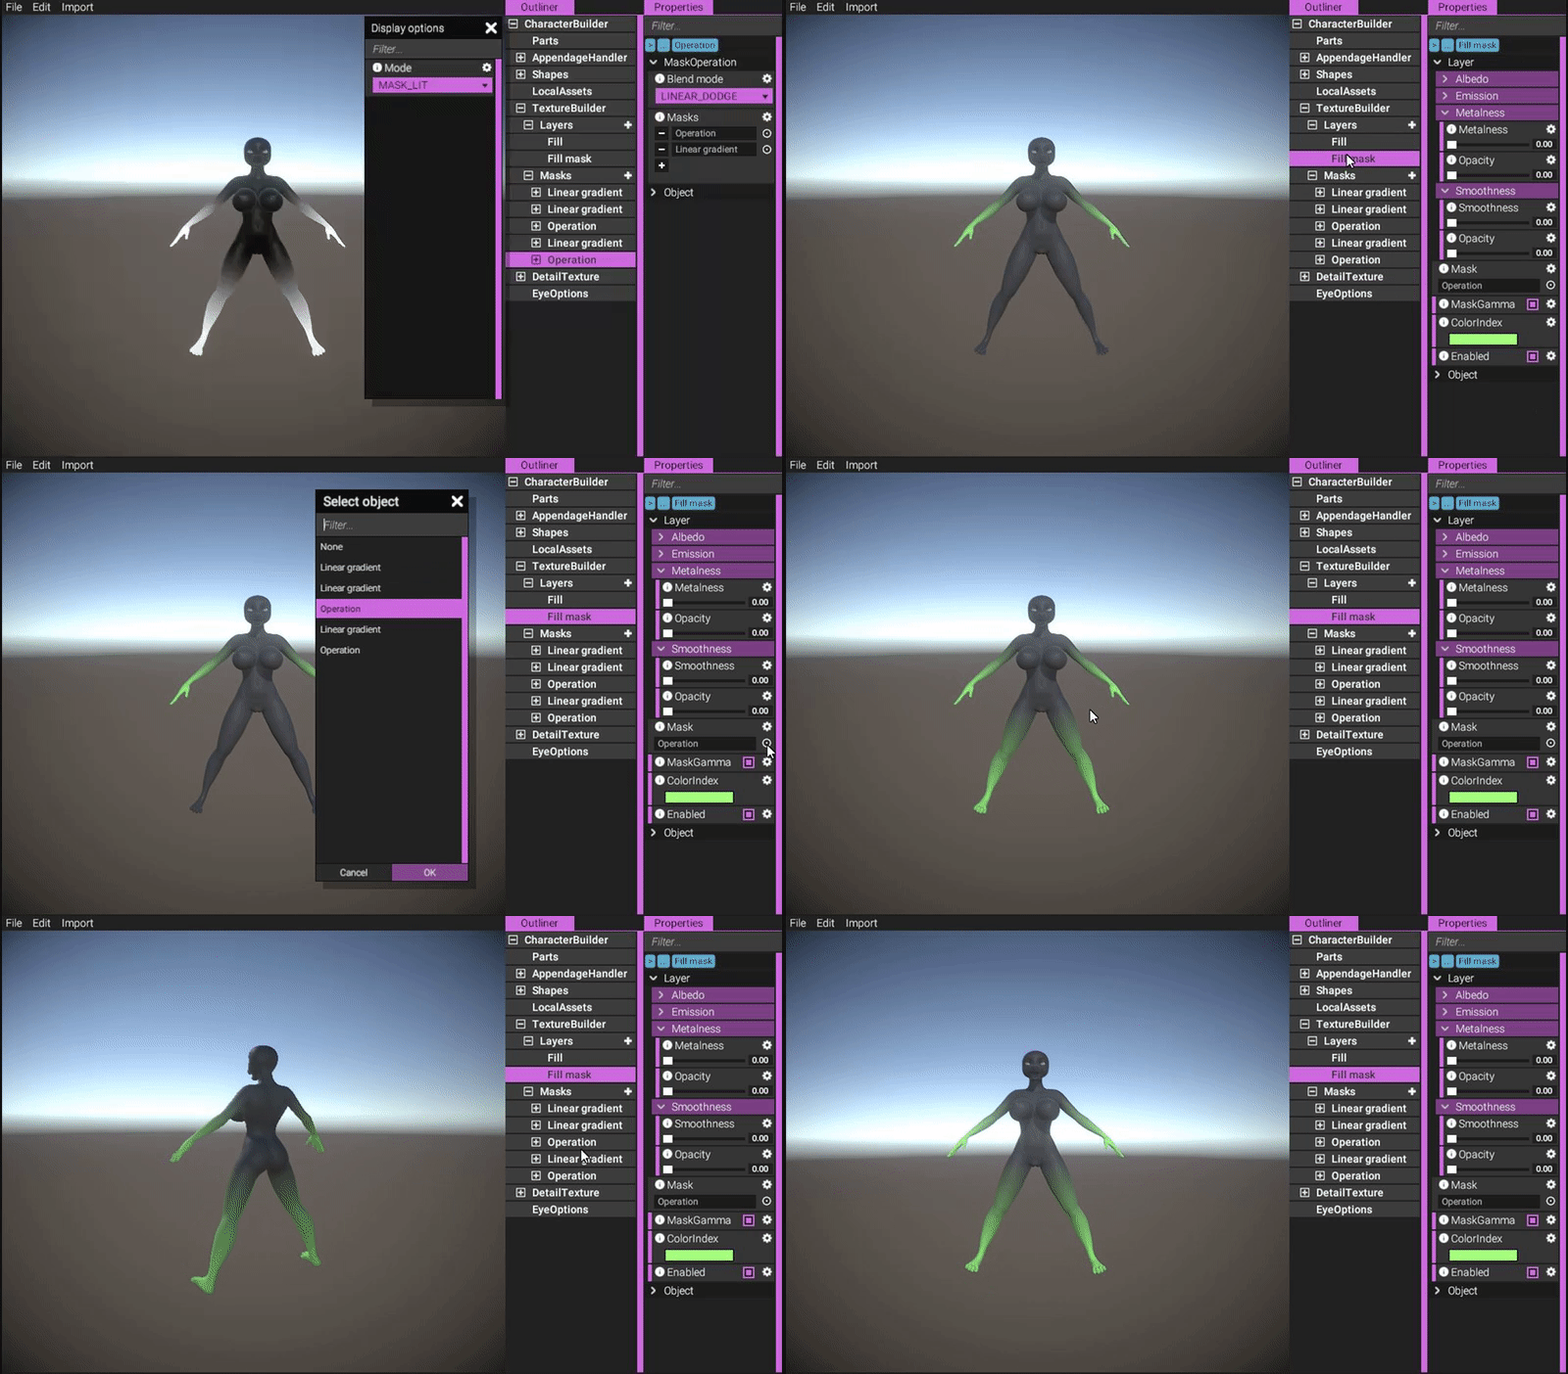
https://gyazo.com/db0254d57f540fe4c846a507394e4bf2
In this case, I think the gradient on the legs doesn't transition quite as smoothly as I want it to. Let's try to remedy that by adding another filter on the linear gradient for the legs. Also, by using the "FINAL" mode in the display options, we can preview the changes directly as we're altering the mask:
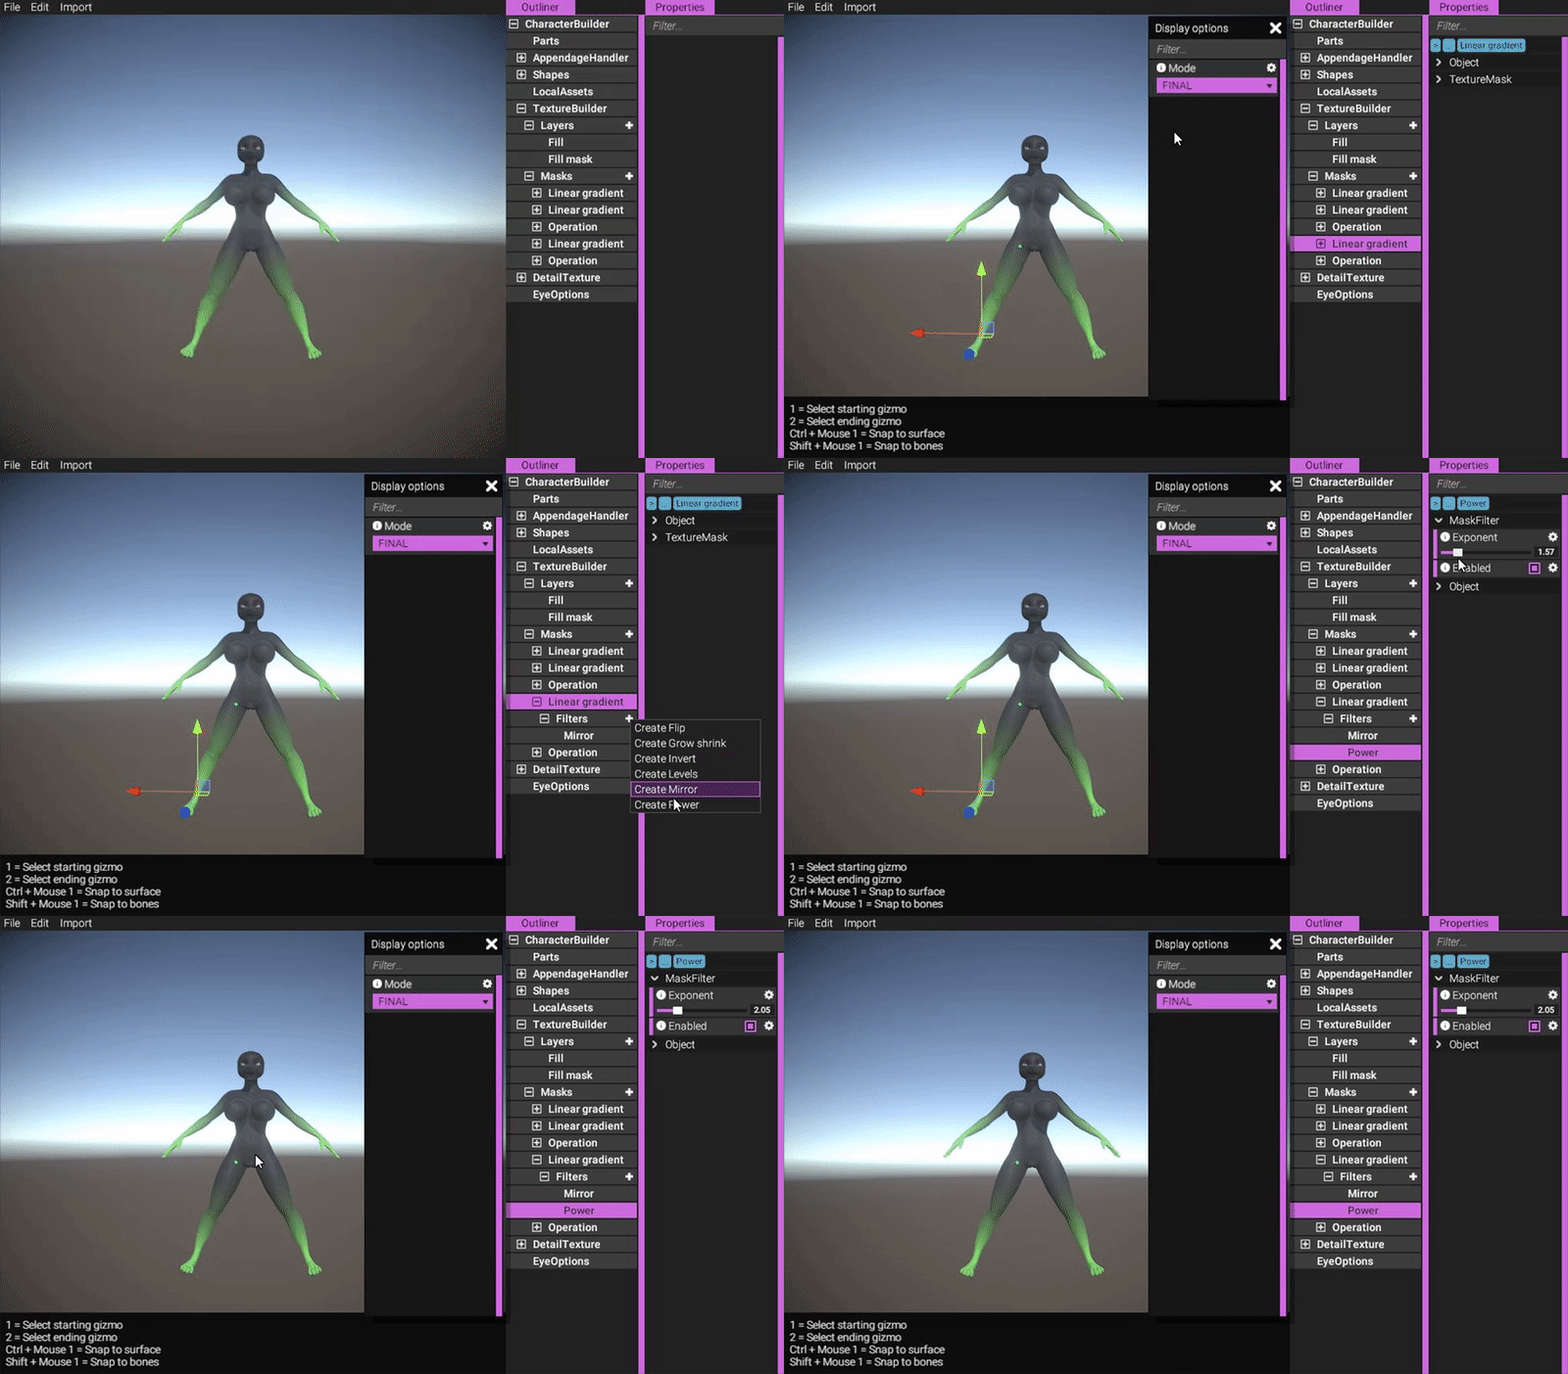
https://gyazo.com/e29fb37ba89d5b2302875a6971164608
There's a lot going on here to make all of this work. Essentially what's happening is that as we're changing the linear gradient for the legs, it's sending an event to whoever is listening that "Hey, I've changed!". The listener, in this case, is the operation mask (the one combining the arms with the legs), which in turn says "Hey, I've changed!". This causes the fill mask layer to notice the changes, which says to the texture building system that the stack has changed, and finally the textures are updated.
(The "Power" filter simply raises the mask according to the exponent, i.e. mask^exponent, causing it to smooth out.)
Let's spice this texturing up a little bit with decals.
We have prepared a heart image. Let's import it and start adding decals!
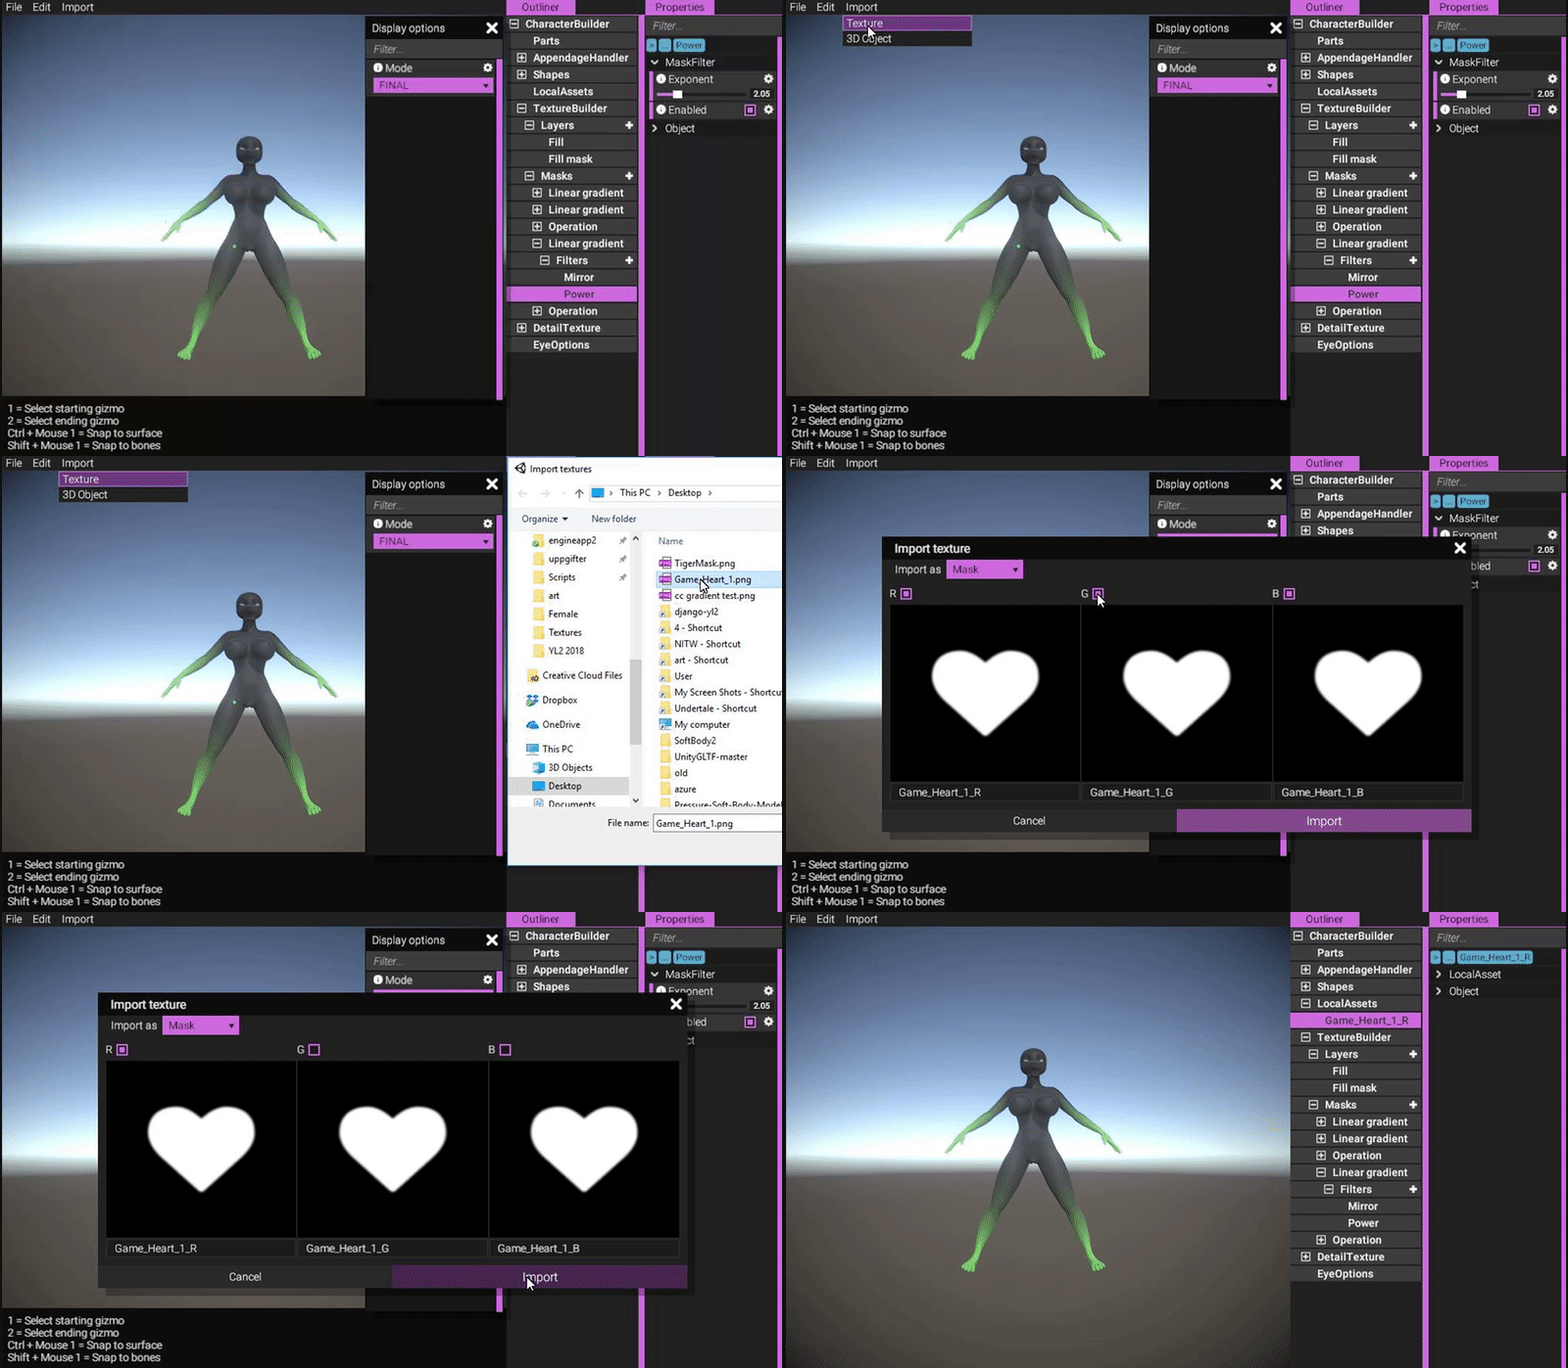
https://gyazo.com/b27868166b253e1392133e39b35035c0
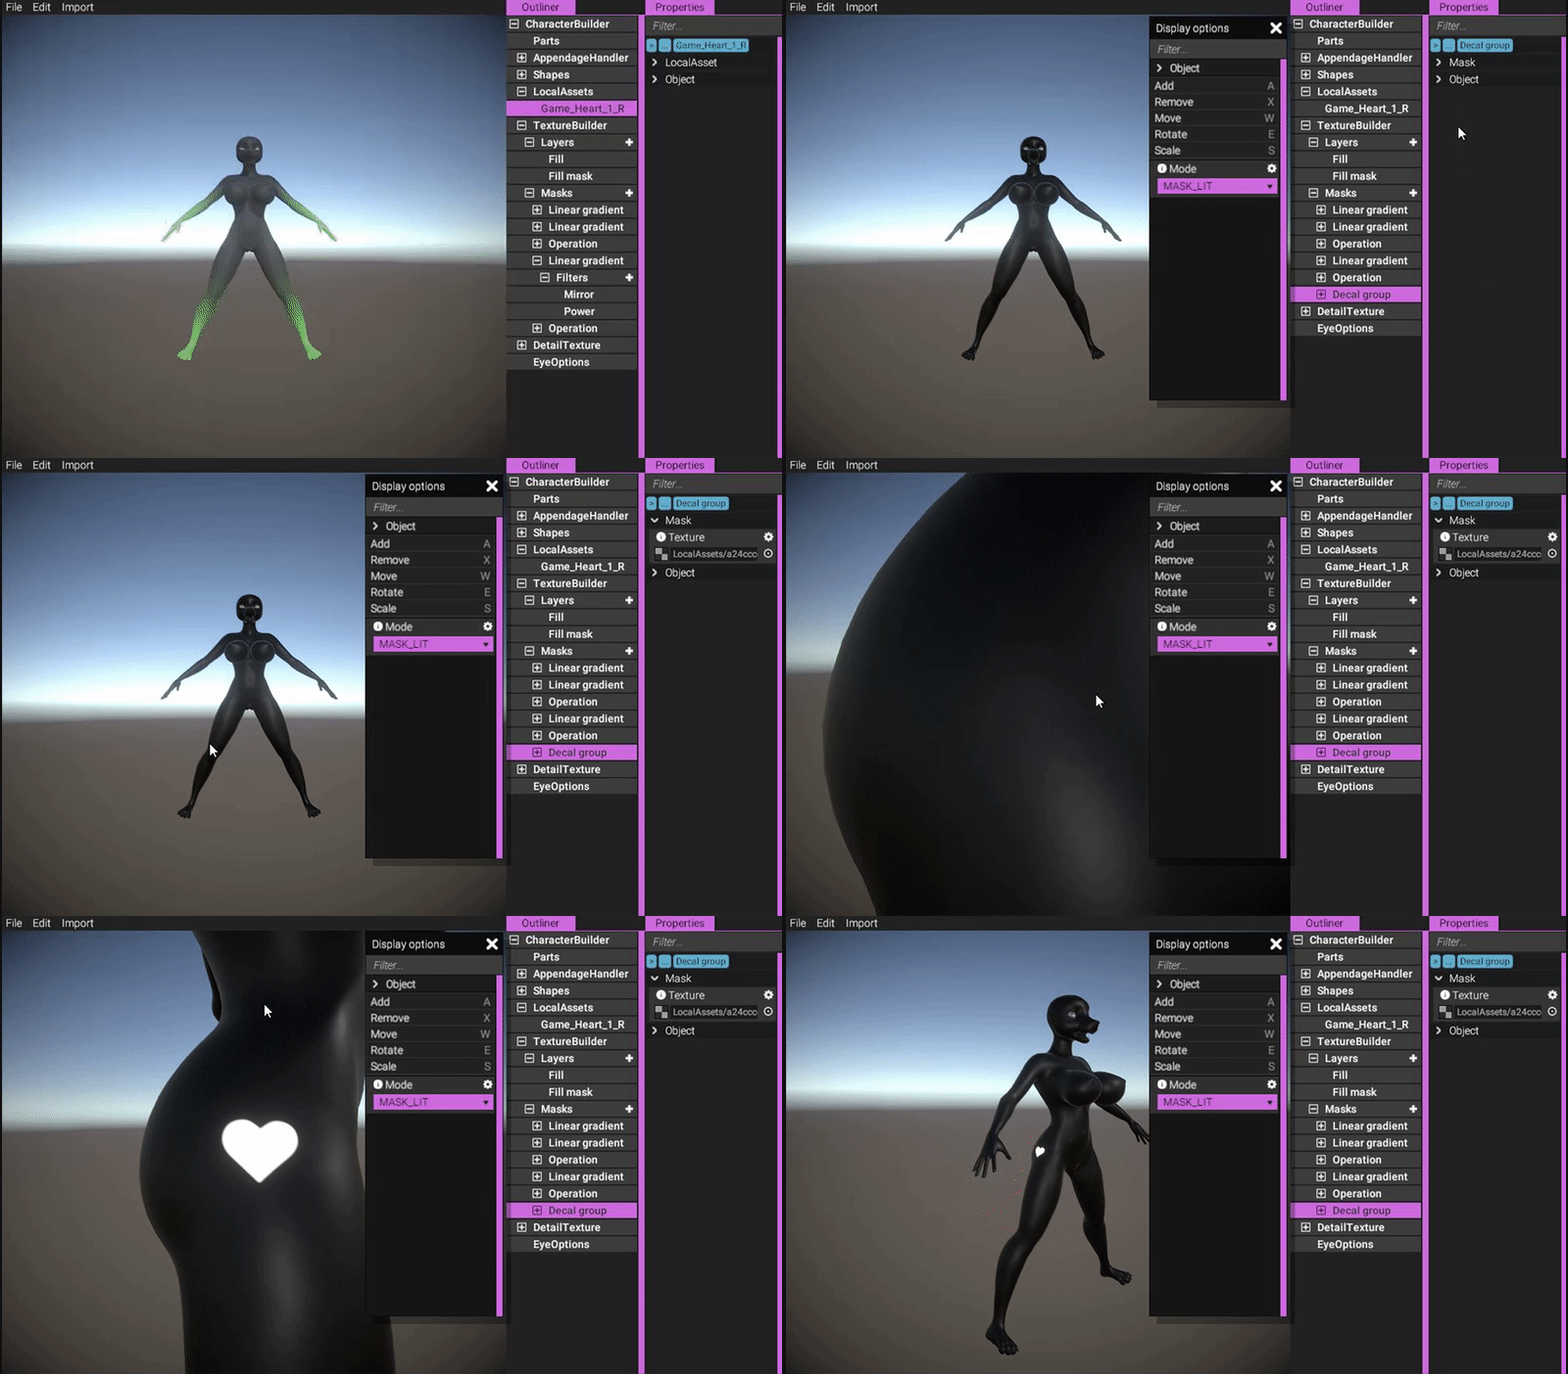
https://gyazo.com/6db7ac28ba9effae339059787cfd96a5
By using the tools, you can transform a decal after it has been added. Simply click one of the tool buttons, or access them quickly through the displayed keyboard shortcuts:
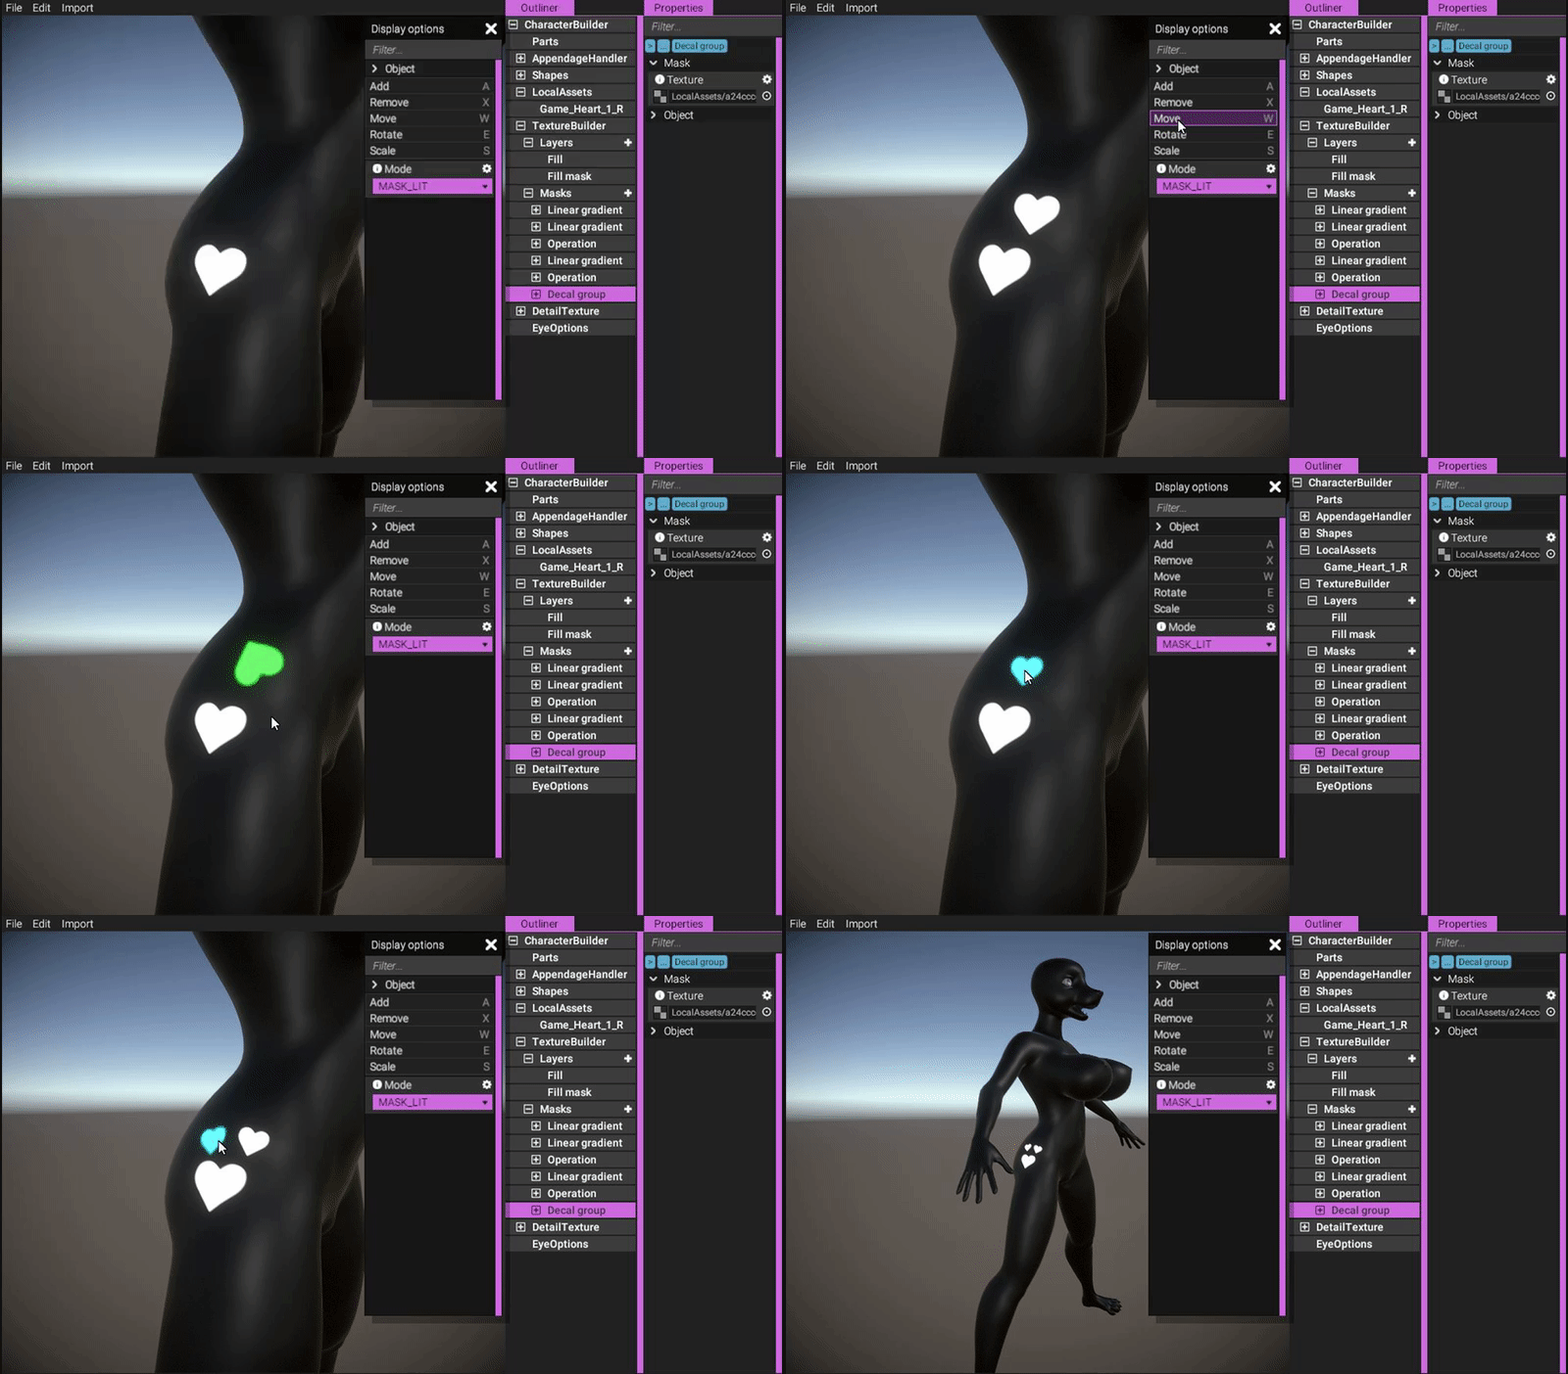
https://gyazo.com/671c936a776f126c6661157ebfde97b8
Now, let's mirror this group and add it to the rest of the masks to have it included:
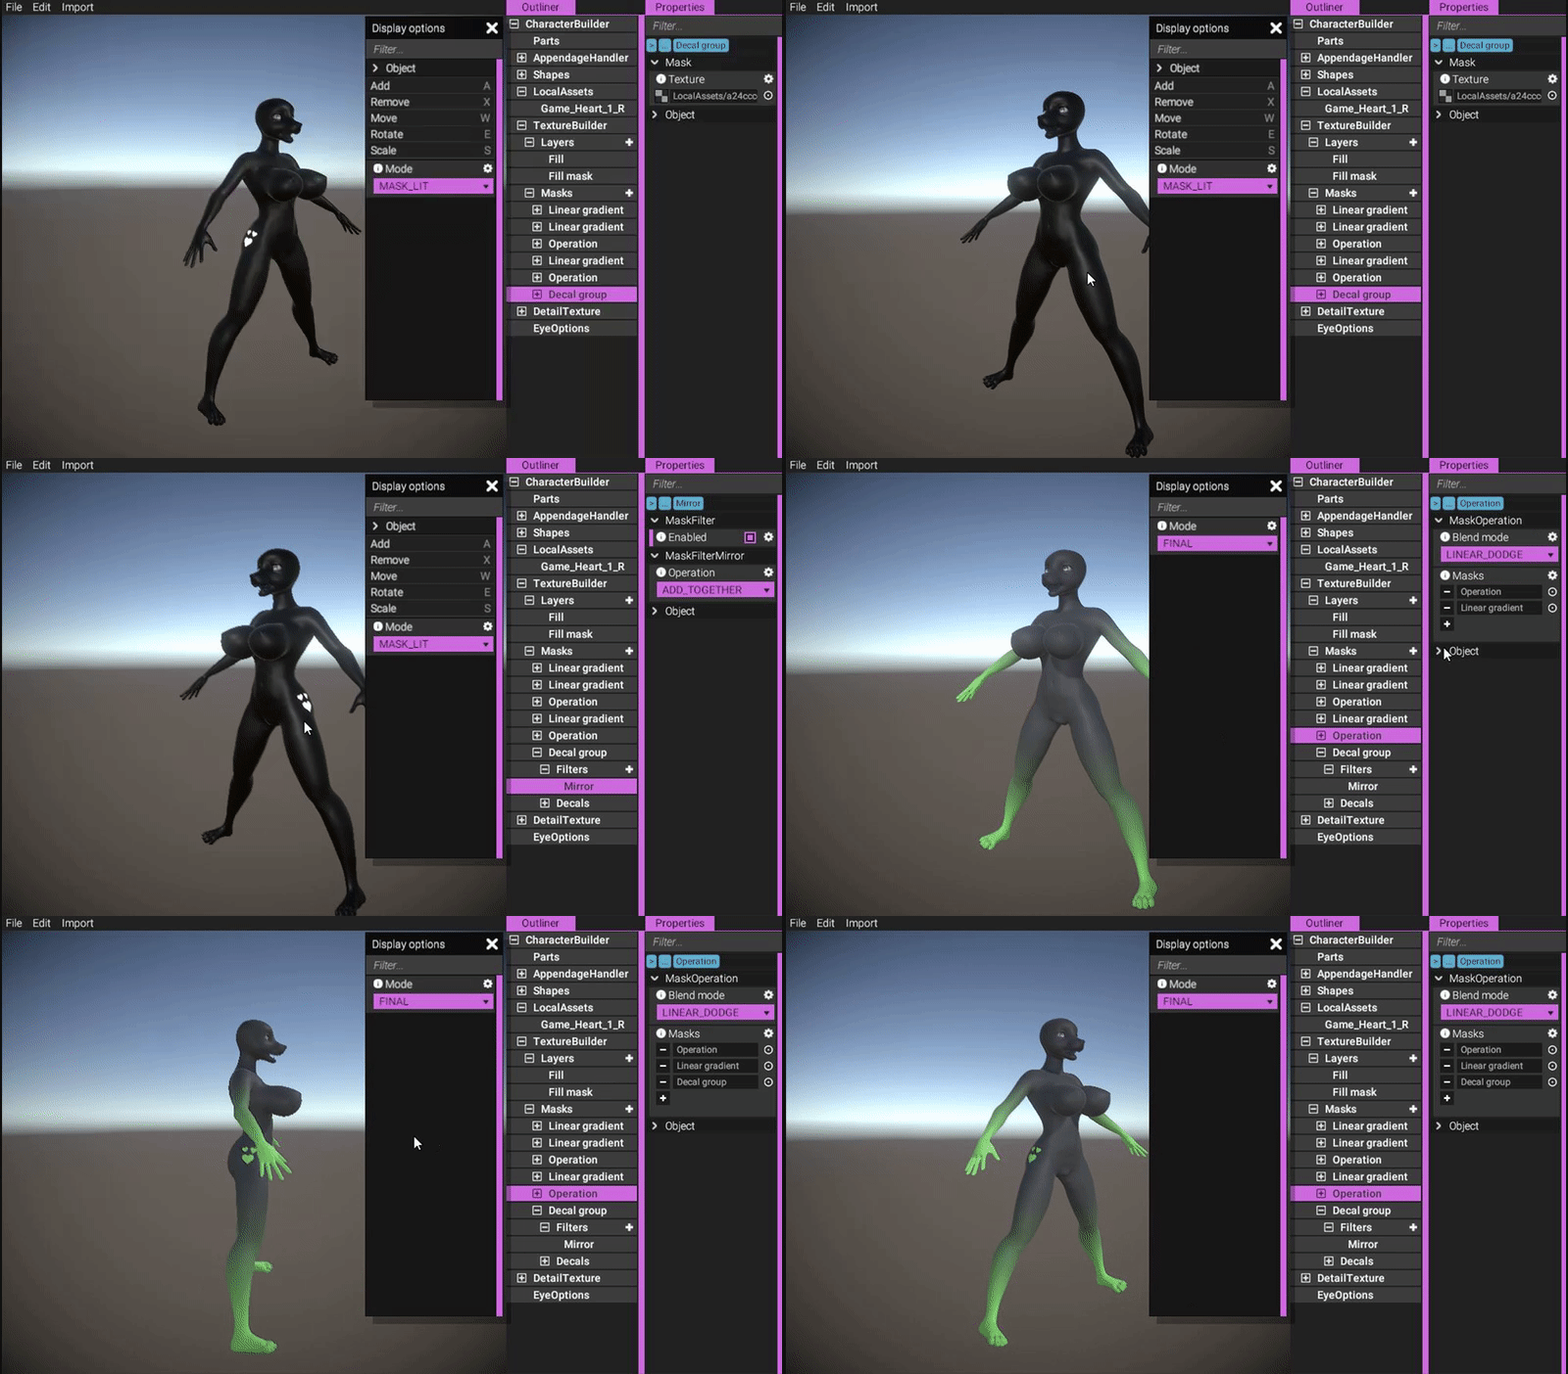
https://gyazo.com/d0d248f30d69fd6ea6c4150cfe70541c
Since we're just using masks and color references, we can easily change the colors of all items by simply altering color in the main character object:
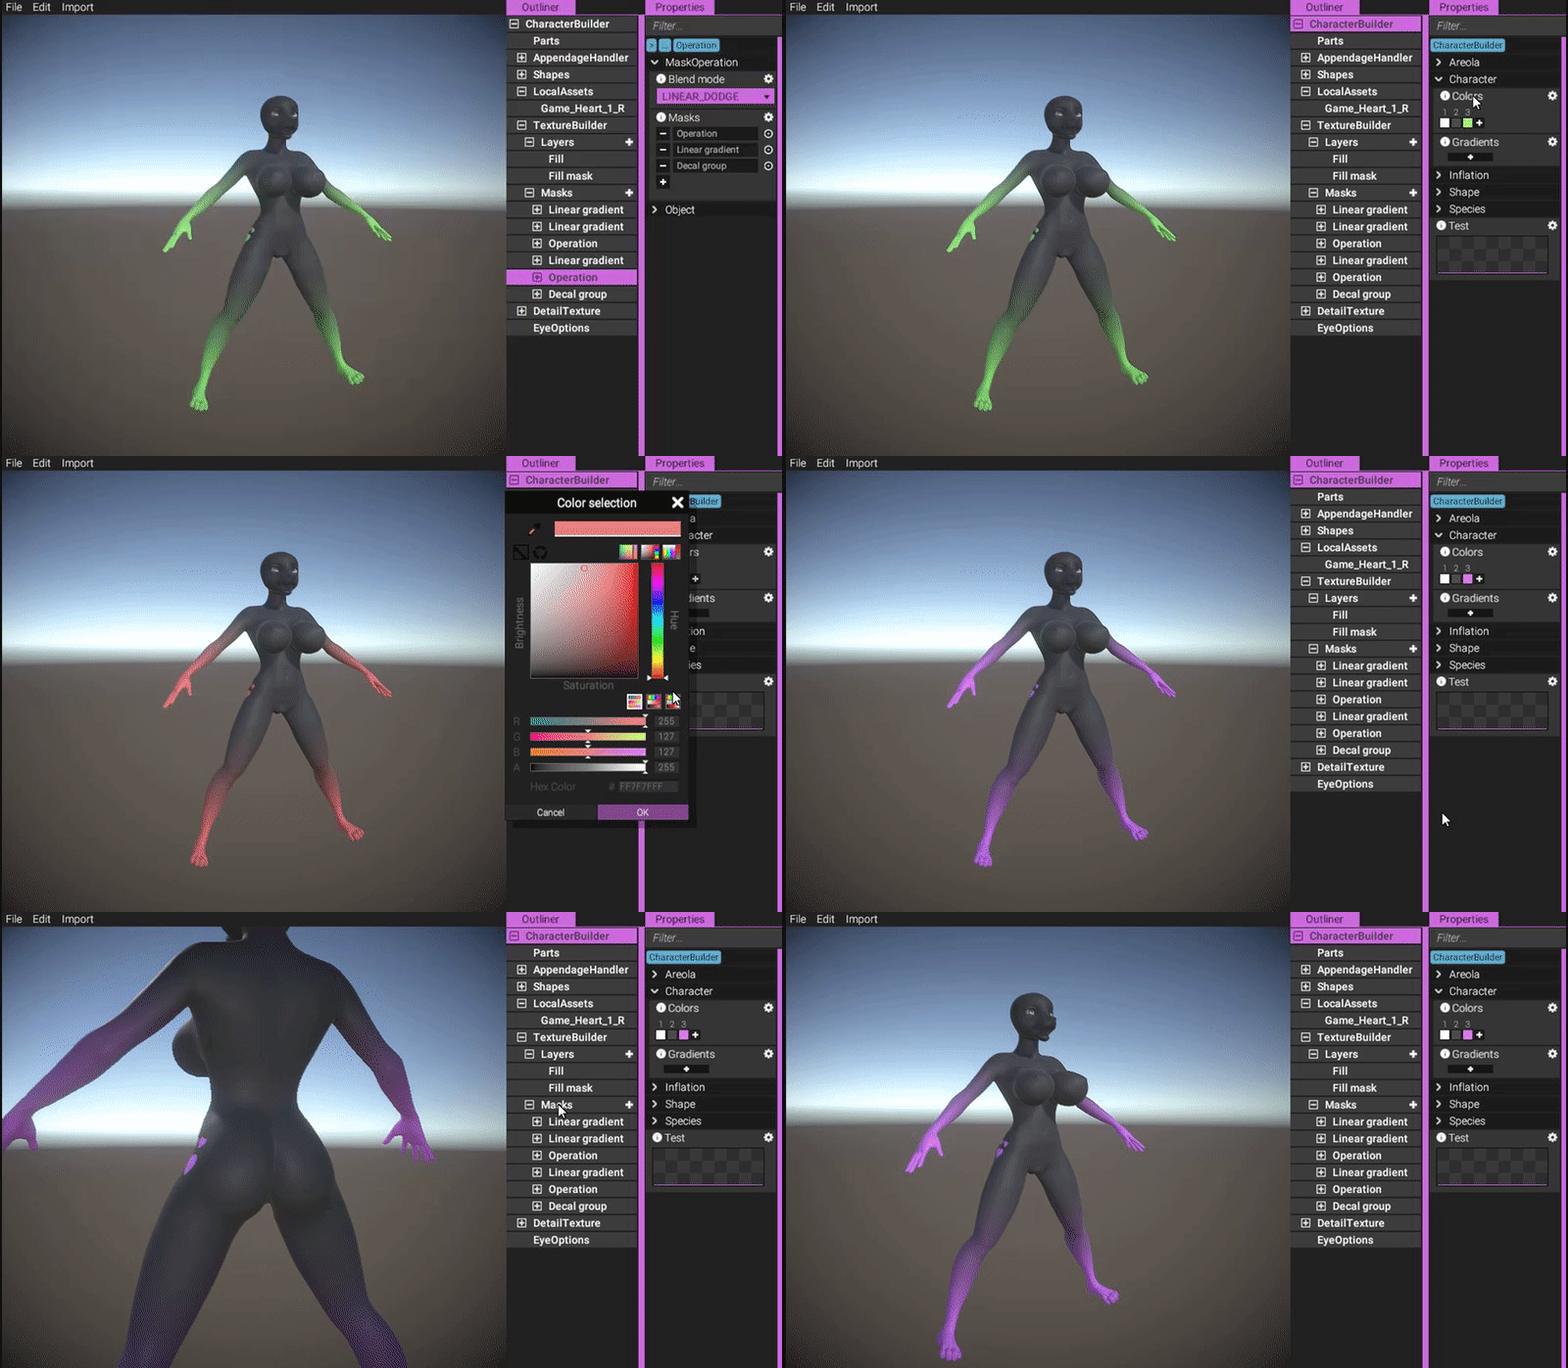
https://gyazo.com/9320b63a741e31abf3491db2ce934d22
We can of course also play around with other channel settings:
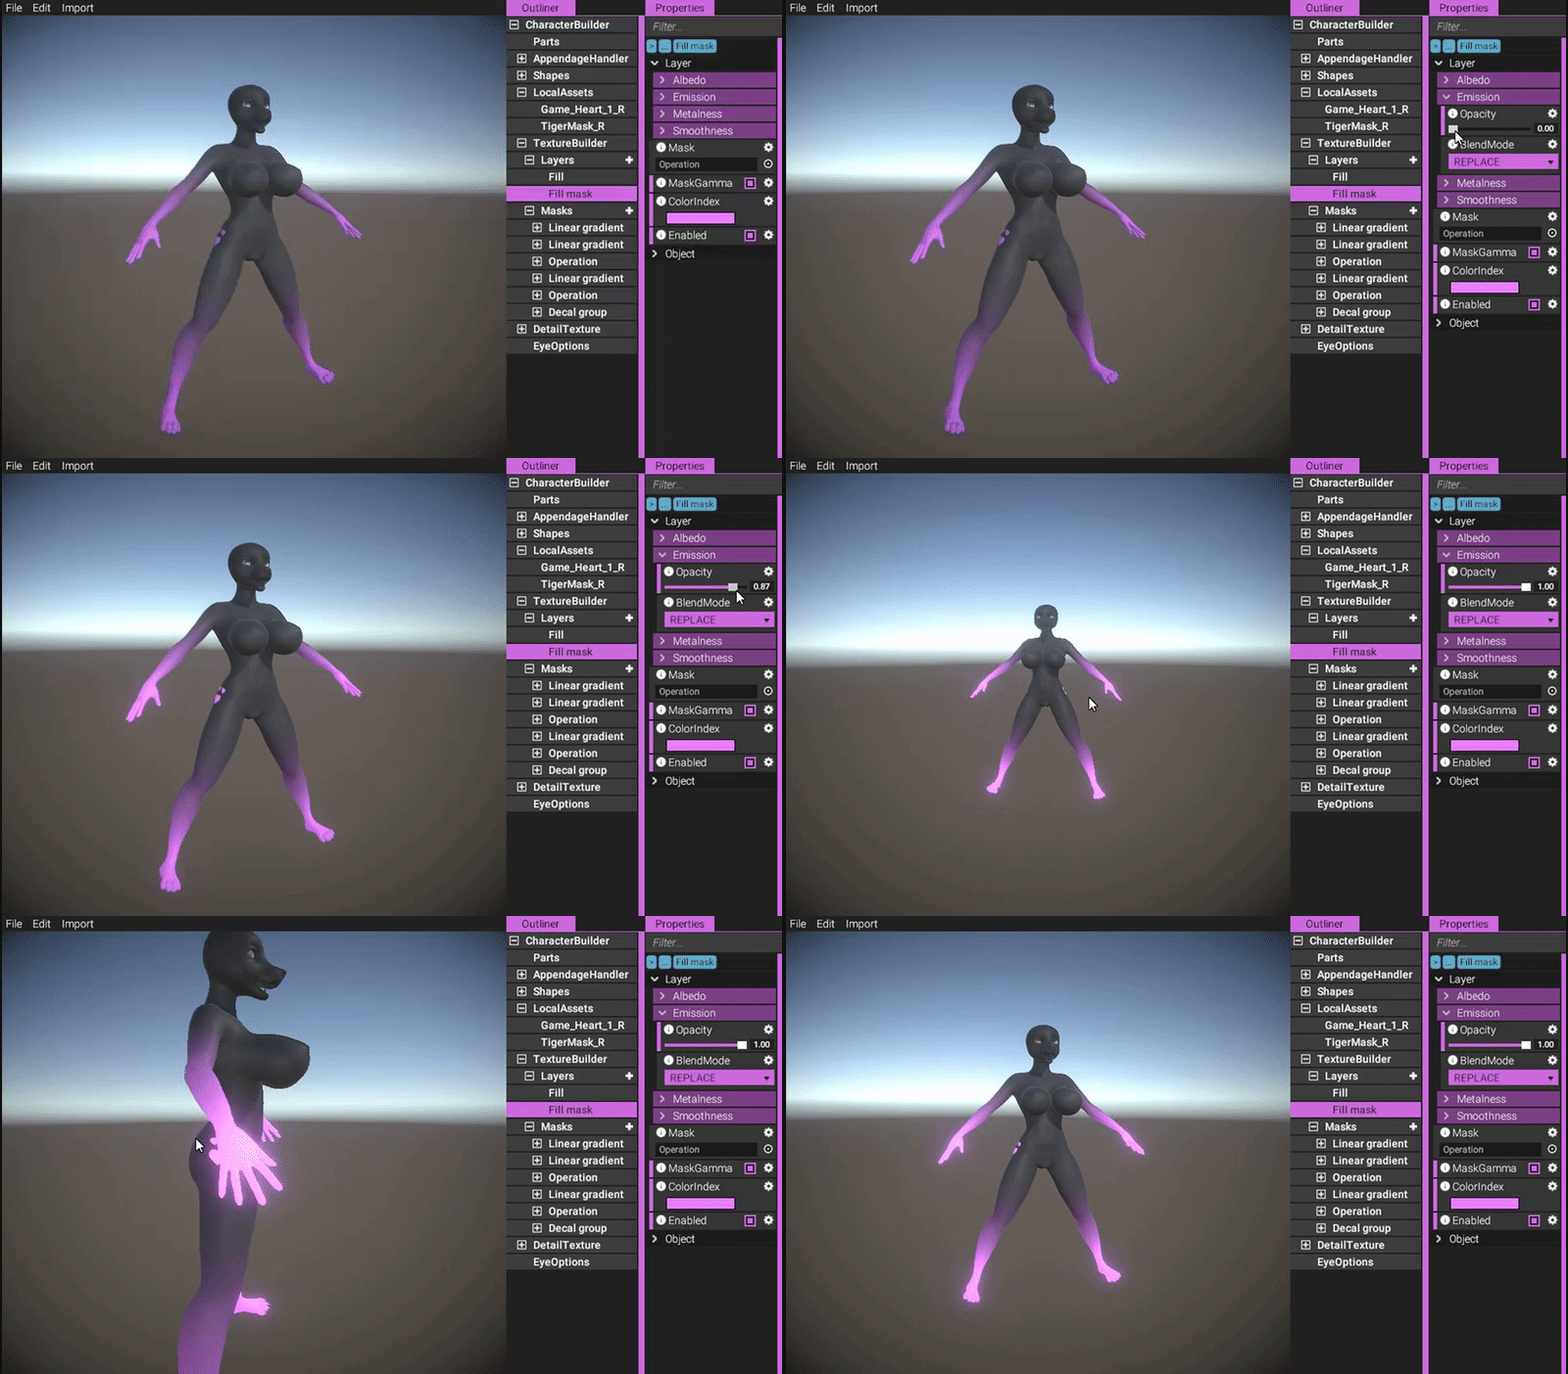
https://gyazo.com/3ac7b9d9b366286441a30a01f8bbb896
Let's check out some more layers and filters on a new color scheme.
I asked dogson to create a tiger stripe mask texture. Let's import it and see what we can do with it:
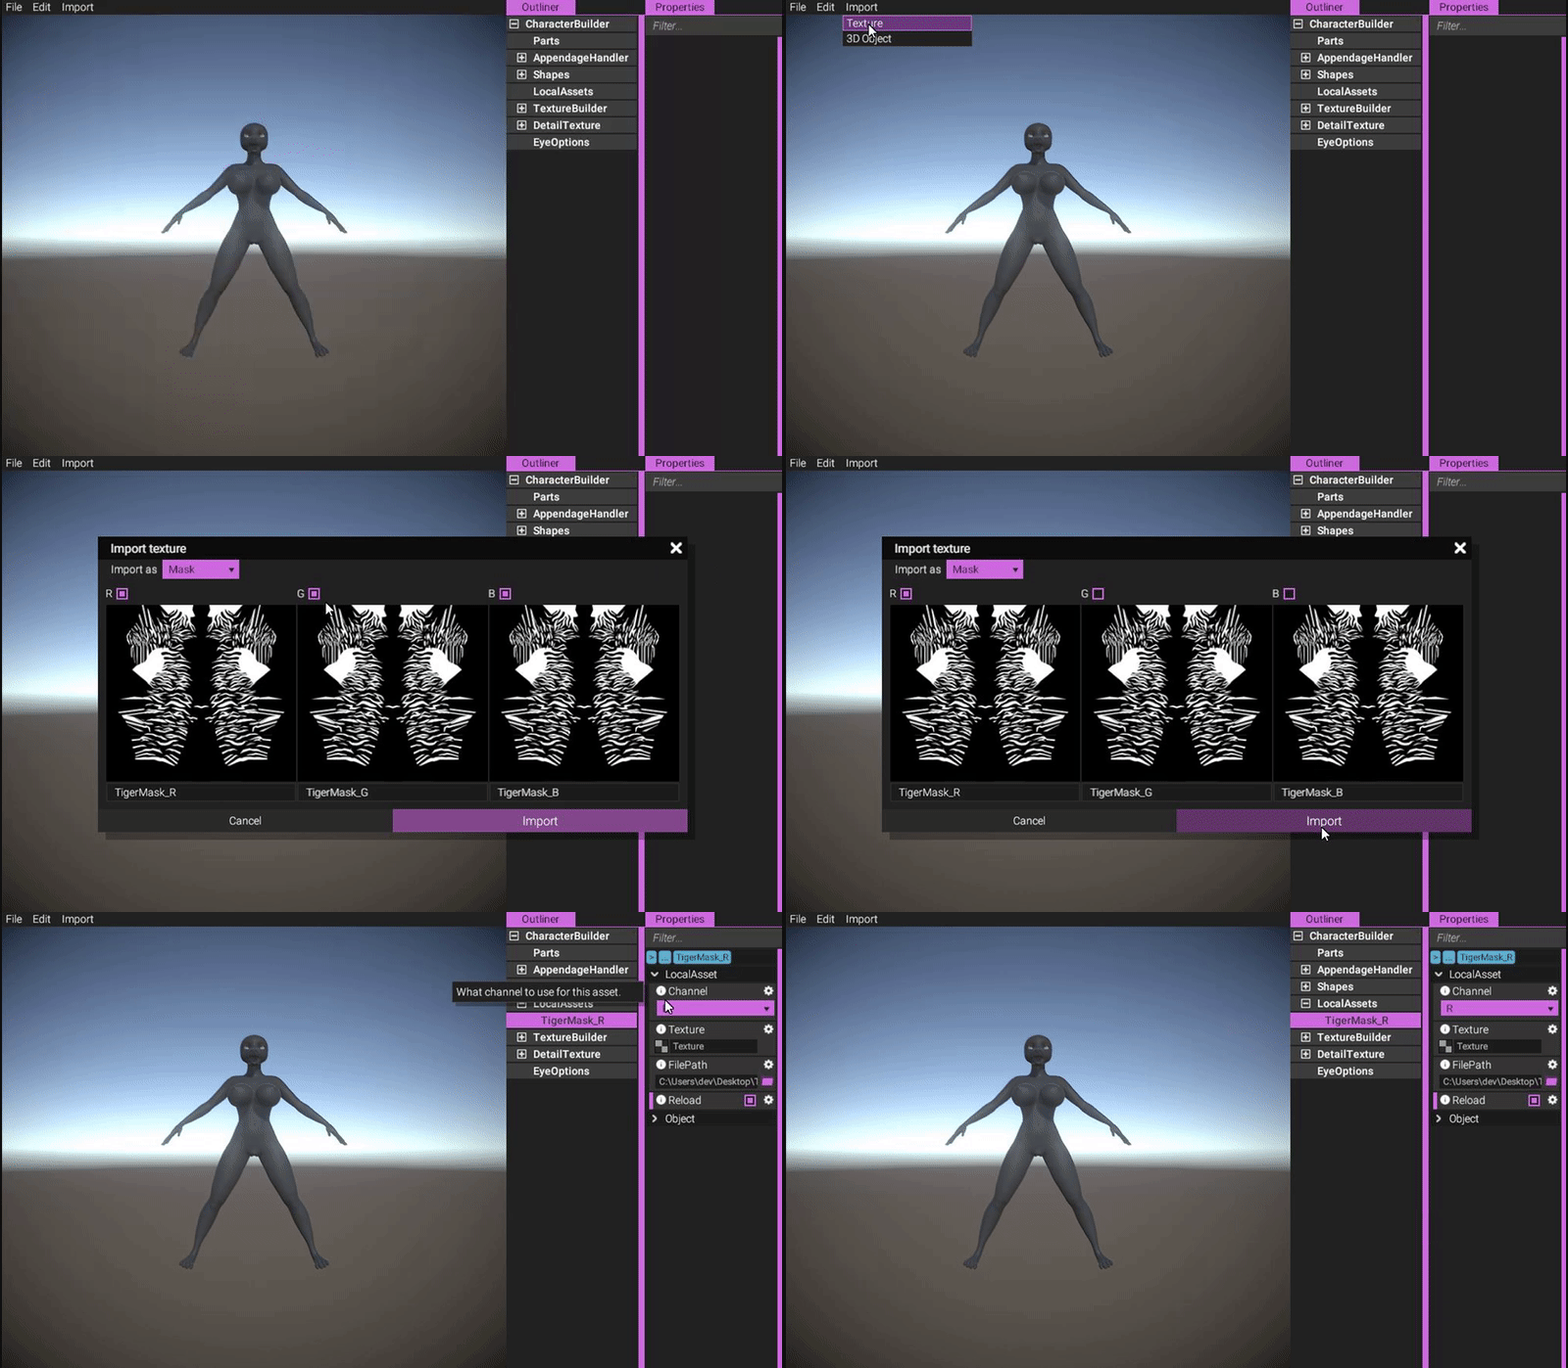
https://gyazo.com/539eae77f8ce8fea2295cbd096ab6bd5
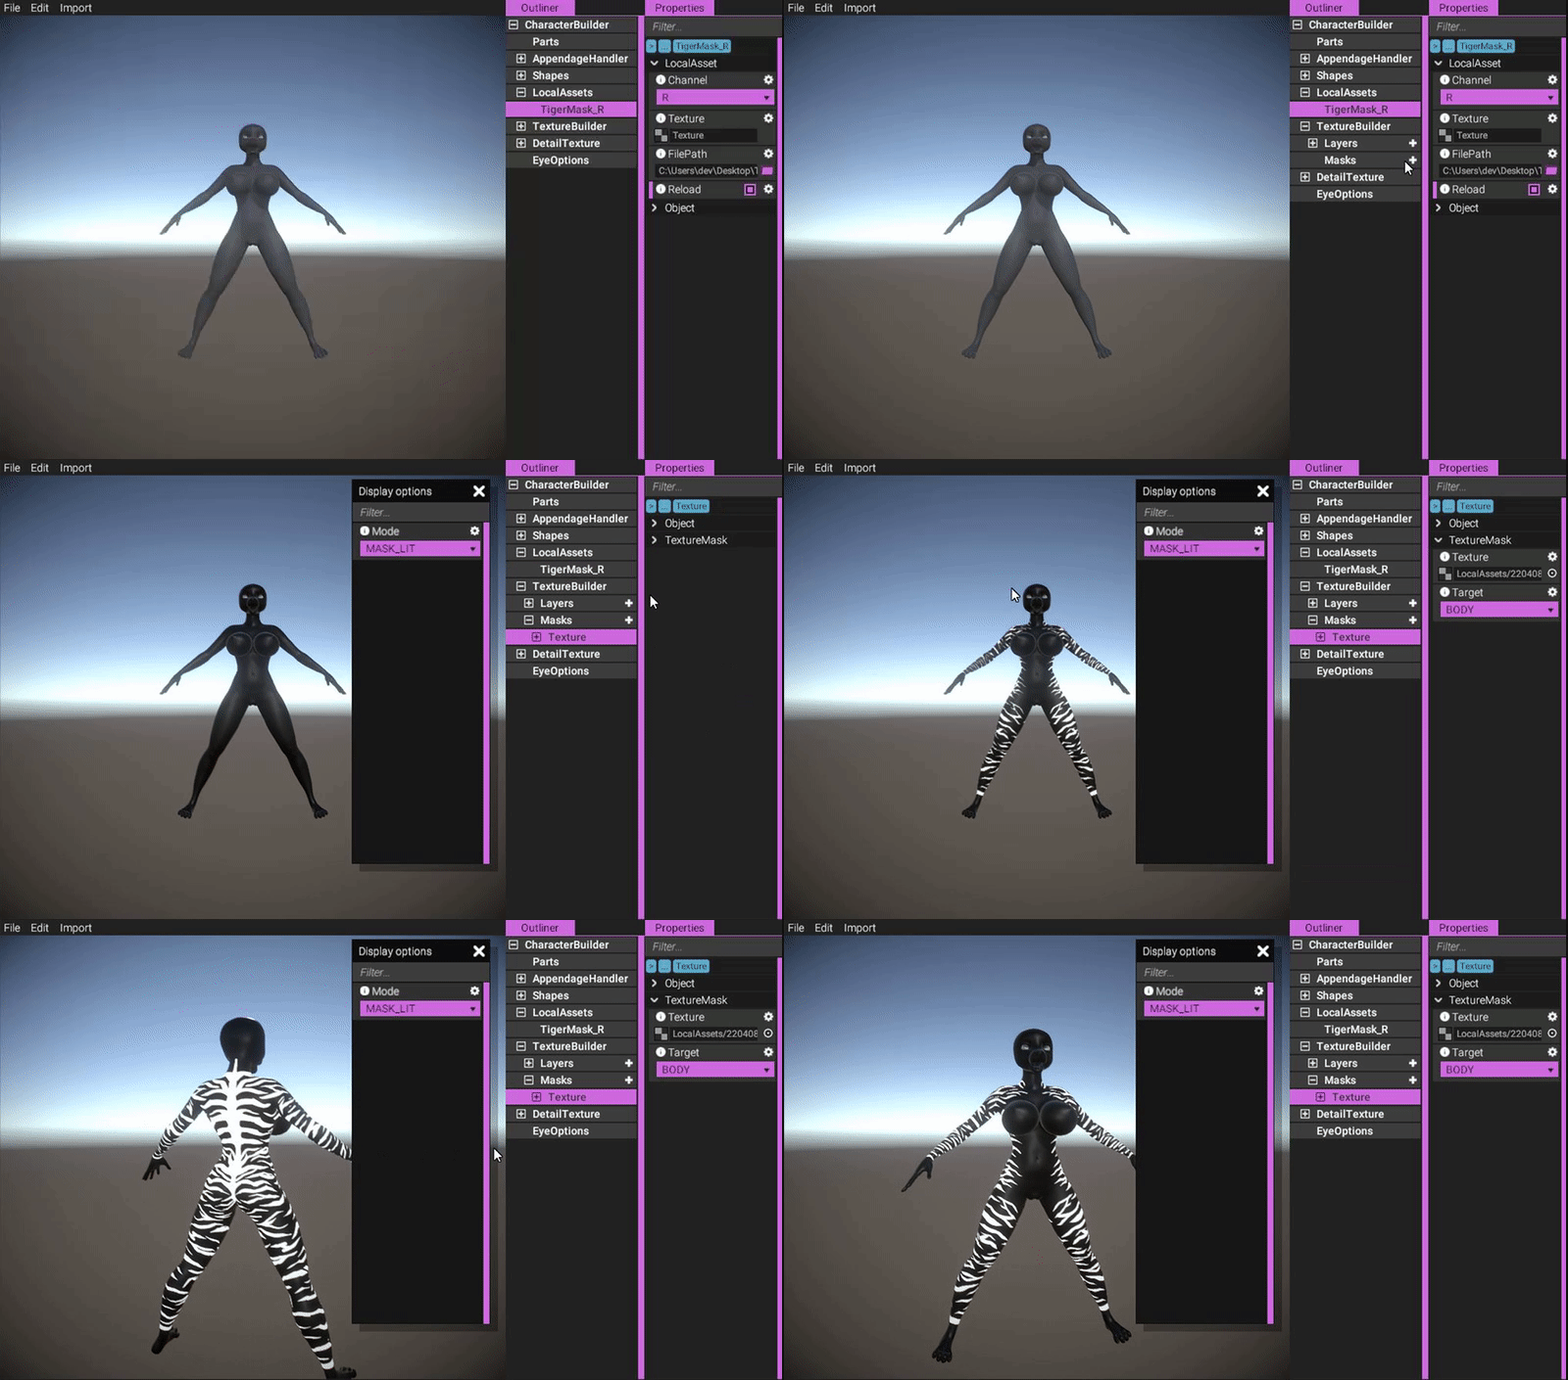
https://gyazo.com/ecce2eee00bfdb5b7b0eef88388d388e
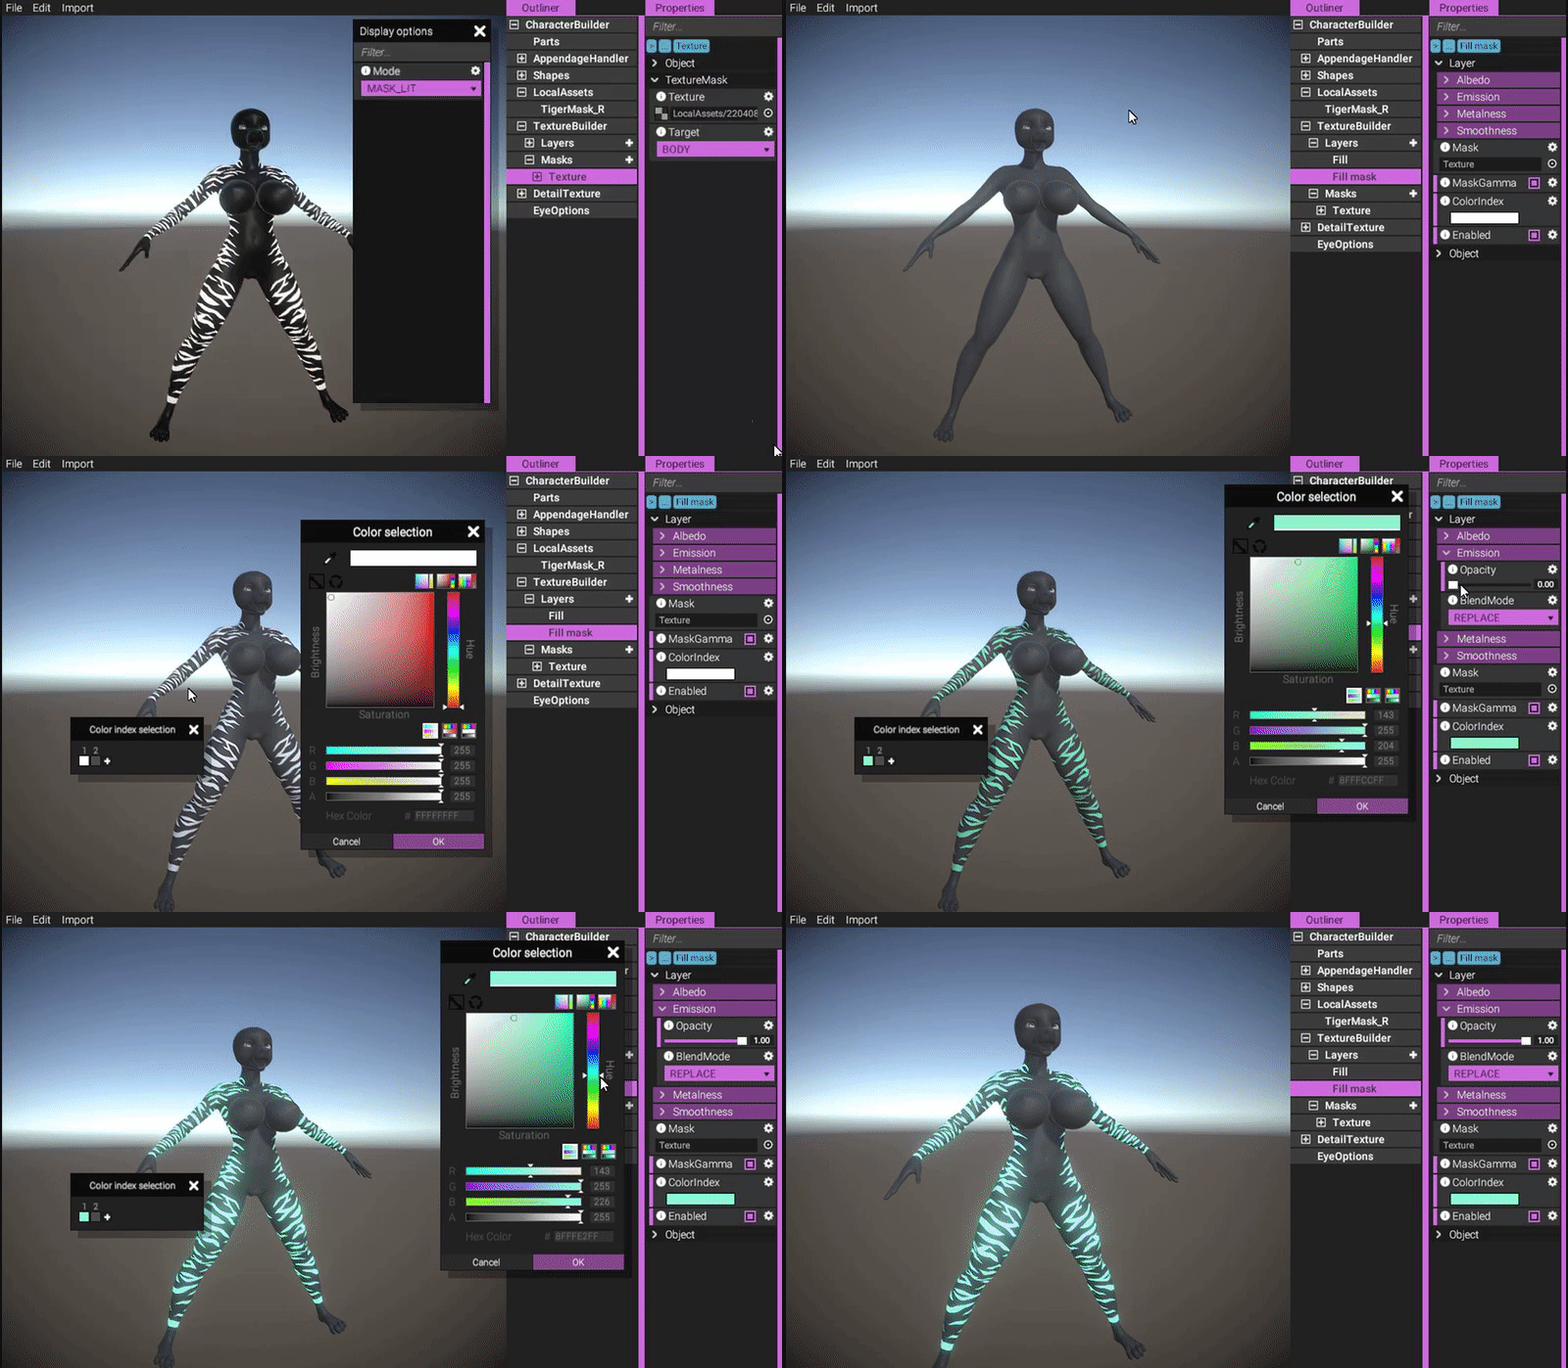
https://gyazo.com/4c2eecf49d5393200bfc0f8f34610e82
Now, let's explore another type of layer, the "gradient fill" layer. This layer requires two masks - one for the gradient and one for masking. Let's start by creating a new gradient:
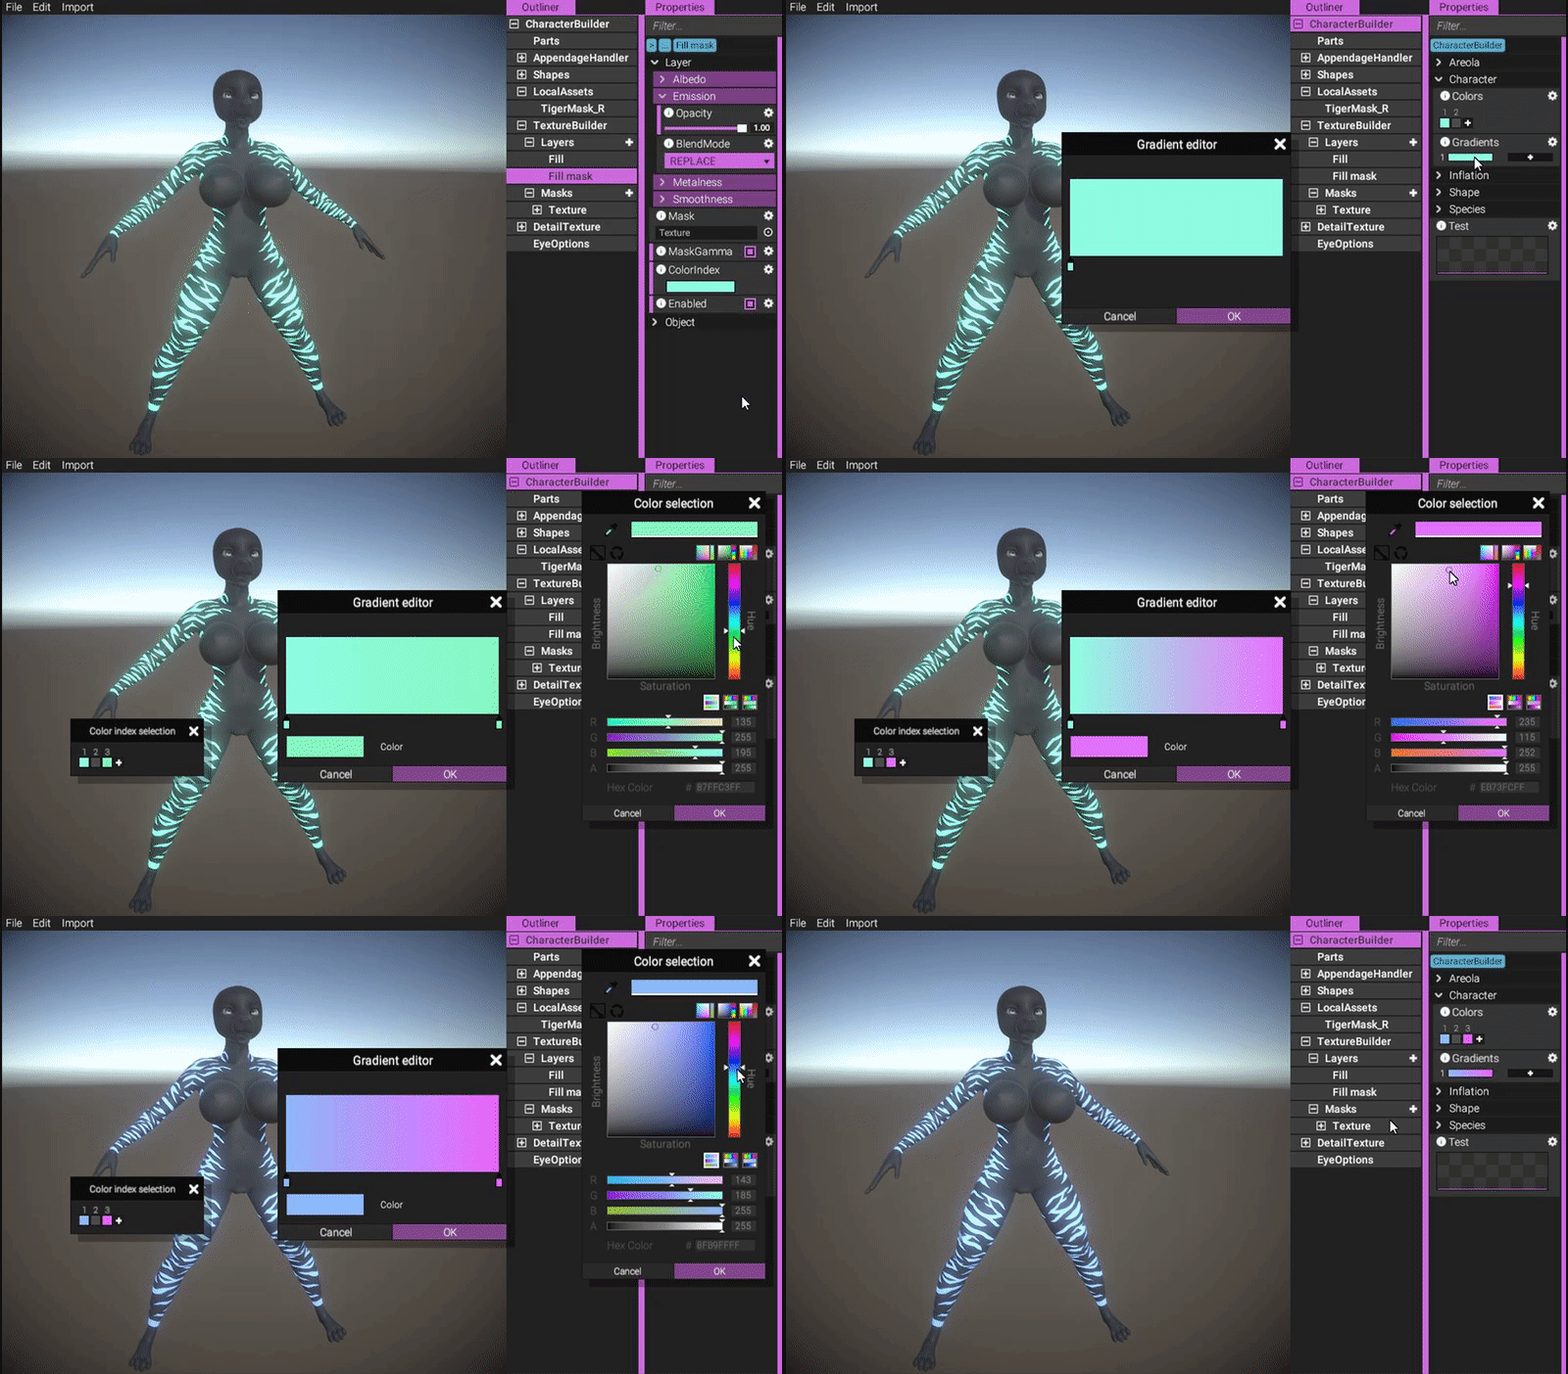
https://gyazo.com/259359d161bd5103ea0f38b7b920d286
Next, let's add a liner gradient that's going to act as the gradient mask input for the gradient fill:
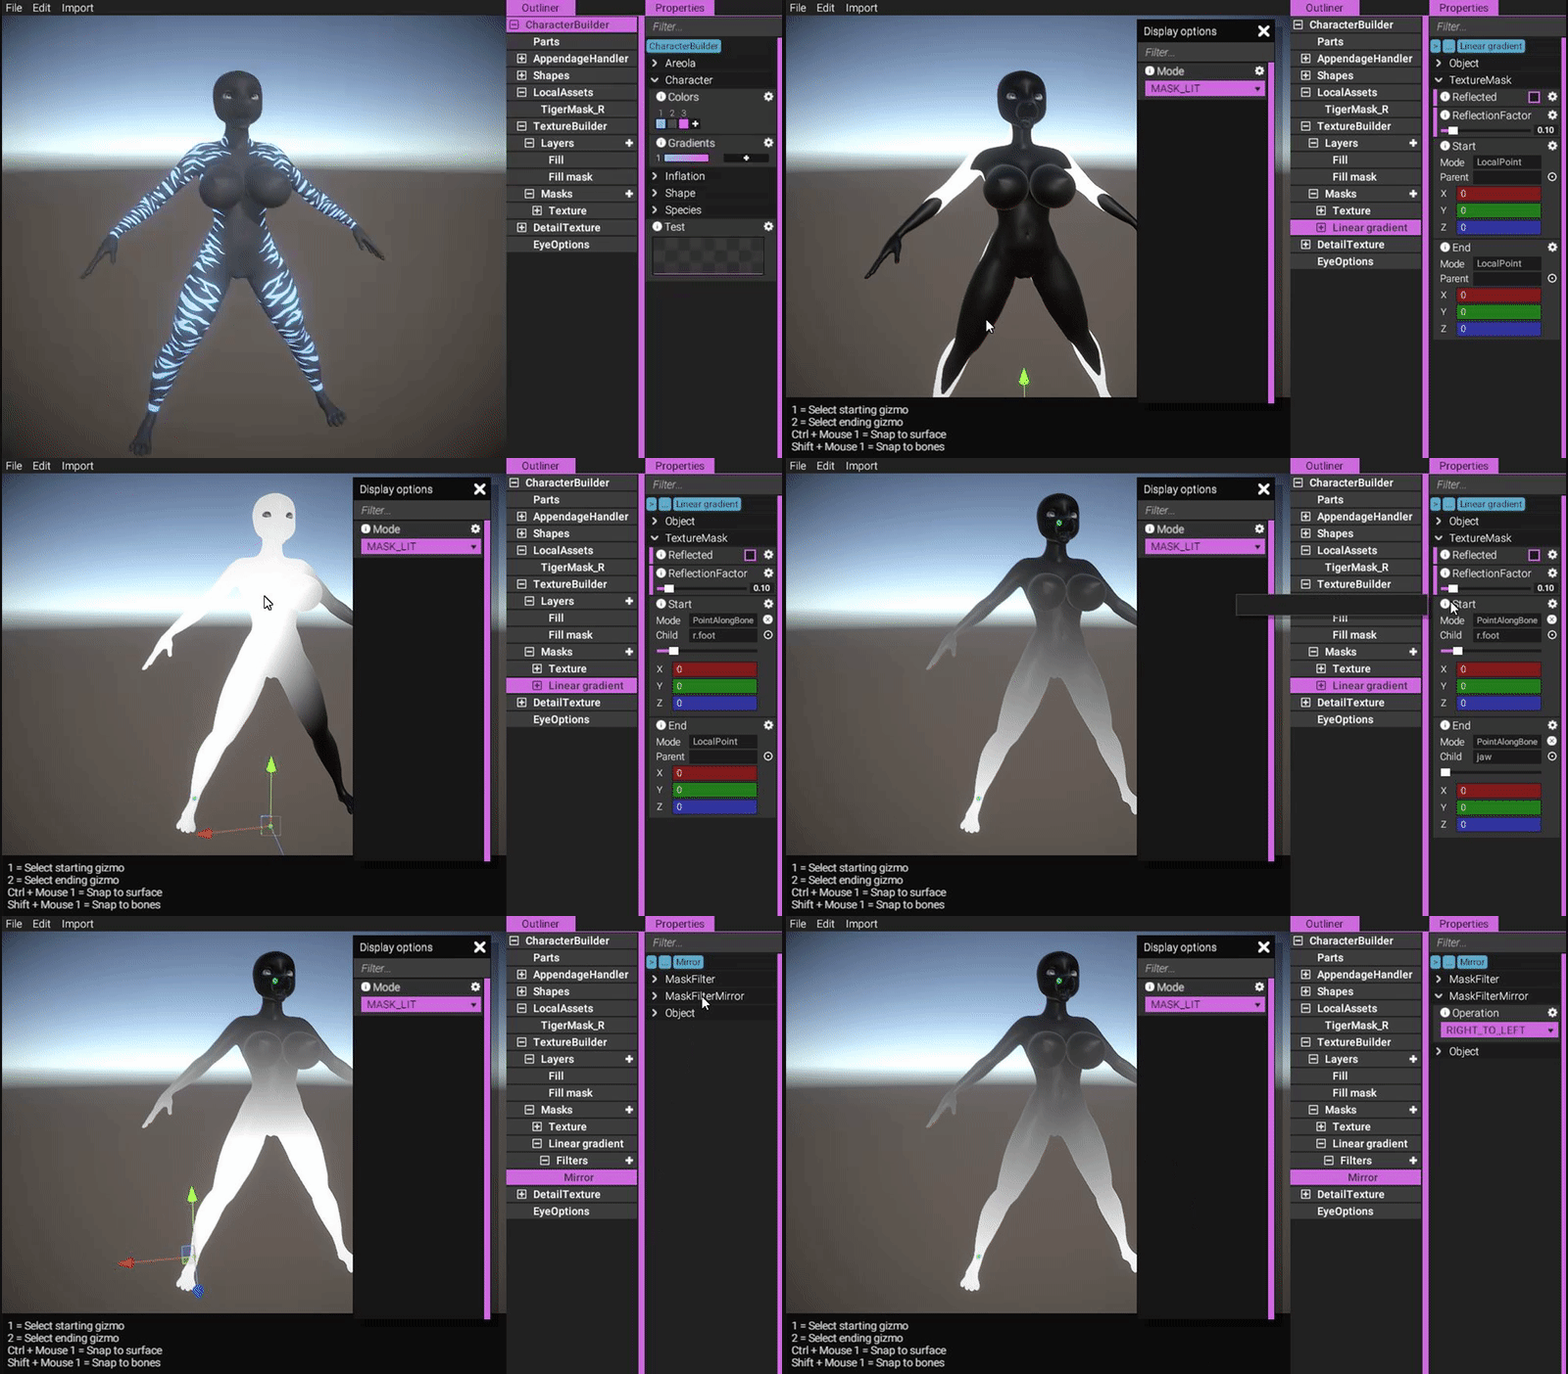
https://gyazo.com/2f03d5a554de0398966bdb8b33f38833
And finally, let's add the actual gradient layer itself!
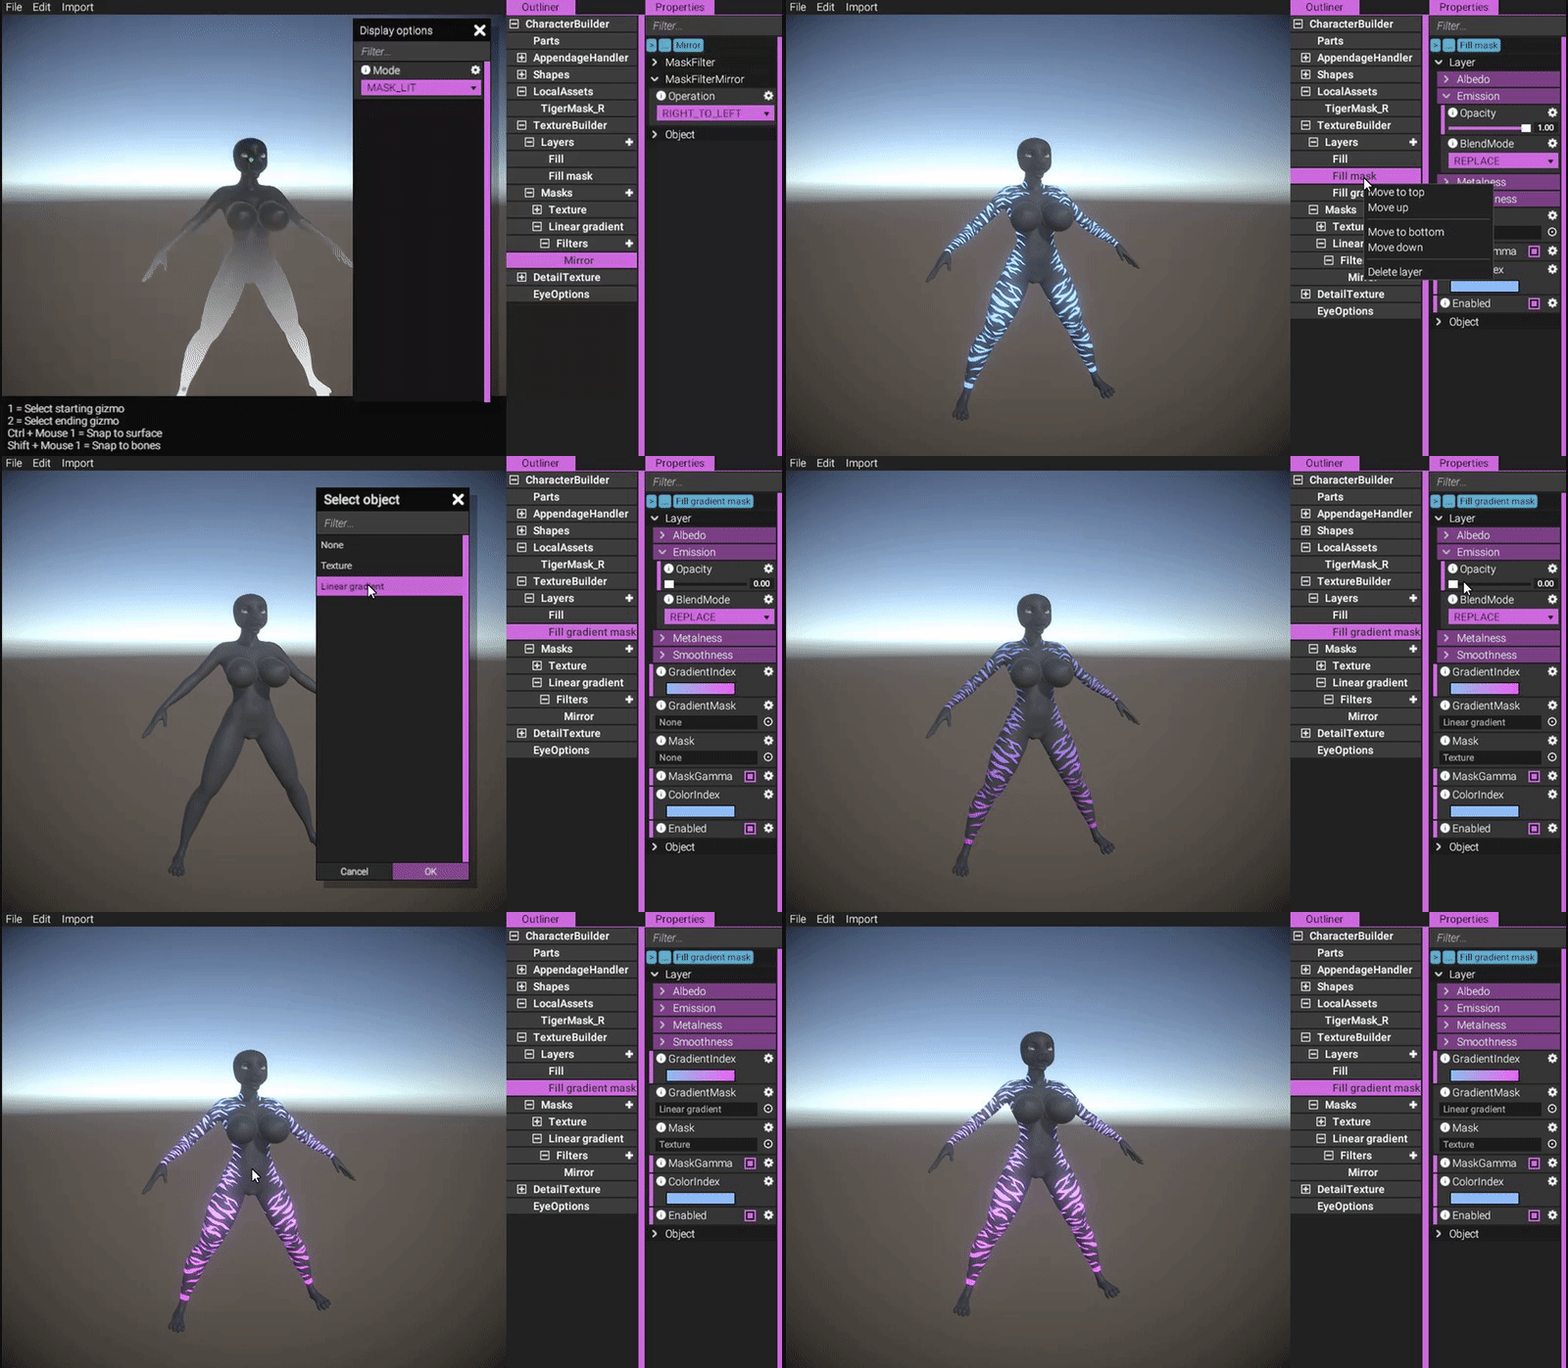
https://gyazo.com/6e51a1b4327a6a4815c238a4f7237439
The way the gradient fill layer works is by simply looking up a color value in the referenced gradient using the provided gradient mask. Black means the color to the left, and white means the color to the right, and any colors in between are interpolated.
Let's try playing around a bit more with the gradient:
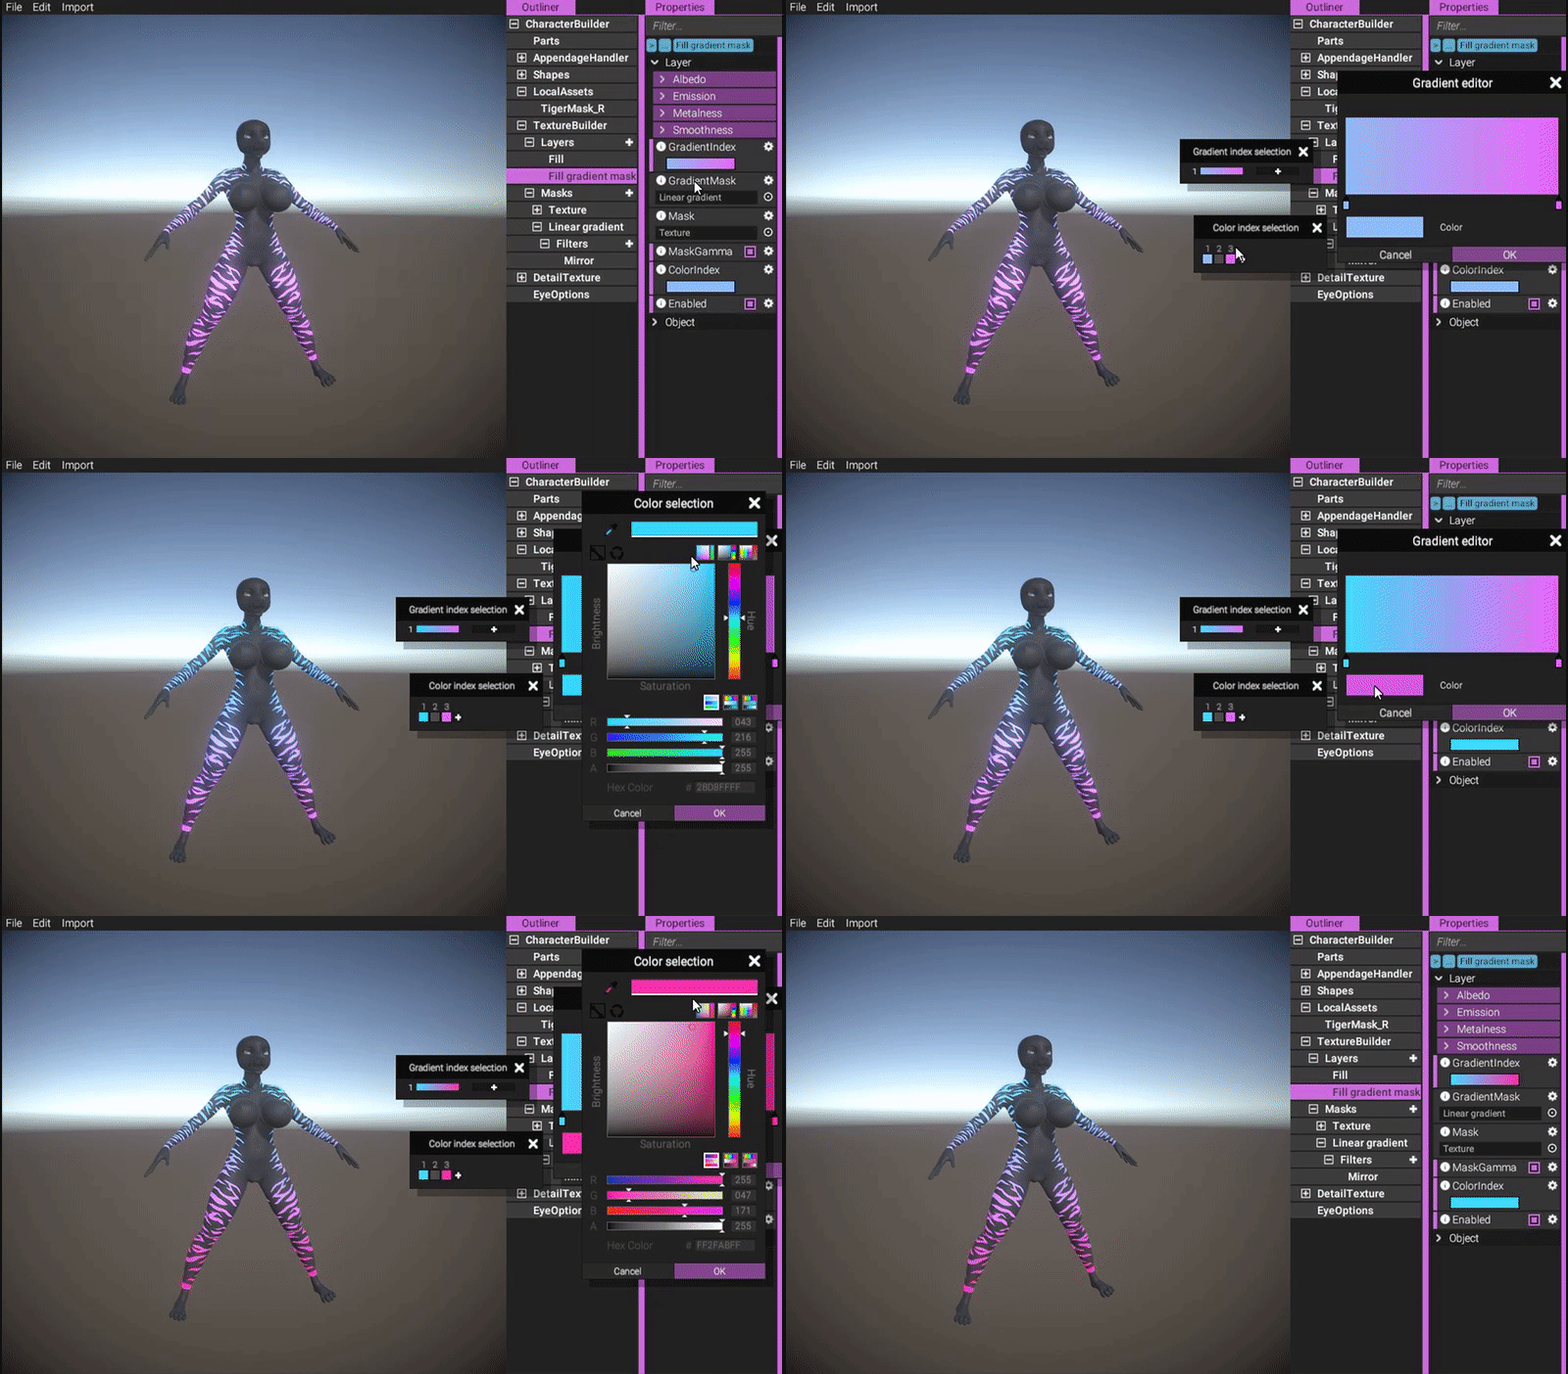
https://gyazo.com/4cc248c677c88986c93f5d0ca12a3292
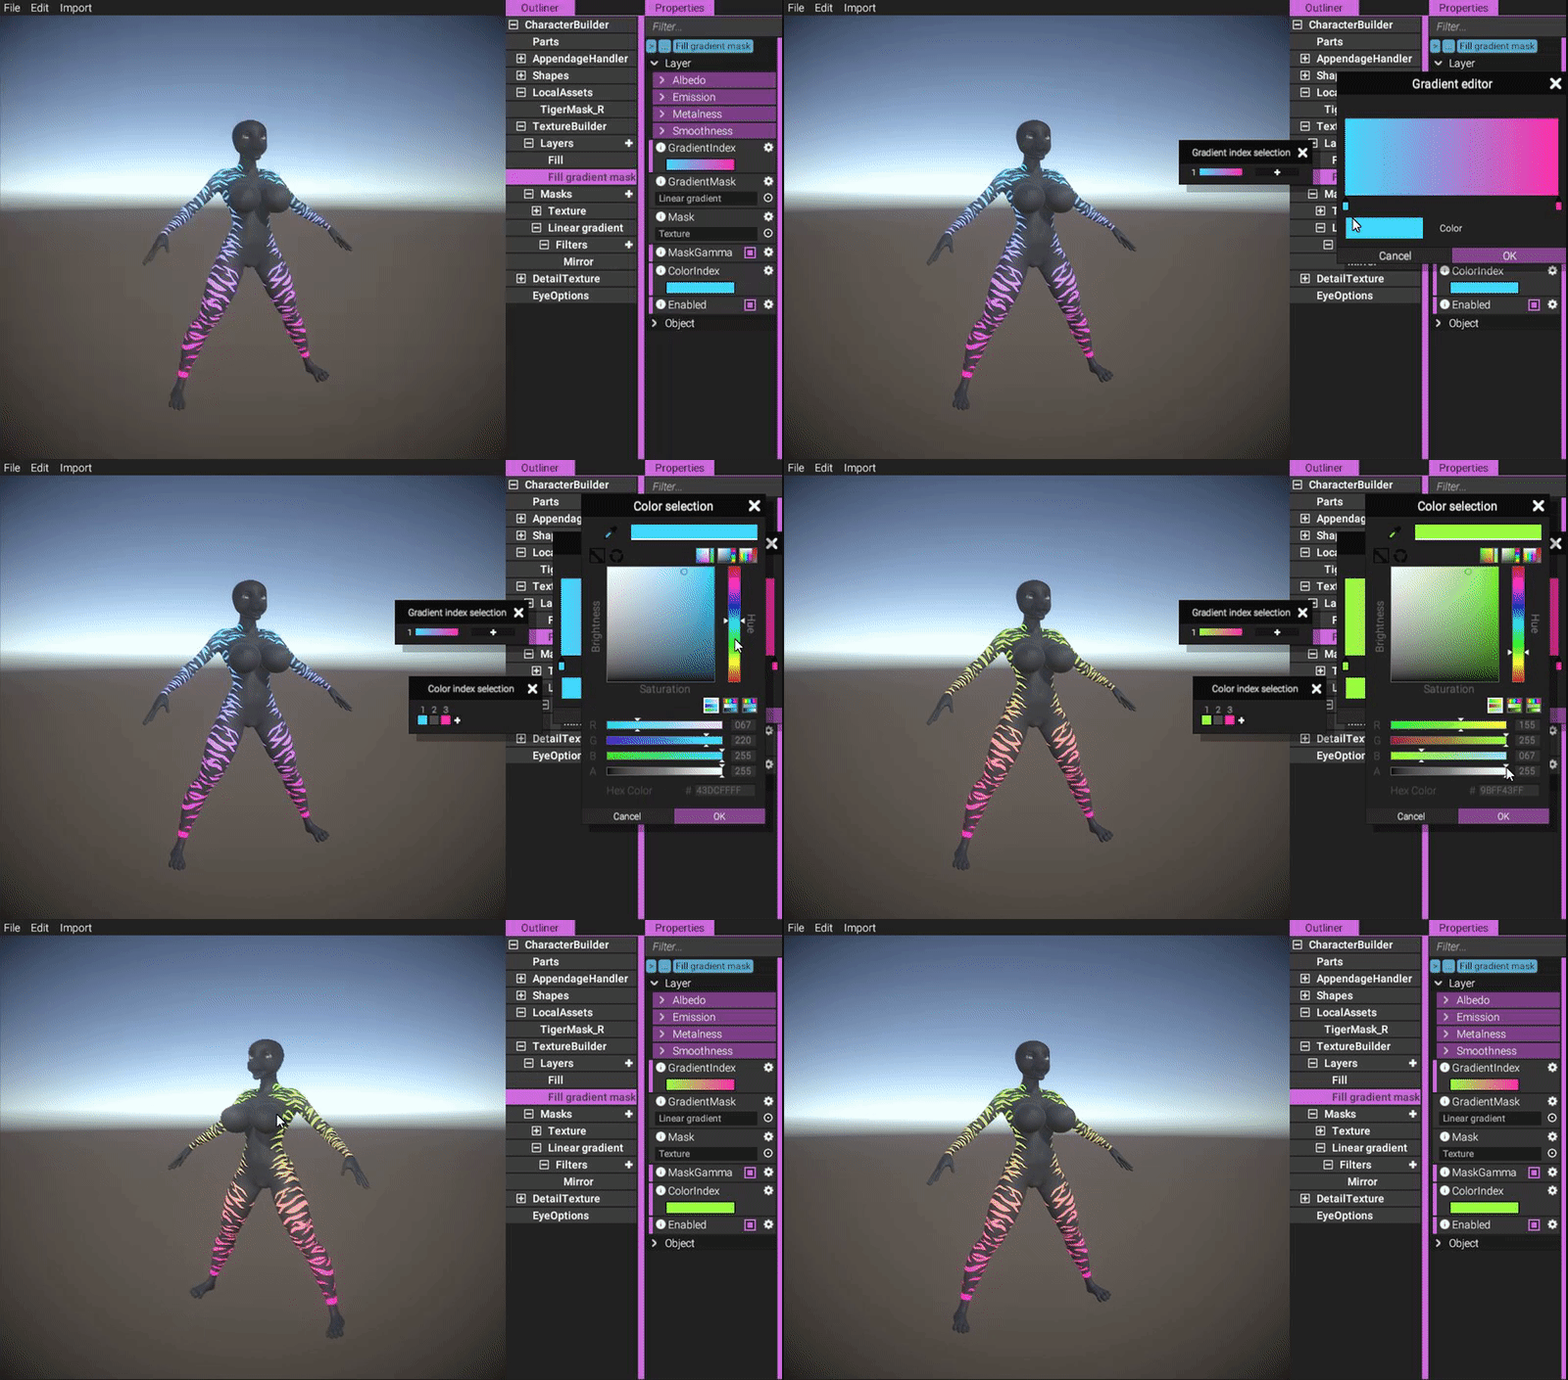
https://gyazo.com/23fbbbe370e060cbf6fc2988853cac55
Naturally, if you change anything in the stack, the textures will update automatically and immediately to reflect the changes. Here we're adding a grow-shrink filter to the texture mask:
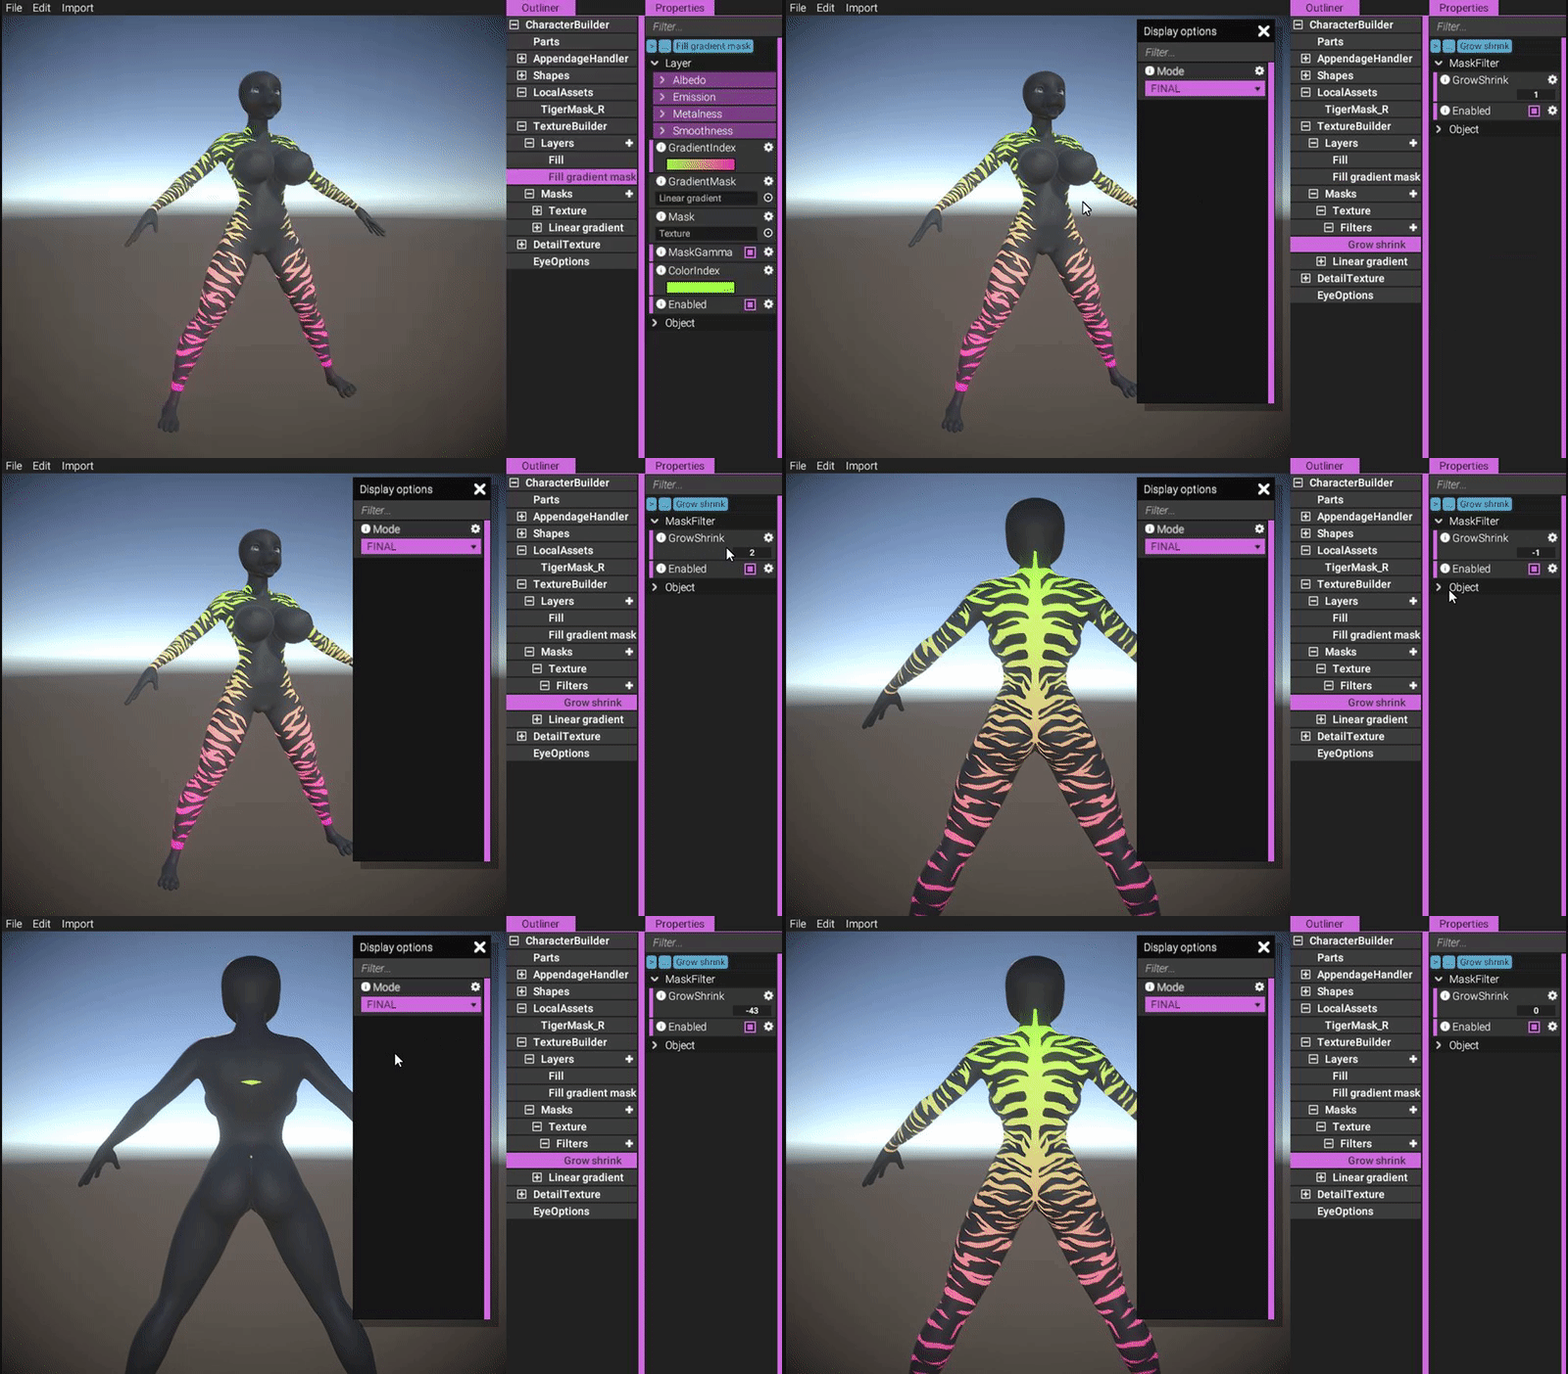
https://gyazo.com/4bd824d26b2c418db827e956e9645e7a
This goes for any layer and stack. So if we for example change the texture mask into a decal group instead, it would work the same way!
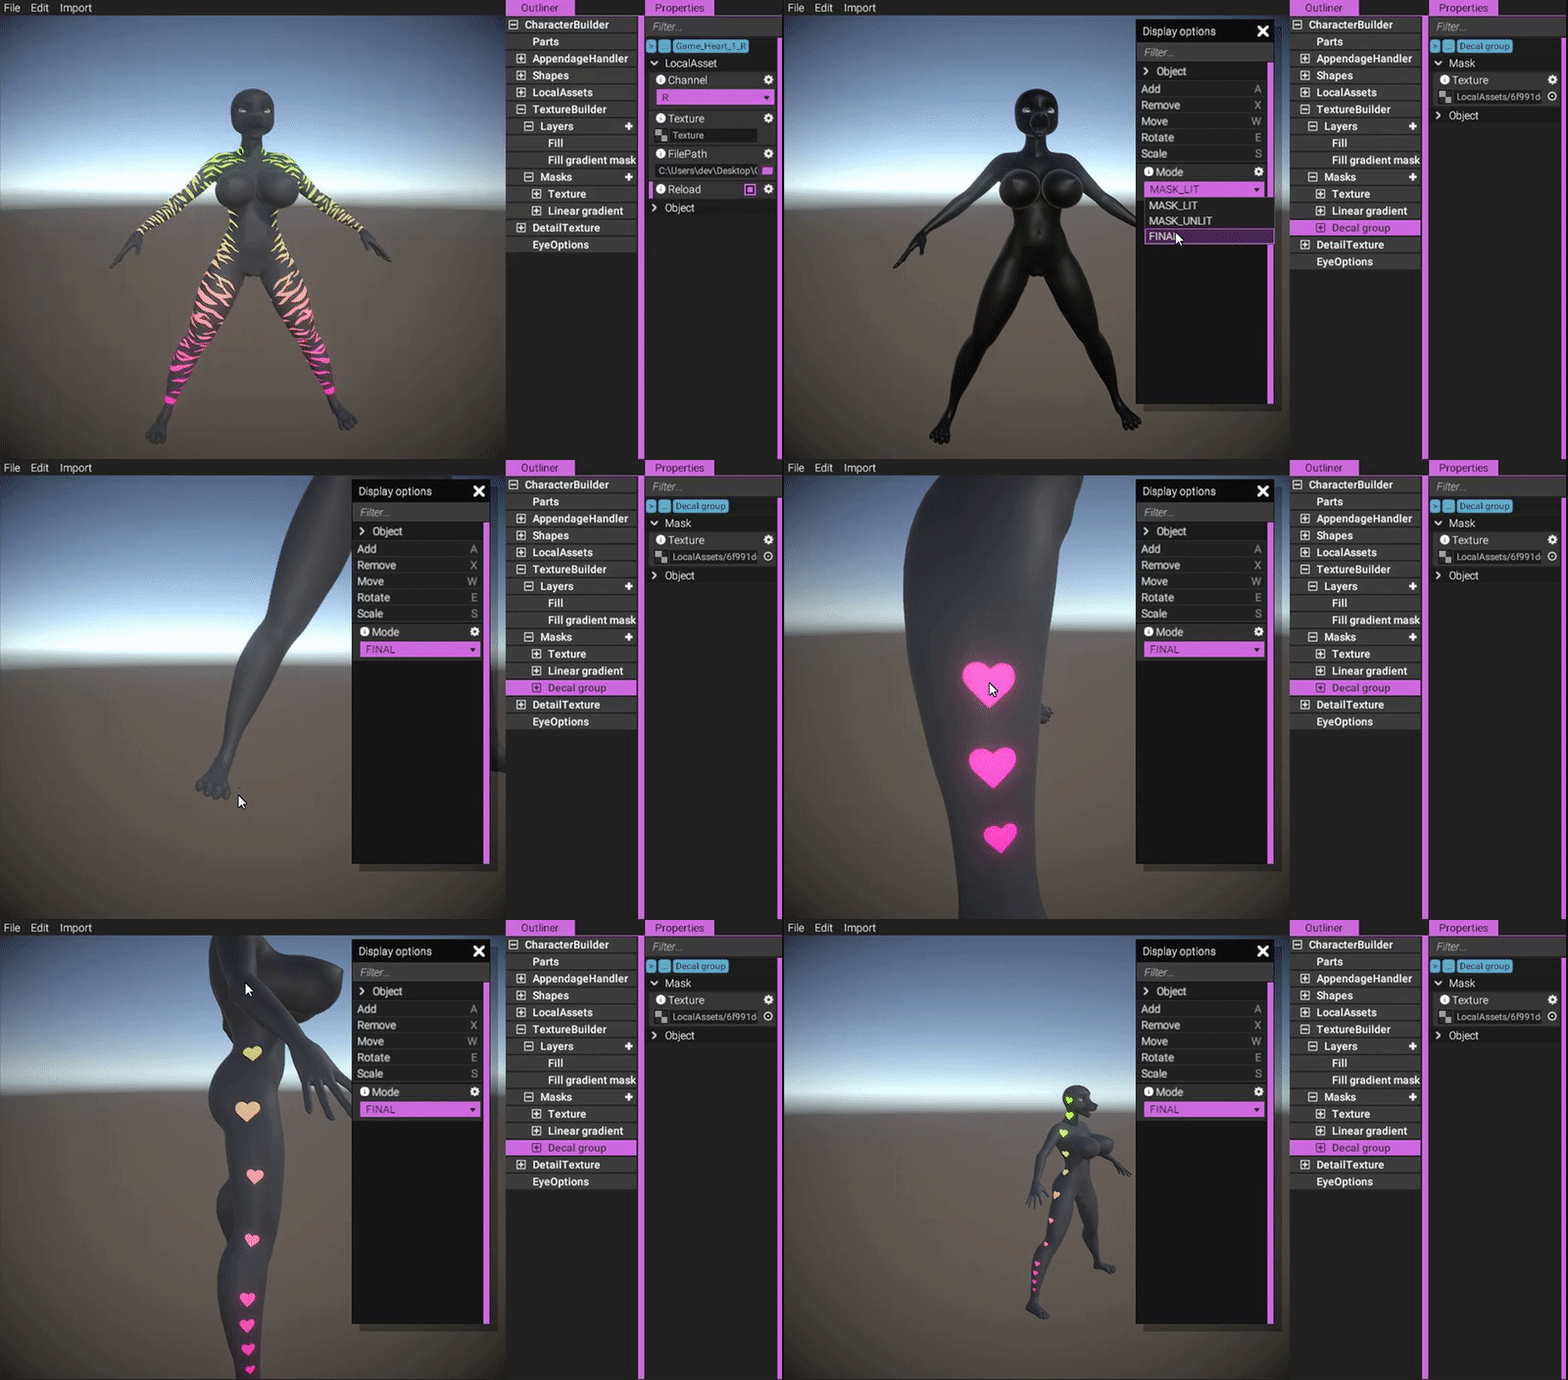
(Silly decal example.)
https://gyazo.com/296cf09ea65ce66662a4cb4de7fa0c44
Having seen this demonstration, I'm sure you have your own ideas of how to use these layers and masks!
The texture building system marks a major milestone in our development. Since everything has been implemented in a modular and extensible fashion, we can easily keep on adding more types of layers, masks and filters with time!
Dogson stuff
Here's a few words from Dogson:
Hello, this is Dogson, the character modeller. After the announcement of our new separate anus mesh in combination with our seamless tech we realized we had to change the topology for the area of the anus for better deformation.
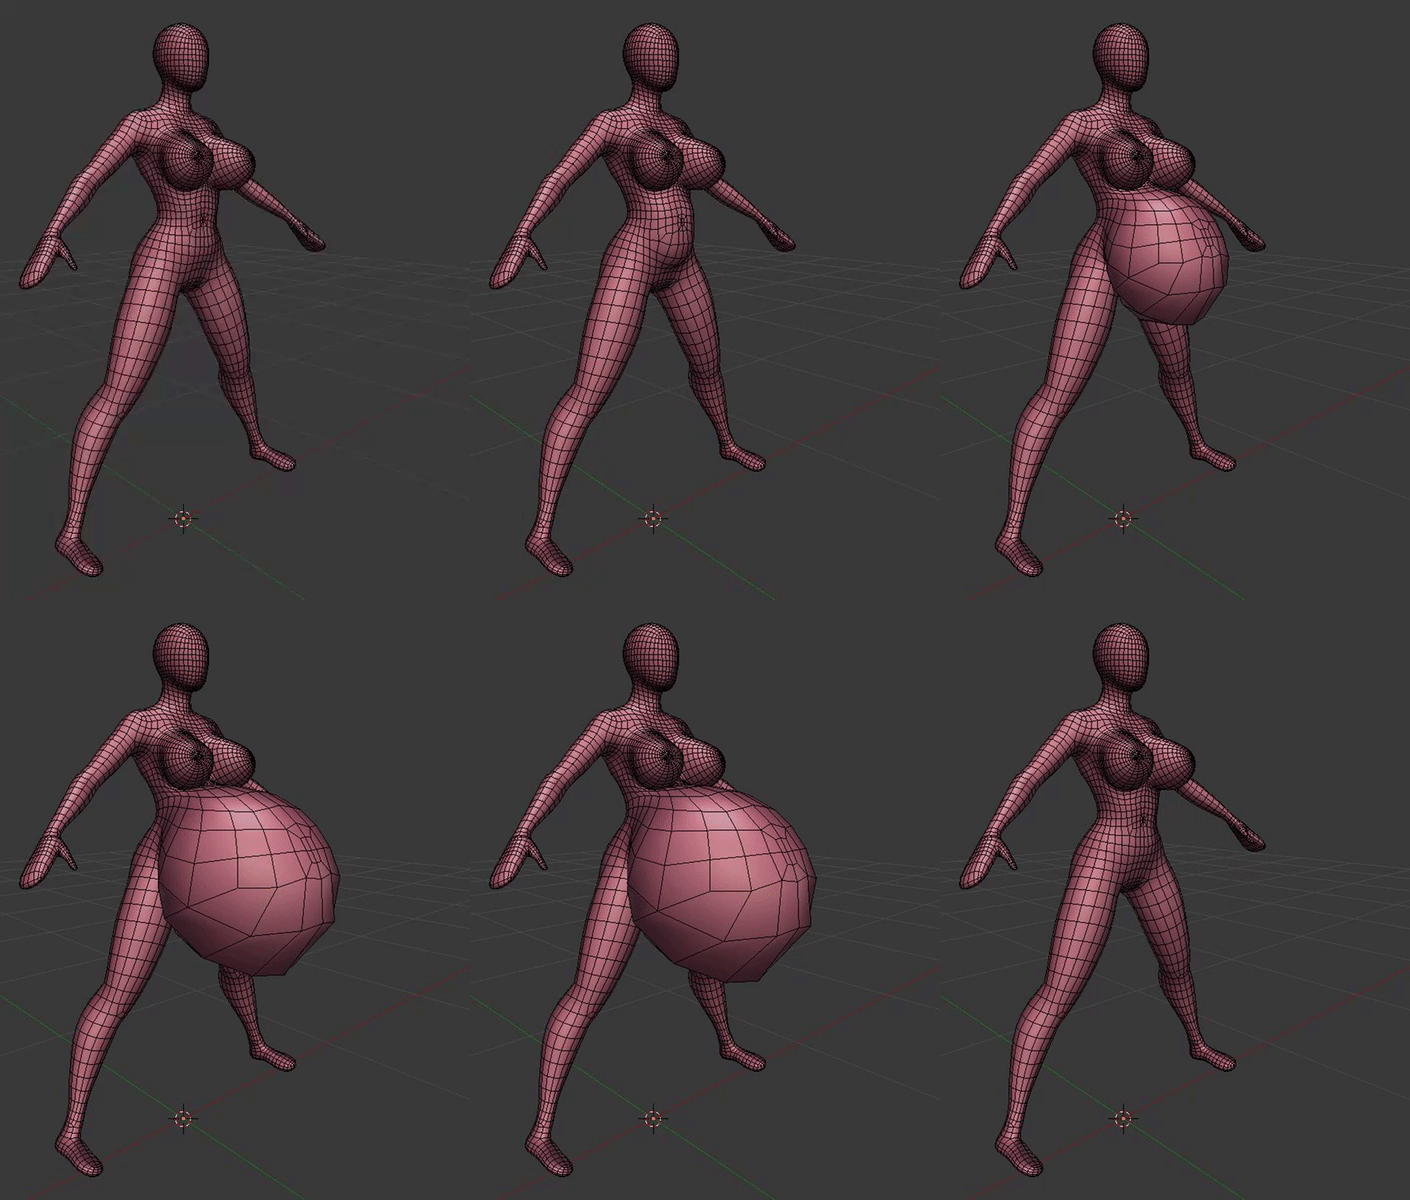
Pondering about this, some old luggage that had been in the back of my mind gnawing started to creep back and that was while the mesh we had was very much optimised and lightweight, verts-wise, it had one rather big problem: It wouldn’t handle big shapes such as exaggerated muscle or exaggerated fat that well, the quads on the arms and would always stretch out to elongated quads, this is bad for both deformation and map-baking.
It handles slender or normal shapes fine, but we’ve built much of our fanbase with the help of our fans that loves fun-sized characters and not being fully able to give them what they’re here for would be very bad.
And for each day that passed, the window of opportunity to change the mesh to better handle deformation would shrink bit by bit and I knew that not fixing it would make me regret it for a very long time.
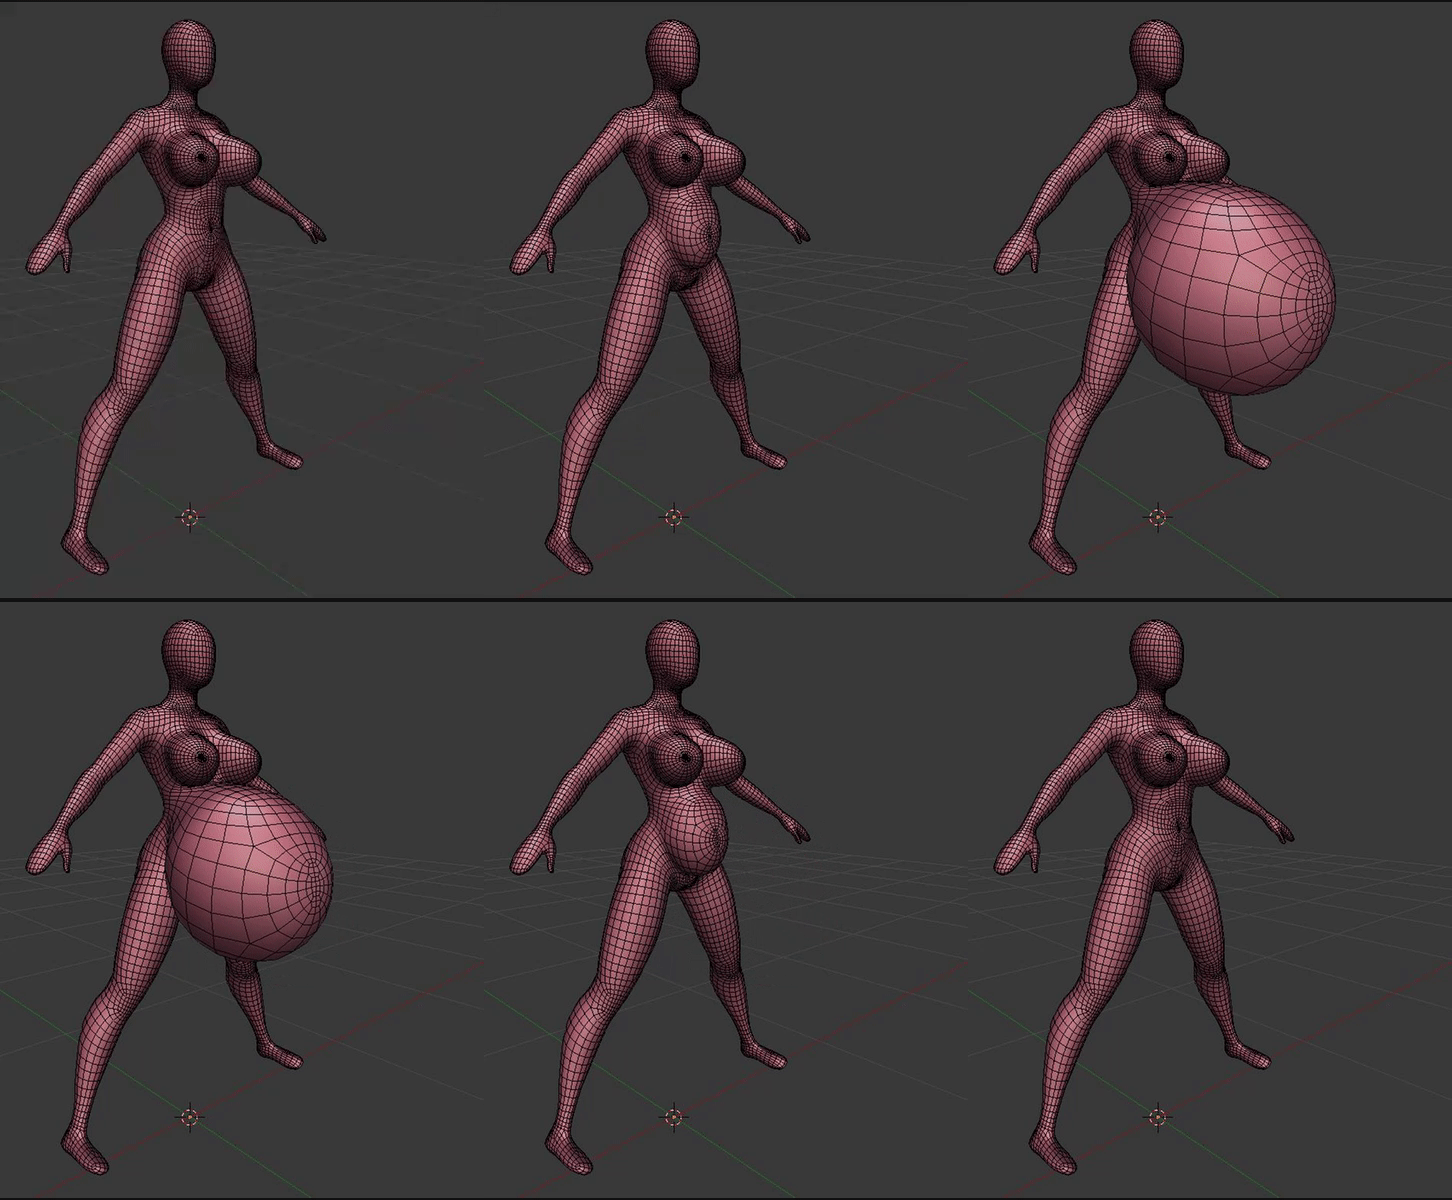
So after talking to Odes I went to work, I could just add more edge loops to the old one, but what would that point be if I couldn't make it even more deform friendly. I looked at a lot of references on how to generally draw out strips of topology that would be crucial for deformation. By using circles in our topology instead of straight lines, crucial shapes such as the buttocks and belly conserve their shape much better when they’re deformed. And after a while and some revisions later, I think we got it.
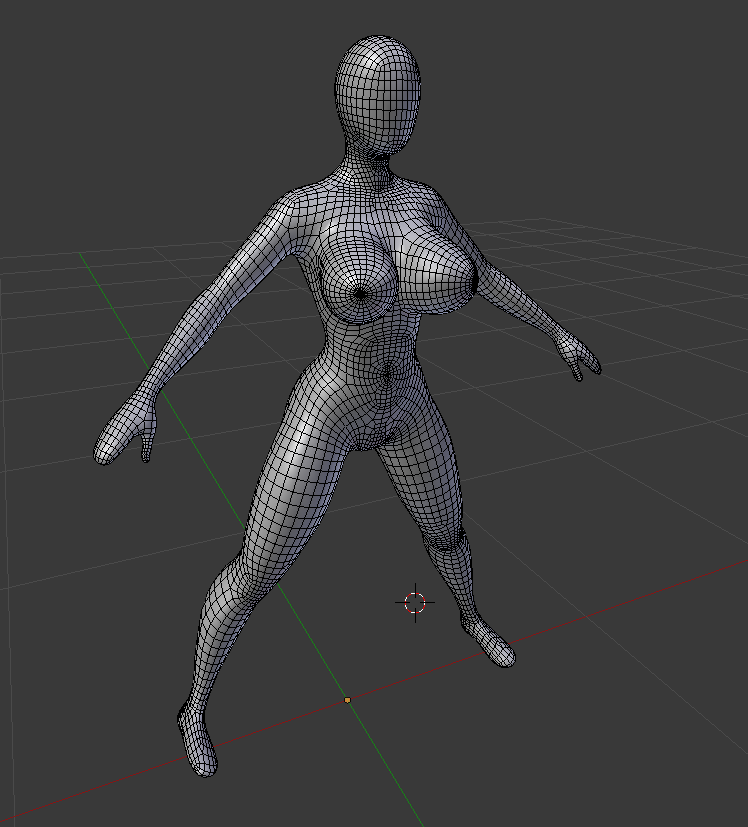
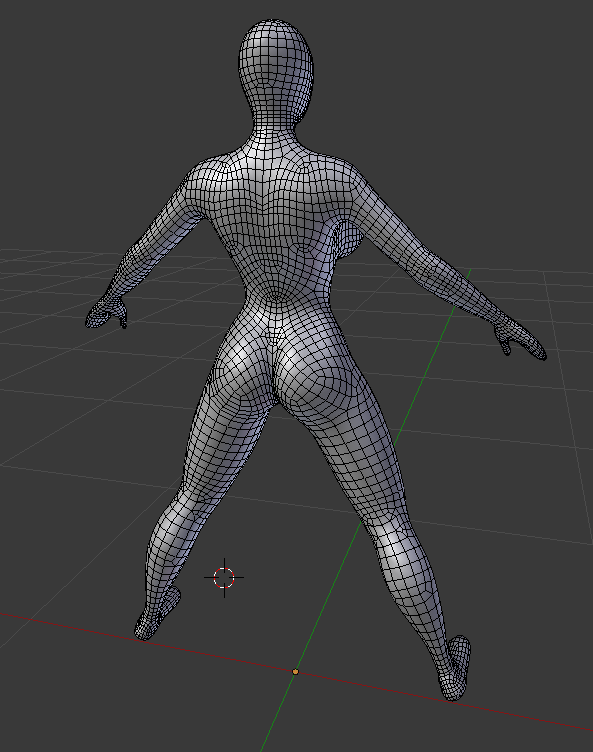
A bit more poly-heavy, but it behaves much more better for deformation and map baking.
Here are some few examples of it being an upgrade that can serve.
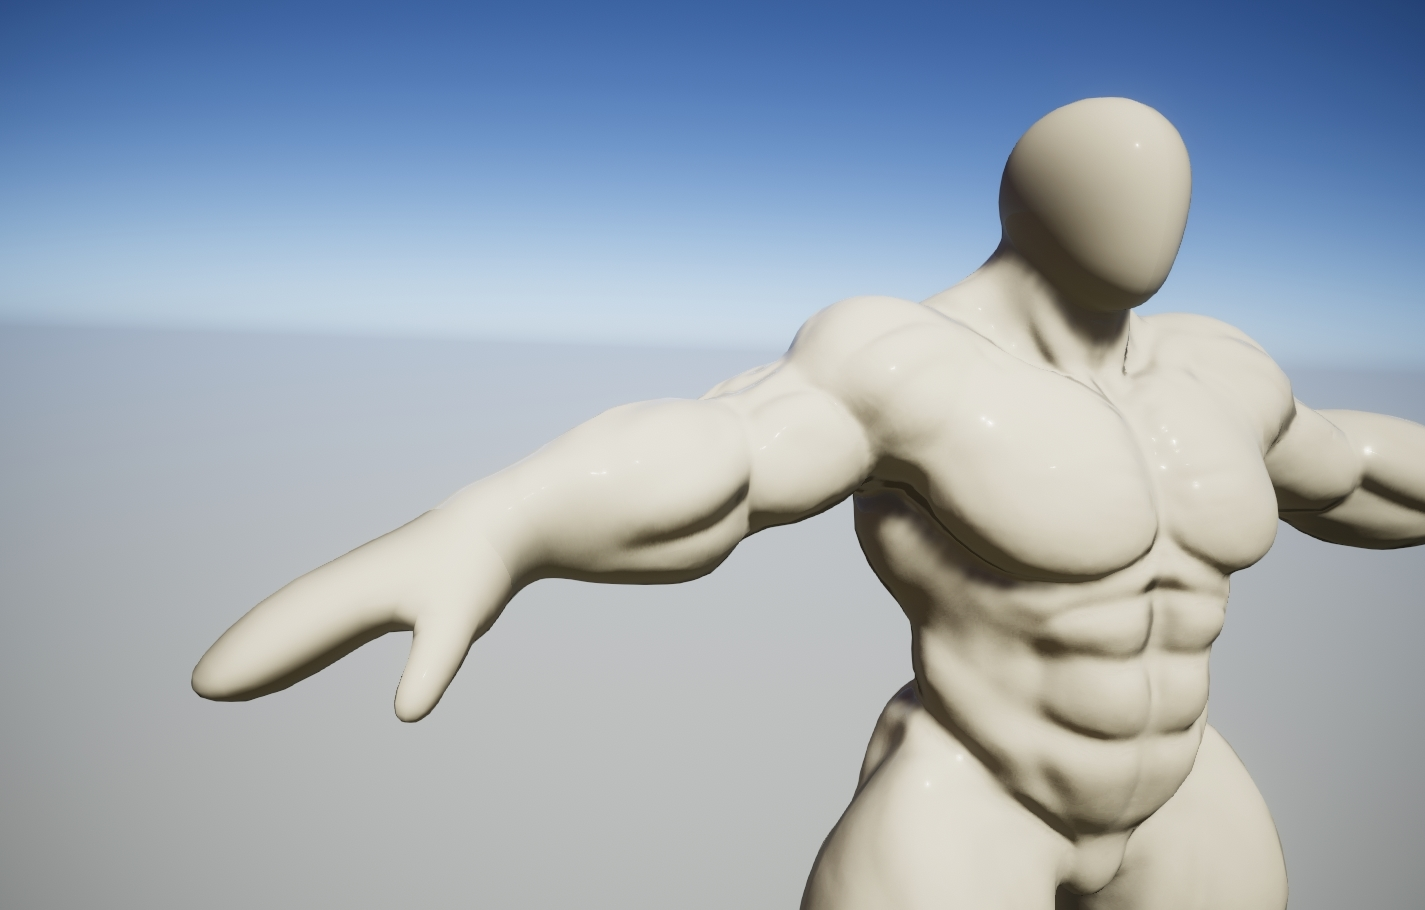
Old mesh with baked maps.
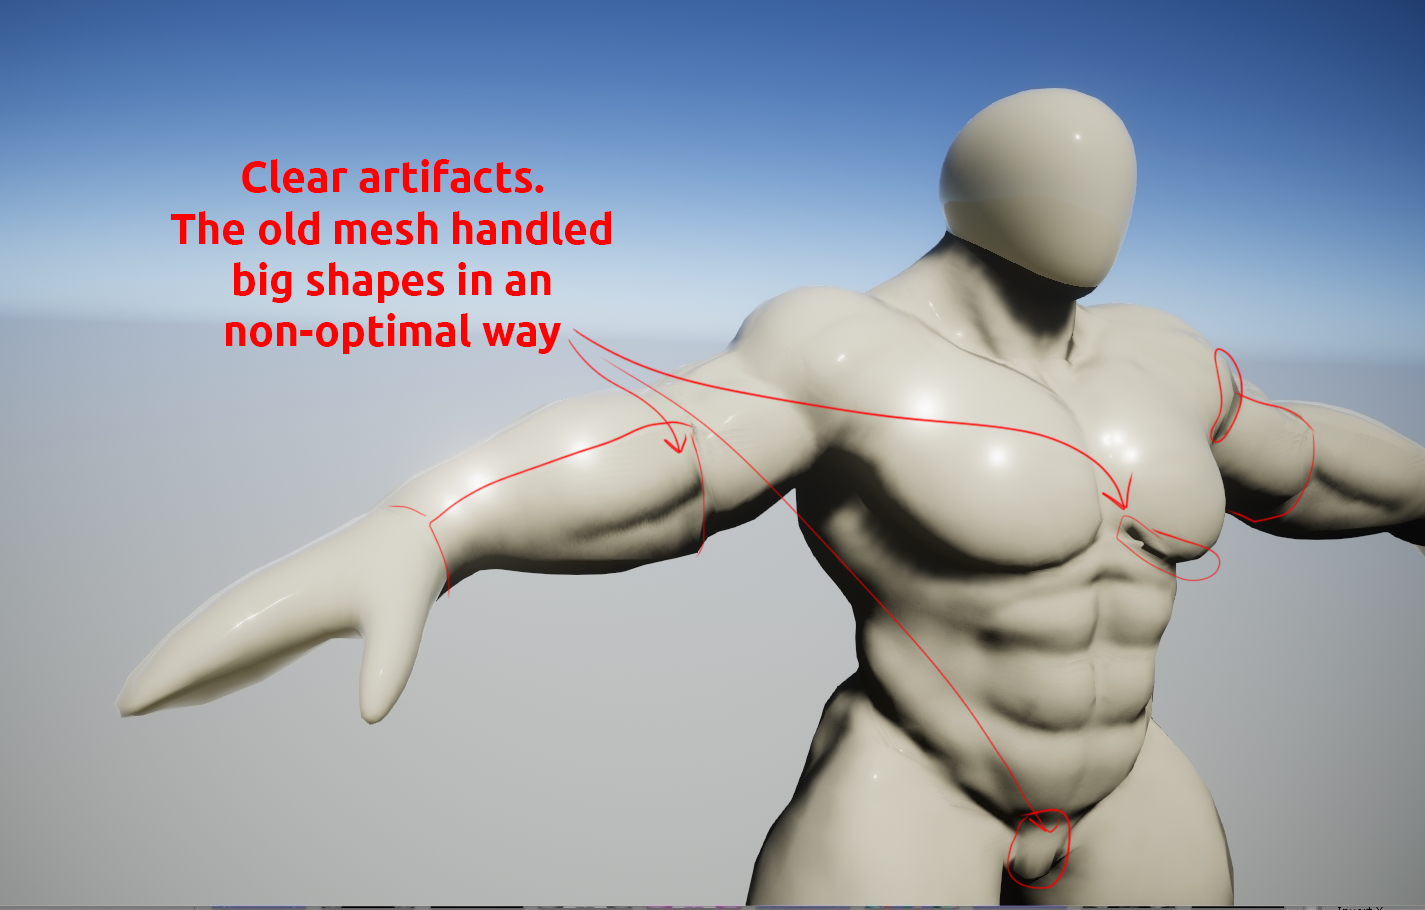
New mesh with baked maps
Inflate belly, old mesh, problematic even if we’d use our tessellation shader (tessellation not used here though).
Inflate belly, new mesh, the mesh can handle it much better than the old one
This mesh works much better for our needs, and I’m very excited about the future!
- dogson
HDRP
This is something we experimented with last month but completely forgot to include in the update! So we're doing it now instead. HDRP is the future of high fidelity rendering in Unity. Last month, we were doing some testing to see how we could eventually transition into HDRP, and also upgraded our project to Unity 2018.2, bringing HDRP within our reach.
One of the many new features that HDRP offers is true support for sub-surface scattering (SSS). This feature allows us to render characters and parts in a much more believable manner. Here's an example we experimented with where we toggle SSS on and off on a horse dick. It's a very subtle effect and yet it makes a huge difference. The dick really comes off as something made out of flesh when SSS is enabled.
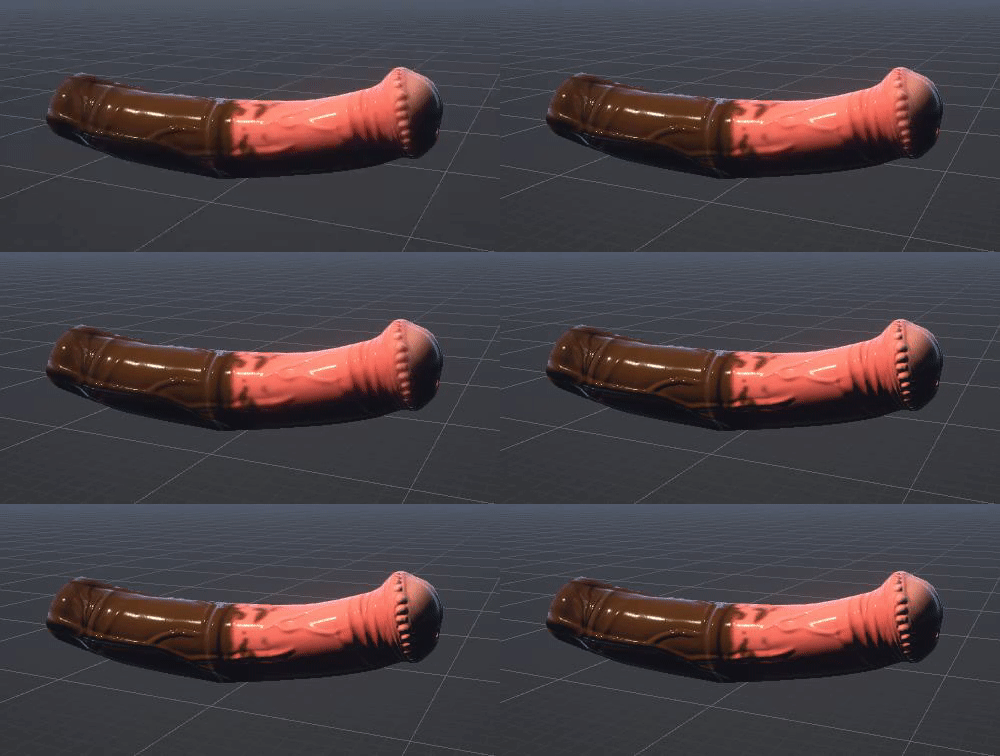
HDRP isn't quite where we want it to be in terms of maturity just yet, but it's definitely something we're interested in and will probably transition to at some point in the future. (Probably not for the first build though.)
Summary
The texture building system is finally integrated into the editor, making it accessible to the user. This marks a major milestone in our development, so it feels great finally having it completed.
Dogson has been working on a new iteration of our universal mesh, making it more adaptable to the types of deformation we want to implement (inflation and body types).
- odes
Comments
Good thinking with the improved deformations. Always figured that was one of the major weak points of the original, good to see the issue resolved.
So, I'm guessing you're not gonna make it to an end-of-the-year release? Looking at the list in the previous update, you've still got a lot on your plate before you've got a build you'll be happy with releasing to the public. Now, I don't personally mind waiting around a while longer, but I'm also not going to toss money your way until you've got something concrete on offer for it, and I'm guessing there's quite a few others like me waiting in the wings. Not trying to rush you, just reminding you there will be something of a bonus to your revenue when the release finally drops as an incentive for you to focus your efforts. But, I guess you already knew that and have taken it into account.
I honestly prefer the release to be pushed after the holidays, having to juggle personal and familiar life with releasing the first public alpha of Yiffalicious 2 has to be way too stressing, and I personally don't mind waiting a bit more.
Always. We were a bit later than usual with this month's update though, so naturally it will be a bit later here too. We usually try to post about 2 weeks after patreon.